Cinder CSI Storage in Hashicorp Nomad nutzen
7 Minuten Lesezeit
Überblick
Hashicorps Workload Orchestrierer - Nomad - bietet für den Betrieb von stateful workloads verschiedene Möglichkeiten an, Daten zu speichern. Eine davon ist die Verwendung von Datenspeichern, die über das Container Storage Interface (CSI) angesprochen werden. In OpenStack-Umgebungen wie der pluscloudopen ist da natürlich Blockstorage interessant, der via Cinder bereitgestellt wird. CSI Plugins laufen in Nomad als Jobs und erledigen das Erzeugen, Mounten und Unmounten von Volumes an den jeweiligen Nomad Clients.
Dieses Tutorial zeigt, wie das CSI Plugin für Cinder in Nomad integriert wird und wie man es benutzt.
CSI-Cinder Storage Plugin aktivieren
Wie oben schon angedeutet, werden CSI Plugins als Nomad Jobs im Nomad Cluster gestartet. Dazu ist es erforderlich, dass auf den Nomad Clients, auf denen Volumes per CSI Plugin gemountet werden sollen, privilegierte Docker Container ausgeführt werden dürfen. Dazu muß in der Konfigurationsdatei des Nomad Clients für Docker Container allowed_privileged = true gesetzt werden:
plugin "docker" {
  config {
    allow_privileged = true
  }
}
CSI Storage Plugins bestehen in der Regel aus einer Controller- und einer Node-Komponente. Für jede dieser beiden Komponenten wird eine eigene Nomad Job Datei benötigt. Wenn obige Client-Konfiguration umgesetzt worden ist, können die Job Dateien für das CSI Cinder Storage Plugin (s. u.) angepasst und dann gestartet werden. Die beiden Jobs gleichen sich. Aber der Controller-Job wird als “service” gestartet,
job "csi-cinder-prod4-controller" {
  region      = "de-west"
  datacenters = ["prod4"]
  type        = "service"
  node_pool   = "all"
[...]
während der Nodes-Job als “system” Job gestartet wird - damit wird eine Instanz dieses Jobs auf jedem Nomad-Client gestartet:
job "csi-cinder-prod4-nodes" {
  region      = "de-west"
  datacenters = ["prod4"]
  type        = "system"
  node_pool   = "all"
[...]
Für beide Komponenten wird wird eine Konfigurationsdatei cloud.conf benötigt, die die Zugangsdaten zur OpenStack-Umgebung enthalten muß, damit das Plugin z. B. Volumes erzeugen kann. Damit die Zugangsdaten nicht in der Job Datei vorkommen, verwenden wir Nomad Variablen oder Vault Secrects. Wenn man seine Zugangsdaten in einer solchen Datei (z. B. mit Namen spec.var.prod4.hcl ) gespeichert hat
items {
  osauthurl     = "https://prod4.api.pco.get-cloud.io:5000/v3"
  osdomainname  = "<yourdomain>"
  ospassword    = "<yourpassword>"
  osprojectname = "<yourprojectname>"
  osregion      = "prod4"
  osusername    = "<yourusername>"
}
kann man sie z. B. mit nomad var put -in hcl nomad/jobs/csi-cinder-prod4-nodes @spec.var.prod4.hcl für den gewünschten Job in Nomad speichern. Und dann in der Job Datei so refernzieren:
auth-url    = {{- with nomadVar "nomad/jobs/csi-cinder-prod4-nodes" }} "{{ .osauthurl }}" {{- end }}
domain-name = {{- with nomadVar "nomad/jobs/csi-cinder-prod4-nodes" }} "{{ .osdomainname }}" {{- end }}
tenant-name = {{- with nomadVar "nomad/jobs/csi-cinder-prod4-nodes" }} "{{ .osprojectname}}" {{- end }}
username    = {{- with nomadVar "nomad/jobs/csi-cinder-prod4-nodes" }} "{{ .osusername }}" {{- end }}
password    = {{- with nomadVar "nomad/jobs/csi-cinder-prod4-nodes" }} "{{ .ospassword }}" {{- end }}
region      = {{- with nomadVar "nomad/jobs/csi-cinder-prod4-nodes" }} "{{ .osregion }}" {{- end }}
Die komplette Job Dateien finden sich hier:
Job Datei für die Controller-Komponente des CSI Cinder Storage Plugins
  job "csi-cinder-prod4-controller" {
  region      = "de-west"
  datacenters = ["prod4"]
  type        = "service"
  node_pool   = "all"

  group "controller" {

    restart {
    attempts = 5
    delay    = "15s"
    mode     = "delay"
    interval = "5m"
  }

    task "cinder-controller" {
      driver = "docker"
      template {
        data        = <<EOT
[Global]
auth-url    = {{- with nomadVar "nomad/jobs/csi-cinder-prod4-controller" }} "{{ .osauthurl }}" {{- end }}
domain-name = {{- with nomadVar "nomad/jobs/csi-cinder-prod4-controller" }} "{{ .osdomainname }}" {{- end }}
tenant-name = {{- with nomadVar "nomad/jobs/csi-cinder-prod4-controller" }} "{{ .osprojectname}}" {{- end }}
username    = {{- with nomadVar "nomad/jobs/csi-cinder-prod4-controller" }} "{{ .osusername }}" {{- end }}
password    = {{- with nomadVar "nomad/jobs/csi-cinder-prod4-controller" }} "{{ .ospassword }}" {{- end }}
region      = {{- with nomadVar "nomad/jobs/csi-cinder-prod4-controller" }} "{{ .osregion }}" {{- end }}
        EOT
        destination = "secrets/cloud.conf"
        change_mode = "restart"
      }
      config {
        image = "registry.k8s.io/provider-os/cinder-csi-plugin:v1.36.0"

        mount {
          type     = "bind"
          target   = "/etc/config/cloud.conf"
          source   = "./secrets/cloud.conf"
          readonly = false
          bind_options {
            propagation = "rshared"
          }
        }

        args = [
          "/bin/cinder-csi-plugin",
          "-v=3",
          "--endpoint=unix:///csi/csi.sock",
          "--cloud-config=/etc/config/cloud.conf",
        ]
      }

      csi_plugin {
        id        = "csi-cinder"
        type      = "controller"
        mount_dir = "/csi"
      }
    }
  }
}
Job Datei für die Node-Komponente des CSI Cinder Storage Plugins
job "csi-cinder-prod4-nodes" {
  region      = "de-west"
  datacenters = ["prod4"]
  type        = "system"
  node_pool   = "all"

  group "nodes" {

    restart {
      attempts = 5
      delay    = "15s"
      mode     = "delay"
      interval = "5m"
    }

    task "cinder-node" {
      driver = "docker"
      template {
        data        = <<EOT
[Global]
auth-url    = {{- with nomadVar "nomad/jobs/csi-cinder-prod4-nodes" }} "{{ .osauthurl }}" {{- end }}
domain-name = {{- with nomadVar "nomad/jobs/csi-cinder-prod4-nodes" }} "{{ .osdomainname }}" {{- end }}
tenant-name = {{- with nomadVar "nomad/jobs/csi-cinder-prod4-nodes" }} "{{ .osprojectname}}" {{- end }}
username    = {{- with nomadVar "nomad/jobs/csi-cinder-prod4-nodes" }} "{{ .osusername }}" {{- end }}
password    = {{- with nomadVar "nomad/jobs/csi-cinder-prod4-nodes" }} "{{ .ospassword }}" {{- end }}
region      = {{- with nomadVar "nomad/jobs/csi-cinder-prod4-nodes" }} "{{ .osregion }}" {{- end }}
        EOT
        destination = "secrets/cloud.conf"
        change_mode = "restart"
      }
      config {
        image = "registry.k8s.io/provider-os/cinder-csi-plugin:v1.36.0"

        mount {
          type     = "bind"
          target   = "/etc/config/cloud.conf"
          source   = "./secrets/cloud.conf"
          readonly = false
          bind_options {
            propagation = "rshared"
          }
        }
        args = [
          "/bin/cinder-csi-plugin",
          "-v=3",
          "--endpoint=unix:///csi/csi.sock",
          "--cloud-config=/etc/config/cloud.conf",
        ]
        privileged = true
      }

      csi_plugin {
        id        = "csi-cinder"
        type      = "node"
        mount_dir = "/csi"
      }
    }
  }
}
Die Jobs können dann nacheinander mit nomad job run csi-cinder-prod4-controller.hcl und nomad job run csi-cinder-prod4-nodes.hcl gestartet werden. Wenn beide Jobs laufen, kann das erste Cinder Volume per CSI Plugin angelegt werden.
Volume anlegen
Um nun ein Cinder Volume anzulegen, wird eine weitere Konfigurationsdatei benötigt. Man kann sich mit nomad volume init eine Beispieldatei erzeugen lassen. Es ist sinnvoll, dies auch zu tun, um die verschiedenen Konfigurationsparameter (mit Kommentaren) kennenzulernen. Diese werden aber auch in der zugehörigen Dokumentation erklärt.
Für ein fünf Gigabyte großes Cinder CSI Volume vom Typ “ceph-premium” könnte die Konfigurationsdatei z. B. so aussehen:
id           = "cinder_prod4_csivolume"
name         = "csivolume-prod4"
type         = "csi"
plugin_id    = "csi-cinder"
capacity_max = "5G"
capacity_min = "5G"

parameters {
  type = "ceph-premium"
}

capability {
  access_mode     = "single-node-reader-only"
  attachment_mode = "file-system"
}

capability {
  access_mode     = "single-node-writer"
  attachment_mode = "file-system"
}

topology_request {
  required {
    topology { segments { "datacenter" = "prod4"} }
  }
}

mount_options {
  fs_type     = "ext4"
  mount_flags = ["noatime"]
}
Hat man die Datei erzeugt und als csi-cinder-prod4-volspec.hcl abgespeichert, kann man das Volume mit nomad volume create csi-cinder-prod4-volspec1.hcl erzeugen und sich gleich den Status des Volumes mit nomad volume status cinder_prod4_csivolume ansehen
02:46:31 admin@laptop → nomad volume status cinder_prod4_csivolume
ID                   = cinder_prod4_csivolume
Name                 = csivolume-prod4
Namespace            = default
External ID          = 510527f5-9f6f-4ed5-a9fb-bb0b5d45230f
Plugin ID            = csi-cinder
Provider             = cinder.csi.openstack.org
Version              = 2.0.0@v1.36.0
Capacity             = 5.0 GiB
Schedulable          = true
Controllers Healthy  = 1
Controllers Expected = 1
Nodes Healthy        = 2
Nodes Expected       = 2
Access Mode          = <none>
Attachment Mode      = <none>
Mount Options        = fs_type: ext4 flags: [REDACTED]
Namespace            = default

Topologies
Topology  Segments
01        topology.cinder.csi.openstack.org/zone=az1

Allocations
No allocations placed
In der OpenStack Web-UI sieht es so aus:

Volume verwenden
Das Volume kann jetzt in Nomad Jobs verwendet werden. Ein Beispiel könnte so aussehen:
job "mysql-server-prod4" {
  datacenters = ["prod4"]
  type        = "service"
  node_pool   = "default"

  group "mysql-server" {
    count = 1

    volume "mysql" {
      type            = "csi"
      read_only       = false
      source          = "cinder_prod4_csivolume"
      access_mode     = "single-node-writer"
      attachment_mode = "file-system"
    }

    network {
      port "db" {
        static = 3306
      }
    }

    restart {
      attempts = 10
      interval = "5m"
      delay    = "25s"
      mode     = "delay"
    }

    task "mysql-server" {
      driver = "docker"

      volume_mount {
        volume      = "mysql"
        destination = "/srv"
        read_only   = false
      }

      template {
        data = <<EOH
MYSQL_ROOT_PASSWORD = {{ with nomadVar "nomad/jobs/mysql-server-prod4" }}{{ .dbpw | toJSON }}{{ end }}
EOH
        destination = "secrets/file.env"
        env         = true
      }

      config {
        image = "hashicorp/mysql-portworx-demo:latest"
        args  = ["--datadir", "/srv/mysql"]
        ports = ["db"]
      }

      resources {
        cpu    = 500
        memory = 1024
      }

      service {
        name = "mysql-server"
        port = "db"

        check {
          type     = "tcp"
          interval = "10s"
          timeout  = "2s"
        }
      }
    }
  }
}
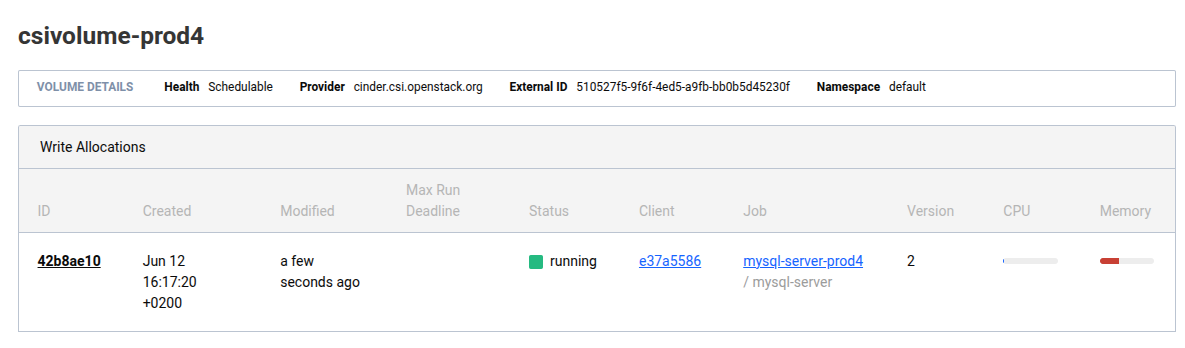
Ist der Job gestartet, taucht das Volume in der Ausgabe von nomad volume status cinder_prod4_csivolume auf:
04:37:00 admin@laptop → nomad volume status cinder_prod4_csivolume
ID                   = cinder_prod4_csivolume
Name                 = csivolume-prod4
Namespace            = default
External ID          = 510527f5-9f6f-4ed5-a9fb-bb0b5d45230f
Plugin ID            = csi-cinder
Provider             = cinder.csi.openstack.org
Version              = 2.0.0@v1.36.0
Capacity             = 5.0 GiB
Schedulable          = true
Controllers Healthy  = 1
Controllers Expected = 1
Nodes Healthy        = 2
Nodes Expected       = 2
Access Mode          = single-node-writer
Attachment Mode      = file-system
Mount Options        = fs_type: ext4 flags: [REDACTED]
Namespace            = default

Topologies
Topology  Segments
01        topology.cinder.csi.openstack.org/zone=az1

Allocations
ID        Node ID   Task Group    Version  Desired  Status   Created     Modified
42b8ae10  e37a5586  mysql-server  2        run      running  19m44s ago  18m51s ago
In der Nomad Web UI sieht es so aus:
Tipp
Achten Sie besonders darauf, welche Art Storage Sie für Datenbanken verwenden wollen. Die Performance von Cinder Blockstorage kann für Ihre Entwicklungsdatenbank ausreichend sein aber für Produktionsdatenbanken brauchen Sie ggfs. local ssd storage.