Product Dashboard
13 minute read
Welcome to the new section of the CloudHub, your product dashboard! Here you can view and manage the products you have booked in the CloudHub. In the following tutorial, we will explain the different areas of the product dashboard (also called levels) and what information, links and, in the future, functions you will find there.
Structure of the Product Dashboard
Level 1: This is the entry page for the dashboard. Here you will find an overview of your booked products (structured by category) as well as links to other CloudHub areas and our product documentation. Clicking on a product tile takes you to level 2.
Level 2: Here you will find an overview of all products in a category. In addition to the information, there are also quick links to the documentation, the respective order wizards and ticket creation.

Level 3: Here you will find a detailed product view and related information: parameters from the order wizard/product, monitoring (own release), consumption data (own release) and a filtered ticket overview (only the tickets for this product). You can also cancel your product/contract by ticket here.
Roles and permissions for the dashboard are managed in the “User Management” area.
The entry page - Level 1
Link to how-to
Below the intro text, you will find a written how-to that you can refer to at any time.
My booked products
Sorted by category, you can see the active products that you have ordered in the CloudHub.
This also means that you do not see any products that you have booked through other channels. And you will not be shown any products for which the termination date of the contracts has been exceeded by at least 14 days.
If you click on the tile, you will be taken to level 2 and see an overview of the selected product type. You can also click on the shopping cart symbol on the tile to access the product’s order wizard.
Further links
The blue element takes you to the overview page of the products available in the CloudHub and from there to the respective order process. You can also use the other link to navigate to our website to find out more about our entire product portfolio.
Below that, you will find further links to the order status table, the overview of products and services and our customer documentation.
Order status: Track the status of the provisioning of your products booked via the CloudHub. You can also access this overview via the navigation under “My products” > “Order status”.
Products and services: Here you will find an overview of all active contracts for your booked plusserver products. This also includes products that you did not order via the CloudHub.
Documentation: You can find our product documentation here.
Support: This will take you to our support area, where you can create tickets for various issues, which our support colleagues will deal with as quickly as possible, view the complete overview of your tickets, find further contact details and much more.
Contact details: We have compiled the most important contact details for you here.
FAQ: Here you will find, organized by category, many questions and answers about the most important functions and background information.
Product summary table - Level 2
Product vs project
Currently, you will find a pure product overview here. An overview of your projects, in which different products can be displayed and managed together, is already in the works.
All active products in a category at a glance
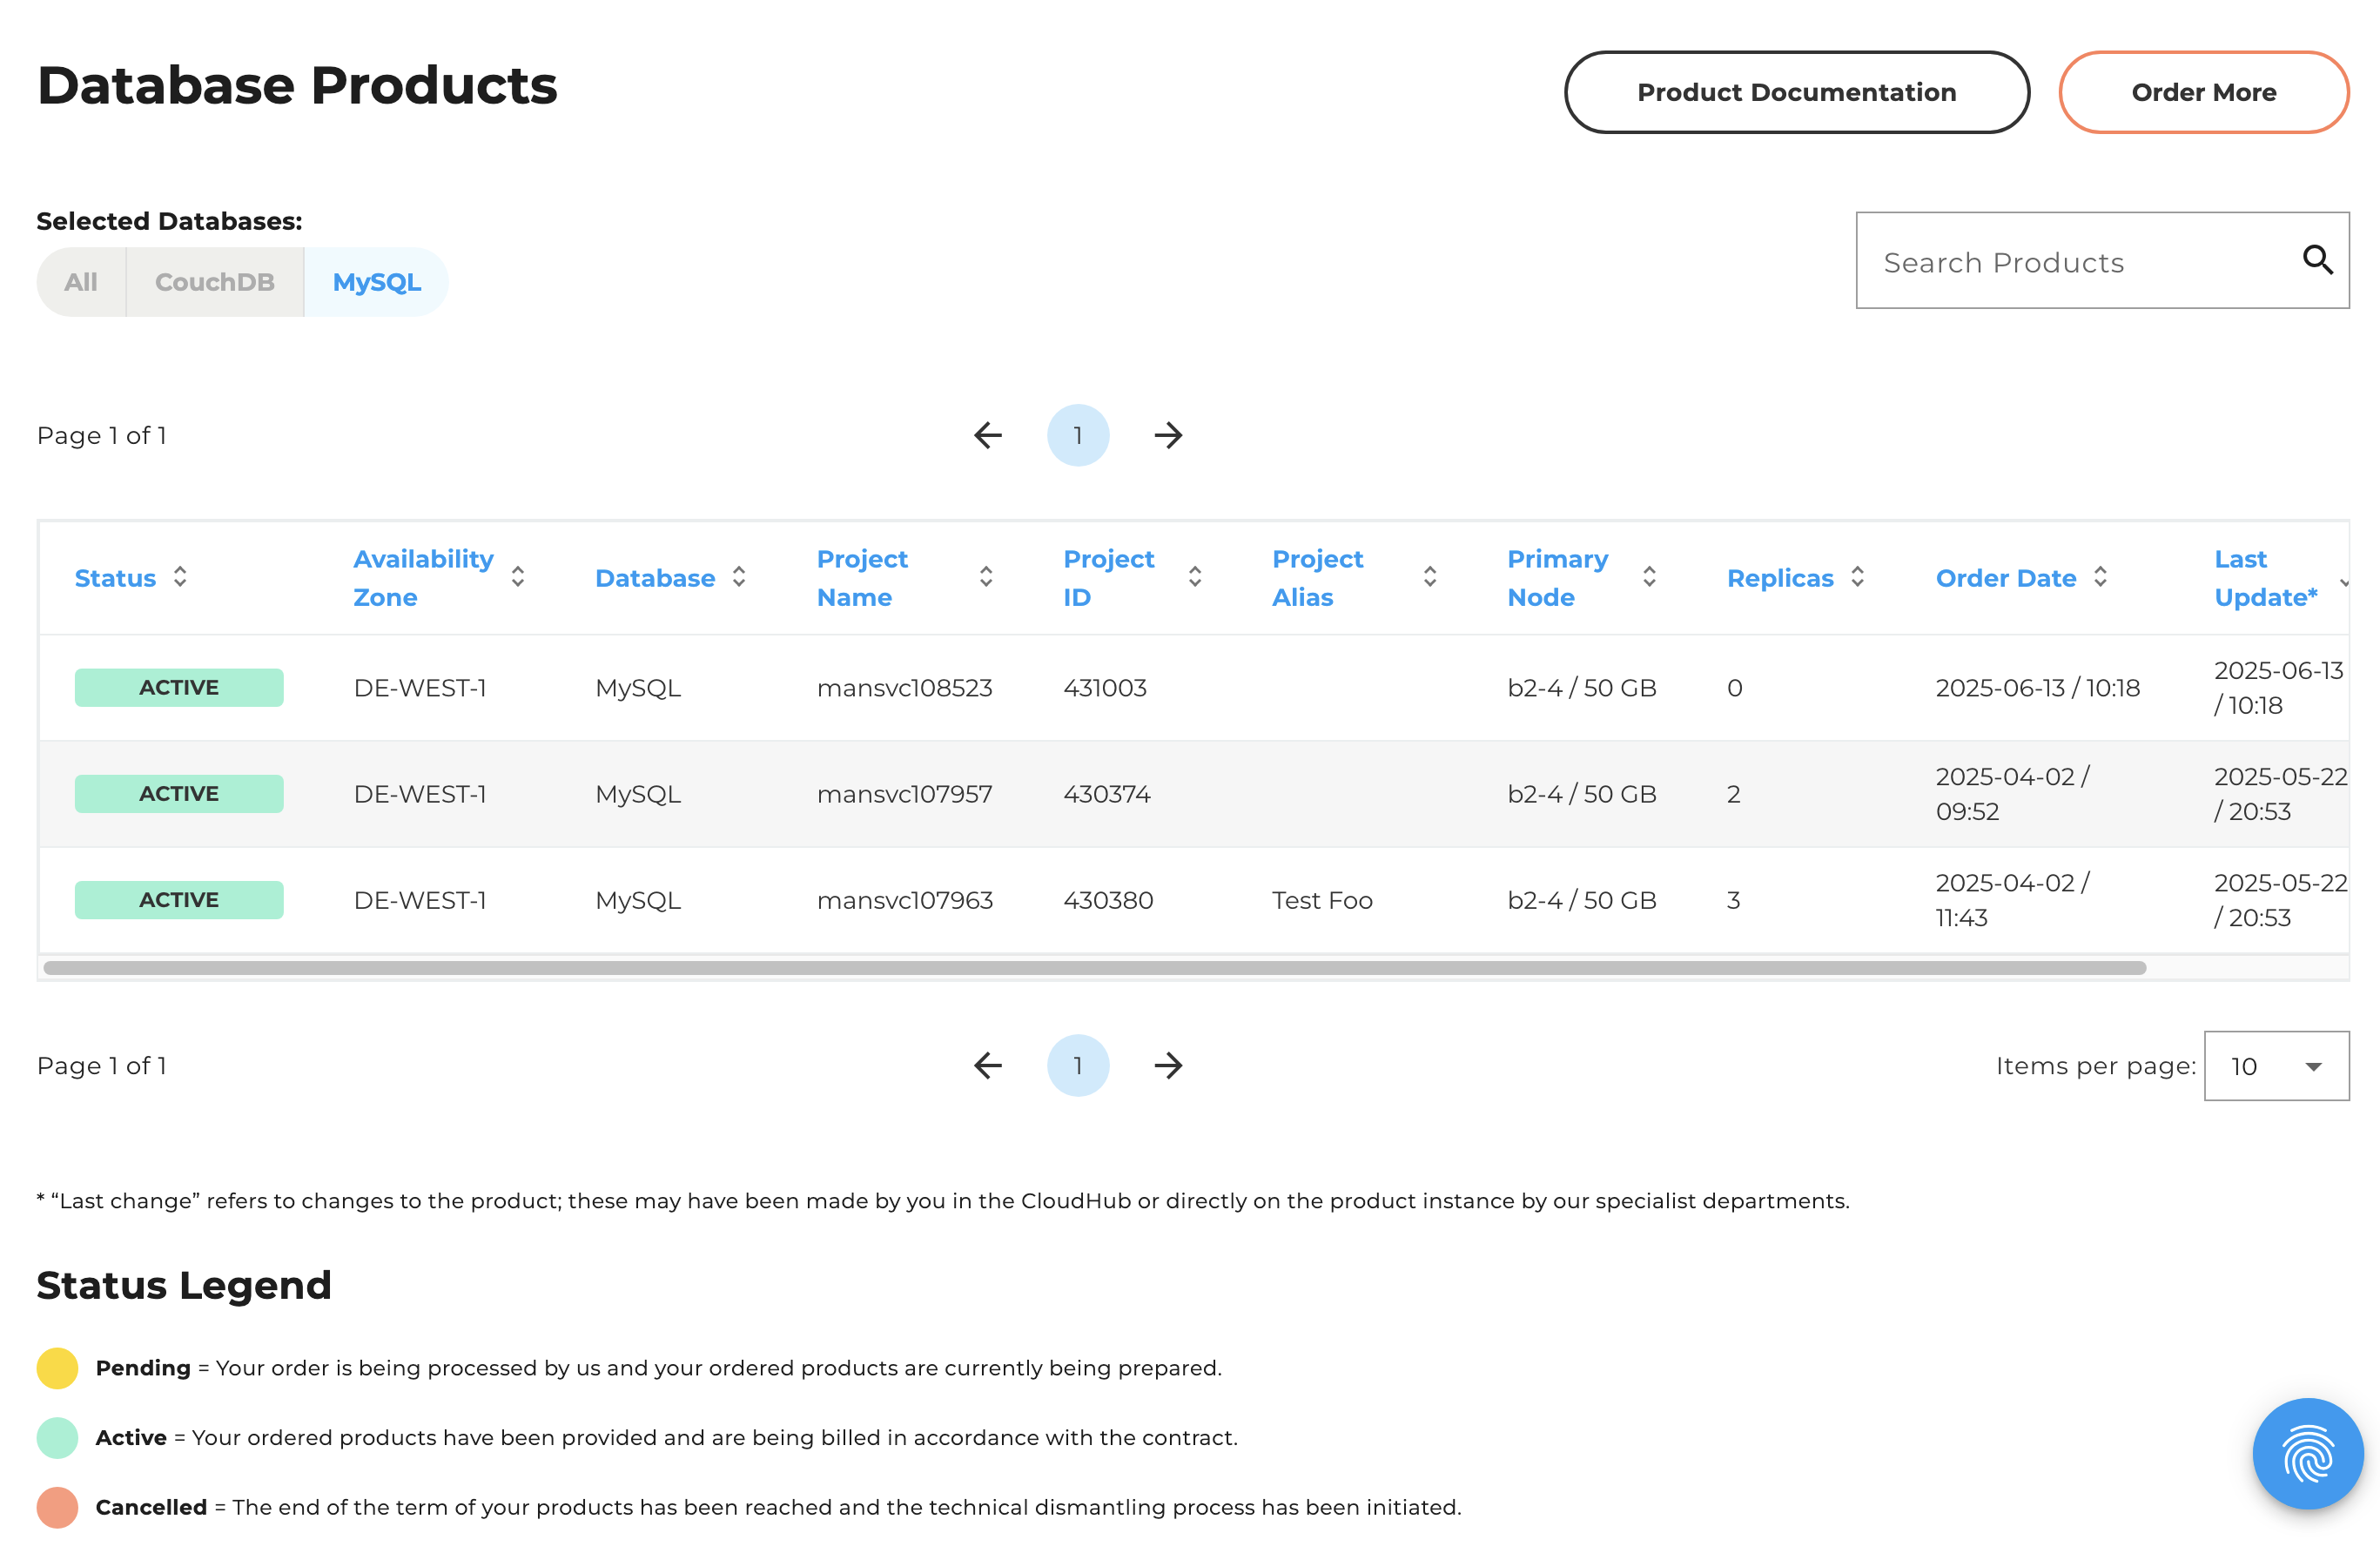
On level 2 you receive an overview of your active products. If you click on a row in the table, you will land on level 3 and thus in the detailed view of your products.
The information should give you an initial overview of your products. Depending on the product, the display of the individual information in the overview may still vary.
“Active” here means: The contract is active and has not yet reached the cancellation date. You can find details in the legend below the table.
As soon as the cancellation date has been exceeded by 14 days, the product is no longer displayed on level 2 in the product dashboard. It is also no longer displayed in the contract overview under “Contracts”. If you have any questions about your canceled contracts, please contact our colleagues in the contracts department via our ticket system. To do so, please select the category “Contracts and Invoices”.

Create tickets directly from Level 2
In the table, on the far right, there is an icon/button for creating tickets. We have implemented a pre-set process to save you time. However, you can click on “Create ticket” at any time and adjust the category and the selected contract.
The pre-set process is as follows:
If your product is “In Deployment” or “Active”, use this button to open a “Service Request” ticket and get in touch with our support team directly.
If your product is “Cancelled”, use this button to open a ticket directly for our colleagues in the contracts department, who are your first point of contact for your product/contract from this status onwards.
Further links
The following links can be found on level 2:
Product documentation: This is where you will find all the information about the product you are currently viewing.
Order more: From here you can go directly to the order process for a new product of the type/category you are currently viewing.
The detaileed product view - Level 3
Information on the tabs
On level 3, you will find a detailed product view with various information about this specific product. In the area above the tabs, you will always see an overview of your product.
Information
In the first tab, you will see basic information about this product. You already know a lot of the information from the ordering process.
For “pluscloud open”, “pluscloud VMware” and “Managed Kubernetes (PSKE)”, we have also included links to the respective dashboards.
For the products “Private Registry”, “Databases” and “Keycloak”, you can customize settings and product features from the dashboard.
Access data
If you have the appropriate permissions, you will see the access data for your product in the second tab, including a link to the respective GUI.
If not you will get a information via banner, that you don’t have the permissions and need to contact your admin user.

Monitoring
The next tab, “Monitoring,” is currently in development and will be available in the coming months. However, since it was important to us to present the final structure of the dashboard to you directly, we have included corresponding info banners with more information.
Consumption data
The “consumption data” is shown in bar charts for the last few months. The different types of consumption (in hours) are clearly distinguished from each other by different colors.

Alternatively, a table view is available in which the consumption data is clearly displayed in tabular form. This data can be downloaded as a .CSV file if required.
Different consumption types are displayed depending on the product:
| Product | Consumption Types |
|---|---|
| PCV | no consumption data currently available |
| PCO | vGPU, vRAM, Cluster, Loadbalancer, Public IP addresses, Storage |
| PSKE | vGPU, vRAM, Cluster, Loadbalancer, Public IP addresses, Storage |
| Private Registry | Node Size, Storage |
| Datenbanken | no consumption data currently available |
| Caching | no consumption data currently available |
| Keycloak | no consumption data currently available |
| Dedicated Server | no consumption data currently available |
Changelog
The “Changelog” tab displays a list of all technical changes made to the product with the date and a brief summary.
Tickets
In the “Tickets” tab, you will see a filtered view of all tickets that have been opened for this product/contract, sorted by “opened” and “all”. If you want a complete overview of all your tickets, you can find it in the “Support” section.
Further links
Create ticket: From level 3, you can create a ticket for this product with just a few clicks. Your “service request” then goes directly to our support. The process is the same as creating a ticket at level 2.
Cancel product / contract: At this point, you have the option of creating a cancellation ticket and initiating the cancellation process with just a few clicks.
Product customizations in Level 3
From now on, you can customize certain product features (e.g. whitelist, backups, patches, primary node and read replica) for all databases, Private Registry and Keycloak in the first tab “Information”.
The corresponding buttons activate the editing mode. A blue marker highlights all the parameters that you can adjust, while yellow markers help you to track your changes at every step. Since not all parameters can be adjusted simultaneously due to the product, the areas that cannot be adjusted in the same step are grayed out.

Since every change affects your billing, you will be informed again transparently about the cost changes before the final confirmation.
After you have confirmed the adjustment, you will see the progress in a banner or in the order status overview.
Until the process is complete, no further changes can be made to the same product. As soon as the banner has disappeared and the buttons are no longer grayed out, you can change further parameters.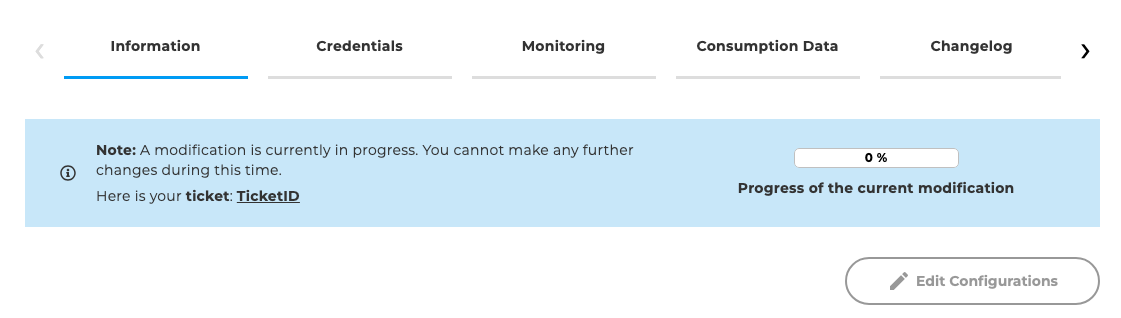
We also document your adjustments in a ticket, about which you will be notified by email. You can also find this ticket in the “Tickets” tab and in the ticket overview in the support area.


For example, you can change trusted sources, increase the number of backups, and adjust the backup and patch schedules. The fields that you can modify are highlighted in blue again in this area.
We would like to give you the following information, as it is product-specific:
First, 7 backups are included in your contract and are also the minimum amount that must be set. You can increase this to a maximum of 90 backups. The change of the amount of backup leads to changes on your billing.
Second, there must be a gap of 2.5 hours between the backup and patch schedule, as they must not overlap. Example: If the backup is to start at 02:00, the patch schedule must not start before 04:30.
By clicking on “Save changes”, information about the price change appears. If you then confirm with “Order with obligation to pay”, the change will take effect as described above.

For the primary node, you can adjust the node disk and the node disk size, although the latter can only be increased. You can adjust both values together or just one of them.
The adjustment immediately leads to a brief interruption of operation to activate the changed values.


You can create (up to three), modify or delete read replica for the databases only. Each of these changes is only possible one after the other using the respective button. The read replica is always an exact copy of the primary node and is billed accordingly.
This also means that you can only customize a read replica by modifying the primary node, and that a modification of the primary node always means that the read replica is also changed. To make this transparent, the parameters that you customize in the primary node are also highlighted in yellow in the read replica. All changes of the primary node and read replicas are leading to changes on your billing.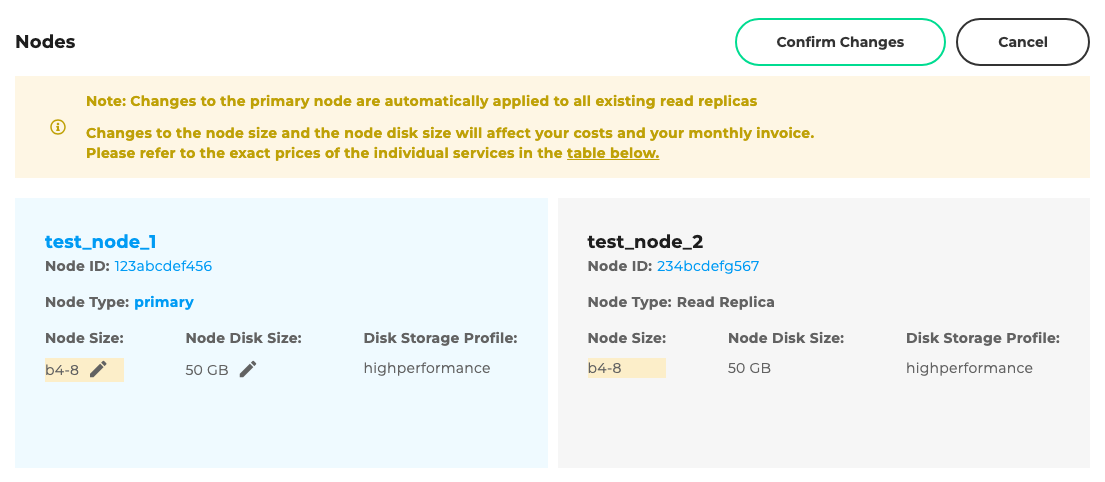
You can delete one or all read replica at any time. To do this, use the corresponding button and select one or more by checking the box in the upper right corner. After deletion, the read replica will no longer be billed.
Product cancellation via Level 3
Unfortunately, there is currently no function available for automated product cancellation. This is only possible via a ticket.
You can create the ticket via the product dashboard in the product detail view (level 3). Click on the button and you will receive an info pop-up with all the necessary information. In this pop-up, please confirm the cancellation again and a ticket will automatically be opened with our colleagues.
You will be informed about the status of your cancellation via the opened tickets. You can find this ticket on level 3 or in the complete ticket overview in the support area.
If you want to cancel several products, you can write them all in one ticket and report them via the category “Contracts and Invoices”. To do this, the colleagues need the respective project IDs.
Information and upcoming features
Much of the product data in the first tab (focusing on the products “Private Registry”, “Databases” and “Keycloak”) will be customizable with the next release. The “Usage Data” tab will show you the usage data for this product on a daily basis. The “Monitoring” tab will soon show you monitoring data so that you can see the status of your product at a glance. You will also find links to the corresponding detailed information. It is planned to integrate the product dashboards of “pluscloud open”, “pluscloud VMware” and “Managed Kubernetes (PSKE)” even more closely with the CloudHub product dashboard.
Roles & Permissions for the Product Dashboard
The roles and permissions for the product dashboard can be managed under “User Management”.
Click on the “Add new role” button (top right). You can then name the role and assign permissions to it.
There is a distinction between “Page Management”, “Contract Management” and “Product Dashboard Management”.
“Page Management” refers to the pages displayed in the CloudHub. “Contract Management” refers to individual contracts and “Product Dashboard Management” refers to the areas and products in the dashboard.
Four predefined roles
You can assign four predefined roles for the product dashboard:
Dashboard admin
The “Dashboard admin” role has access to the entire product dashboard. This means all information and features. The dashboard admin and the CloudHub admin do not have to be the same person. This role cannot be edited. If you no longer want someone to be a dashboard admin, you have to revoke this role and assign a different one.
Technician
The “Technician” role is primarily designed to modify products or change product parameters in the dashboard itself. However, it should not be able to order or cancel products. The “Manager” role is intended for this. You can restrict the role to individual products, e.g. “Databases”, so that users with this role can only see and use the dashboard for databases.
Manager
The main focus of the “Manager” role is to be able to order and cancel products in the dashboard. However, they should also have access to the information in the dashboard without being able to change it. The “Technician” role is intended for this.
Read-only
The role “Read-Only” is intended primarily for those people in your company to whom you want to give easy access to the information in the dashboard, but with the assurance that they cannot change, order or cancel anything.

Important notes for the roles (functions in the dashboard)
How can I customize the roles?
The “Technician”, “Manager” and “Read-only” roles can be edited after creation. Example: You assign a technician role for pluscloud open and a few weeks later you need to give the same user the same permissions for Managed Kubernetes. Simply go to “User Management” > “Roles”, find the respective role and click on the “Edit” icon. Then you can check the additional product and the permissions for this role have been extended.
A user should be able to view and manage everything for databases
If you want someone to be able to view everything in the dashboard and use the functions for the database products only, then please assign them the “Technician” and “Manager” roles, each restricted to the database products.
The order status
As soon as a user has a product dashboard role, they automatically see level 1 and the order status table.
Ticket creation
The roles “Dashboard Admin”, “Technician” and “Manager” automatically receive the permissions to create tickets.
Access data / Credentials
Access data can be seen in the dashboard with all three roles except the “Read-Only” role, with the corresponding restrictions (for individual contracts) that may already have been assigned.
Permissions outside of the dashboard
All permissions outside of the product dashboard, such as viewing contracts or invoices, managing contact persons, etc., must be restricted/edited under “page management” or “contract management”.
Info: We are testing a simplification of roles and permissions in the CloudHub with the product dashboard permissions and welcome any feedback. You will be informed in good time before there is a new major change. Also, you can find all of our changes in the changelog (in the navigation in the “Support” section).