Import your own Images into pluscloudopen - e. g. Talos Linux
4 minute read
Overview
Although pluscloudopen offers a number of well known cloud images it might be necessary to import images from third parties or created by yourself. This tutorial will use a Talos Linux image to show how to do it and what needs to be considered doing it.
Import
In order to import an image into a project in pluscloudopen we have to download it first. Either down to our local workstation or on an instance, that is already running in pluscloudopen. In the case of Talos Linux we create a individual image for us in the Talos Image Factory. In the menu we choose:
- Hardware Type: Cloud Server
- Talos Version: 1.12.6
- Cloud: OpenStack
- Machine Architecture: amd64
- System Extensions: none
- Customization: none
- Bootloader: auto
On the next page we can see the download-link for our Disk Image under First Boot.
Using the CLI
If we want to import the image into pluscloudopen using the CLI, we first have to download it. With wget:
ubuntu@ubuntu:/data wget -c https://factory.talos.dev/image/376567988ad370138ad8b2698212367b8edcb69b5fd68c80be1f2ec7d603b4ba/v1.12.6/openstack-amd64.raw.xz
The image file has been compressed with xz. It has to be decompressed with xz -d openstack-amd64.raw.xz and will consume about four gigabytes of diskspace afterwards. To import it into the pluscloudopen we need an installed and configured OpenStack client. Installation and configuration have been described in this documentation under Introduction/Basics. Using the OpenStack client we import the image as follows:
ubuntu@ubuntu:/data openstack image create \
                         --disk-format raw \
                         --container-format bare \
                         --file /data/openstack-amd64.raw \
                         --property os_type=linux \
                         --property hw_disk_bus=scsi \
                         --property hw_machine_type=q35 \
                         --property hw_rng_model=virtio \
                         --community \
                         "Talos Linux v1.12.6 openstack"
This command will import the image file and make it available for you as an image, that you can use to start an instance.
Using the WebGui
Similar to the import via the command line interface you can import images via the WebGui, too. You can find the menu in  .
.
A click on “Create Image” will open it. In the menu
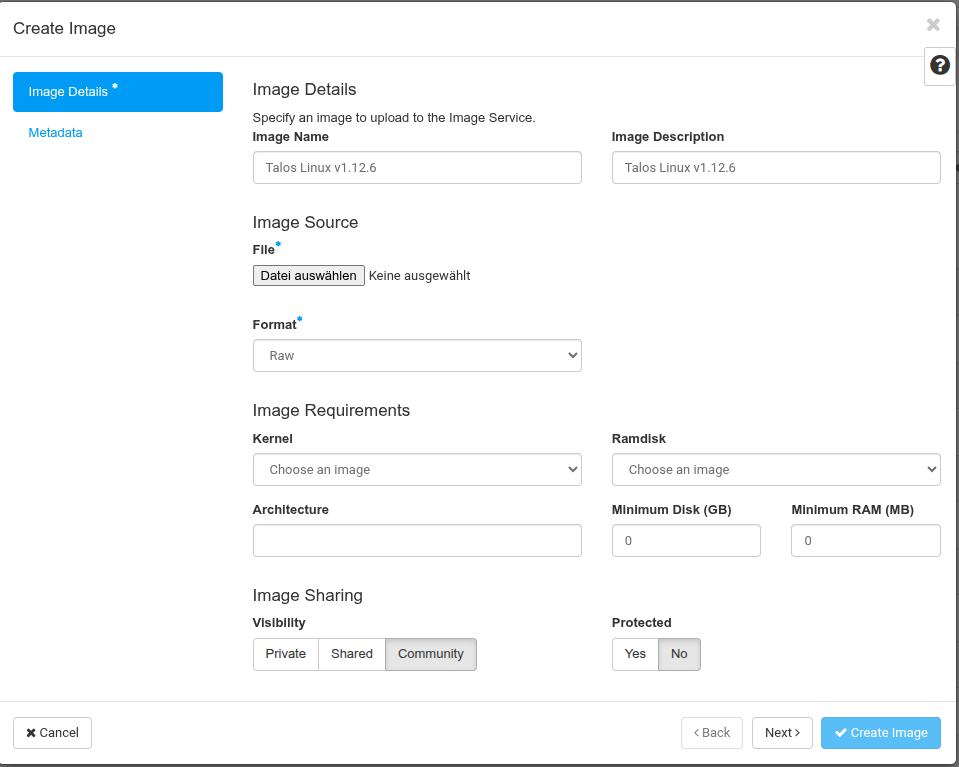
there are a few points to consider. First be sure to choose “Raw” out of the “Format” drop down. In “Image Source” you choose the uncompressed image file, you previously downloaded on to your workstation. Depending on your needs you can choose the “visibility” of the uploaded image in pluscloudopen
- Private: the image is only visible and useable in your own project
- Community: the image is visible for all other users of pluscloudopen in the category “Community”
- Shared: the image is shared with one or more specific projects
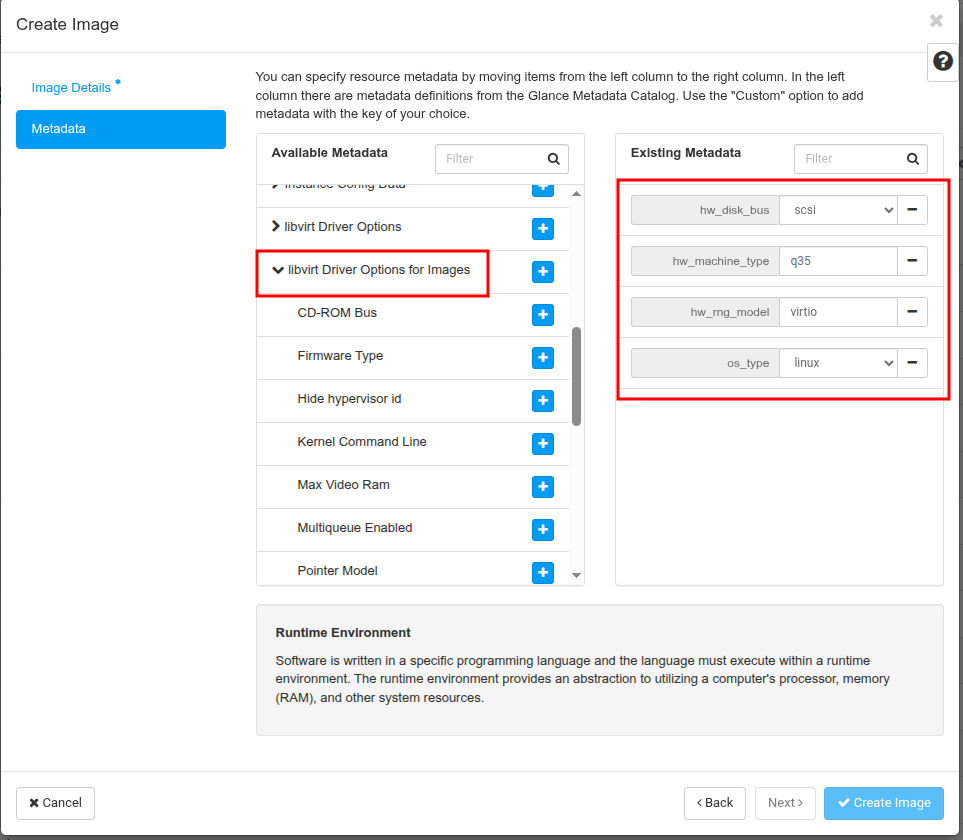
Furthermore you can take precautions to prevent the accidental deletion of you image: Set the value “Protected” to “Yes”. With the click on “Next” another menu opens:
 .
.
Here you can (and should) set some metada for your image. Some of these values - also called “properties” - can have a performance impact on instances, that use this image. Others help choosing and administering the right image, especially if you want to make a specific choice out of a bigger image library.
Properties
As mentioned above, it is important to set the right properties/metadata for self-created or imported images, in order to get the most performance out of them in pluscloudopen and to be able to filter and use them easily later.
Images, that have been imported automatically by Plusserver into pluscloudopen are already configured with many image properties, that you can use as an orientation for you own images. Here is an example of a current Ubuntu image:
(openstack-client) ubuntu@ubuntu:~$ openstack image show --fit 05ccd070-88dd-41ca-bc3b-b829f84d5dae
+------------------+------------------------------------------------------------------------------------------------------------------------------------------------------------------------------------------------+
| Field            | Value                                                                                                                                                                                          |
+------------------+------------------------------------------------------------------------------------------------------------------------------------------------------------------------------------------------+
| checksum         | af18ea56b7c16171a22ed2597232596c                                                                                                                                                               |
| container_format | bare                                                                                                                                                                                           |
| created_at       | 2026-03-06T13:25:55Z                                                                                                                                                                           |
| disk_format      | raw                                                                                                                                                                                            |
| file             | /v2/images/05ccd070-88dd-41ca-bc3b-b829f84d5dae/file                                                                                                                                           |
| id               | 05ccd070-88dd-41ca-bc3b-b829f84d5dae                                                                                                                                                           |
| min_disk         | 8                                                                                                                                                                                              |
| min_ram          | 512                                                                                                                                                                                            |
| name             | Ubuntu 24.04                                                                                                                                                                                   |
| owner            | b8fd6cf7468d469685654d270526232a                                                                                                                                                               |
| properties       | architecture='x86_64', direct_url='rbd://a5bf811b-566d-4079-ace1-0e3396c22512/images/05ccd070-88dd-41ca-bc3b-b829f84d5dae/snap', hotfix_hours='0', hw_disk_bus='scsi', hw_machine_type='q35',  |
|                  | hw_rng_model='virtio', hw_scsi_model='virtio-scsi', hw_watchdog_action='reset', hypervisor_type='qemu', image_build_date='2026-02-25', image_description='Ubuntu 24.04', image_name='Ubuntu    |
|                  | 24.04', image_original_user='ubuntu', image_source='https://cloud-images.ubuntu.com/releases/noble/release-20260225/ubuntu-24.04-server-cloudimg-amd64.img', internal_version='20260225',      |
|                  | locations='[{'url': 'rbd://a5bf811b-566d-4079-ace1-0e3396c22512/images/05ccd070-88dd-41ca-bc3b-b829f84d5dae/snap', 'metadata': {'store': 'rbd'}}]', os_distro='ubuntu',                        |
|                  | os_glance_failed_import='', os_glance_importing_to_stores='', os_hash_algo='sha512',                                                                                                           |
|                  | os_hash_value='7447fc99609fa9ec76065e8a2a7496dfc04d2fd73949f05cd02cfd3fac4d0b47519a45668cc45e266f5cc32a4df9de7fbdfb2e6ac0d8533762ad205489c5df59', os_hidden='False', os_purpose='generic',     |
|                  | os_version='24.04', owner_specified.openstack.md5='', owner_specified.openstack.object='images/Ubuntu 24.04 (20260225)', owner_specified.openstack.sha256='', provided_until='none',           |
|                  | replace_frequency='monthly', stores='rbd', uuid_validity='last-3'                                                                                                                              |
| protected        | False                                                                                                                                                                                          |
| schema           | /v2/schemas/image                                                                                                                                                                              |
| size             | 3758096384                                                                                                                                                                                     |
| status           | active                                                                                                                                                                                         |
| tags             | managed_by_plusserver, os:ubuntu                                                                                                                                                               |
| updated_at       | 2026-03-06T13:27:03Z                                                                                                                                                                           |
| virtual_size     | 3758096384                                                                                                                                                                                     |
| visibility       | public                                                                                                                                                                                         |
+------------------+------------------------------------------------------------------------------------------------------------------------------------------------------------------------------------------------+
Especially in the context of automatically created and imported images properties like image_build_date, image_version, image_name, etc. help to filter for these images automatically. For example to get always the latest version for you Packer buildpipeline:
    source_image_filter {
      filters {
        name = "Debian 11"
      }
      most_recent = "true"
    }


At the same time omitting properties like `hw_machine_type` can lead to issues with attaching and mounting a high number of volumes to an instance.
The upstram OpenStack documentation has a list of [useful image properties](https://docs.openstack.org/glance/latest/admin/useful-image-properties.html).