Use Cinder CSI Storage in Hashicorp Nomad
7 minute read
Overview
Hashicorps Workload Orchestrator - Nomad - offers various options to store data for stateful workloads. One is using data stores, that are accessed via the Container Storage Interface (CSI). For OpenStack environments like pluscloudopen there is the Cinder plugin, which offers blockstorage for your VMs CSI Plugins run as Jobs in Nomad and are used to create, mount and unmount volumes on Nomad clients.
This tutorial shows, who the CSI plugin for Cinder is integrated into Nomad and how it is used.
Activate the CSI Cinder Storage Plugin
As mentioned above, CSI plugins are started as Nomad jobs in your Nomad cluster. In order to do so, we have to allow the execution of privileged Docker containers on all Nomad clients, that should be able to mount volumes, that are managed by the CSI plugin. We have to set allowed_privileged = true for Docker containers in the configuration file of our Nomad clients and restart Nomad afterwards:
plugin "docker" {
  config {
    allow_privileged = true
  }
}
CSI storage plugins normally consist of two components: a controller component and a node component. For each of these we need a Nomad job file. As soon as the client configuration above is active, the job files for CSI Cinder storage plugin (s. below) can be adapted and then be started. Both jobs are similar. But the controller job is started as a “service” job,
job "csi-cinder-prod4-controller" {
  region      = "de-west"
  datacenters = ["prod4"]
  type        = "service"
  node_pool   = "all"
[...]
while the nodes job is a “system” job, which will run on all Nomad clients in the datacenter:
job "csi-cinder-prod4-nodes" {
  region      = "de-west"
  datacenters = ["prod4"]
  type        = "system"
  node_pool   = "all"
[...]
Both jobs need a configuation file cloud.conf, that contains the access credentials for the OpenStack environment - in order to let the plugin (e. g.) create volumes. To exclude the credentials from our job files, we use Nomad variables or Vault secrets. If you save your cloud access credentials into a file (e. g. named spec.var.prod4.hcl) like this
items {
  osauthurl     = "https://prod4.api.pco.get-cloud.io:5000/v3"
  osdomainname  = "<yourdomain>"
  ospassword    = "<yourpassword>"
  osprojectname = "<yourprojectname>"
  osregion      = "prod4"
  osusername    = "<yourusername>"
}
you can save those with nomad var put -in hcl nomad/jobs/csi-cinder-prod4-nodes @spec.var.prod4.hcl for the respective job in Nomad. The data can then be referenced like this in the job file:
auth-url    = {{- with nomadVar "nomad/jobs/csi-cinder-prod4-nodes" }} "{{ .osauthurl }}" {{- end }}
domain-name = {{- with nomadVar "nomad/jobs/csi-cinder-prod4-nodes" }} "{{ .osdomainname }}" {{- end }}
tenant-name = {{- with nomadVar "nomad/jobs/csi-cinder-prod4-nodes" }} "{{ .osprojectname}}" {{- end }}
username    = {{- with nomadVar "nomad/jobs/csi-cinder-prod4-nodes" }} "{{ .osusername }}" {{- end }}
password    = {{- with nomadVar "nomad/jobs/csi-cinder-prod4-nodes" }} "{{ .ospassword }}" {{- end }}
region      = {{- with nomadVar "nomad/jobs/csi-cinder-prod4-nodes" }} "{{ .osregion }}" {{- end }}
You can fine the complete job files here:
Job file for the controler component of the CSI Cinder storage plugin
  job "csi-cinder-prod4-controller" {
  region      = "de-west"
  datacenters = ["prod4"]
  type        = "service"
  node_pool   = "all"

  group "controller" {

    restart {
    attempts = 5
    delay    = "15s"
    mode     = "delay"
    interval = "5m"
  }

    task "cinder-controller" {
      driver = "docker"
      template {
        data        = <<EOT
[Global]
auth-url    = {{- with nomadVar "nomad/jobs/csi-cinder-prod4-controller" }} "{{ .osauthurl }}" {{- end }}
domain-name = {{- with nomadVar "nomad/jobs/csi-cinder-prod4-controller" }} "{{ .osdomainname }}" {{- end }}
tenant-name = {{- with nomadVar "nomad/jobs/csi-cinder-prod4-controller" }} "{{ .osprojectname}}" {{- end }}
username    = {{- with nomadVar "nomad/jobs/csi-cinder-prod4-controller" }} "{{ .osusername }}" {{- end }}
password    = {{- with nomadVar "nomad/jobs/csi-cinder-prod4-controller" }} "{{ .ospassword }}" {{- end }}
region      = {{- with nomadVar "nomad/jobs/csi-cinder-prod4-controller" }} "{{ .osregion }}" {{- end }}
        EOT
        destination = "secrets/cloud.conf"
        change_mode = "restart"
      }
      config {
        image = "registry.k8s.io/provider-os/cinder-csi-plugin:v1.36.0"

        mount {
          type     = "bind"
          target   = "/etc/config/cloud.conf"
          source   = "./secrets/cloud.conf"
          readonly = false
          bind_options {
            propagation = "rshared"
          }
        }

        args = [
          "/bin/cinder-csi-plugin",
          "-v=3",
          "--endpoint=unix:///csi/csi.sock",
          "--cloud-config=/etc/config/cloud.conf",
        ]
      }

      csi_plugin {
        id        = "csi-cinder"
        type      = "controller"
        mount_dir = "/csi"
      }
    }
  }
}
Job file for the node component of the CSI Cinder storage plugin
job "csi-cinder-prod4-nodes" {
  region      = "de-west"
  datacenters = ["prod4"]
  type        = "system"
  node_pool   = "all"

  group "nodes" {

    restart {
      attempts = 5
      delay    = "15s"
      mode     = "delay"
      interval = "5m"
    }

    task "cinder-node" {
      driver = "docker"
      template {
        data        = <<EOT
[Global]
auth-url    = {{- with nomadVar "nomad/jobs/csi-cinder-prod4-nodes" }} "{{ .osauthurl }}" {{- end }}
domain-name = {{- with nomadVar "nomad/jobs/csi-cinder-prod4-nodes" }} "{{ .osdomainname }}" {{- end }}
tenant-name = {{- with nomadVar "nomad/jobs/csi-cinder-prod4-nodes" }} "{{ .osprojectname}}" {{- end }}
username    = {{- with nomadVar "nomad/jobs/csi-cinder-prod4-nodes" }} "{{ .osusername }}" {{- end }}
password    = {{- with nomadVar "nomad/jobs/csi-cinder-prod4-nodes" }} "{{ .ospassword }}" {{- end }}
region      = {{- with nomadVar "nomad/jobs/csi-cinder-prod4-nodes" }} "{{ .osregion }}" {{- end }}
        EOT
        destination = "secrets/cloud.conf"
        change_mode = "restart"
      }
      config {
        image = "registry.k8s.io/provider-os/cinder-csi-plugin:v1.36.0"

        mount {
          type     = "bind"
          target   = "/etc/config/cloud.conf"
          source   = "./secrets/cloud.conf"
          readonly = false
          bind_options {
            propagation = "rshared"
          }
        }
        args = [
          "/bin/cinder-csi-plugin",
          "-v=3",
          "--endpoint=unix:///csi/csi.sock",
          "--cloud-config=/etc/config/cloud.conf",
        ]
        privileged = true
      }

      csi_plugin {
        id        = "csi-cinder"
        type      = "node"
        mount_dir = "/csi"
      }
    }
  }
}
Both jobs can be run one after the other with nomad job run csi-cinder-prod4-controller.hcl and nomad job run csi-cinder-prod4-nodes.hcl. As soon as both jobs are healthy we can create our first Cinder volume via CSI plugin.
Create a volume
We need another configuration file to create a volume. You can create an example file with nomad volume init. It is sensible to do this in order to see the various configuration parameters (with comments). But those are also listed in the documentation.
To create a five gigabyte Cinder volume via CSI (type “ceph-premium”) the configuration file could look like this:
id           = "cinder_prod4_csivolume"
name         = "csivolume-prod4"
type         = "csi"
plugin_id    = "csi-cinder"
capacity_max = "5G"
capacity_min = "5G"

parameters {
  type = "ceph-premium"
}

capability {
  access_mode     = "single-node-reader-only"
  attachment_mode = "file-system"
}

capability {
  access_mode     = "single-node-writer"
  attachment_mode = "file-system"
}

topology_request {
  required {
    topology { segments { "datacenter" = "prod4"} }
  }
}

mount_options {
  fs_type     = "ext4"
  mount_flags = ["noatime"]
}
If you save the file as csi-cinder-prod4-volspec.hcl, you can create the volume with the command nomad volume create csi-cinder-prod4-volspec1.hcl and its status with nomad volume status cinder_prod4_csivolume:
02:46:31 admin@laptop → nomad volume status cinder_prod4_csivolume
ID                   = cinder_prod4_csivolume
Name                 = csivolume-prod4
Namespace            = default
External ID          = 510527f5-9f6f-4ed5-a9fb-bb0b5d45230f
Plugin ID            = csi-cinder
Provider             = cinder.csi.openstack.org
Version              = 2.0.0@v1.36.0
Capacity             = 5.0 GiB
Schedulable          = true
Controllers Healthy  = 1
Controllers Expected = 1
Nodes Healthy        = 2
Nodes Expected       = 2
Access Mode          = <none>
Attachment Mode      = <none>
Mount Options        = fs_type: ext4 flags: [REDACTED]
Namespace            = default

Topologies
Topology  Segments
01        topology.cinder.csi.openstack.org/zone=az1

Allocations
No allocations placed
The OpenStack web UI shows this:

Use a volume
You can now use the volume in your Nomad jobs. One example could look like this:
job "mysql-server-prod4" {
  datacenters = ["prod4"]
  type        = "service"
  node_pool   = "default"

  group "mysql-server" {
    count = 1

    volume "mysql" {
      type            = "csi"
      read_only       = false
      source          = "cinder_prod4_csivolume"
      access_mode     = "single-node-writer"
      attachment_mode = "file-system"
    }

    network {
      port "db" {
        static = 3306
      }
    }

    restart {
      attempts = 10
      interval = "5m"
      delay    = "25s"
      mode     = "delay"
    }

    task "mysql-server" {
      driver = "docker"

      volume_mount {
        volume      = "mysql"
        destination = "/srv"
        read_only   = false
      }

      template {
        data = <<EOH
MYSQL_ROOT_PASSWORD = {{ with nomadVar "nomad/jobs/mysql-server-prod4" }}{{ .dbpw | toJSON }}{{ end }}
EOH
        destination = "secrets/file.env"
        env         = true
      }

      config {
        image = "hashicorp/mysql-portworx-demo:latest"
        args  = ["--datadir", "/srv/mysql"]
        ports = ["db"]
      }

      resources {
        cpu    = 500
        memory = 1024
      }

      service {
        name = "mysql-server"
        port = "db"

        check {
          type     = "tcp"
          interval = "10s"
          timeout  = "2s"
        }
      }
    }
  }
}
As soon as the job is started you can see the allocation in the output of nomad volume status cinder_prod4_csivolume:
04:37:00 admin@laptop → nomad volume status cinder_prod4_csivolume
ID                   = cinder_prod4_csivolume
Name                 = csivolume-prod4
Namespace            = default
External ID          = 510527f5-9f6f-4ed5-a9fb-bb0b5d45230f
Plugin ID            = csi-cinder
Provider             = cinder.csi.openstack.org
Version              = 2.0.0@v1.36.0
Capacity             = 5.0 GiB
Schedulable          = true
Controllers Healthy  = 1
Controllers Expected = 1
Nodes Healthy        = 2
Nodes Expected       = 2
Access Mode          = single-node-writer
Attachment Mode      = file-system
Mount Options        = fs_type: ext4 flags: [REDACTED]
Namespace            = default

Topologies
Topology  Segments
01        topology.cinder.csi.openstack.org/zone=az1

Allocations
ID        Node ID   Task Group    Version  Desired  Status   Created     Modified
42b8ae10  e37a5586  mysql-server  2        run      running  19m44s ago  18m51s ago
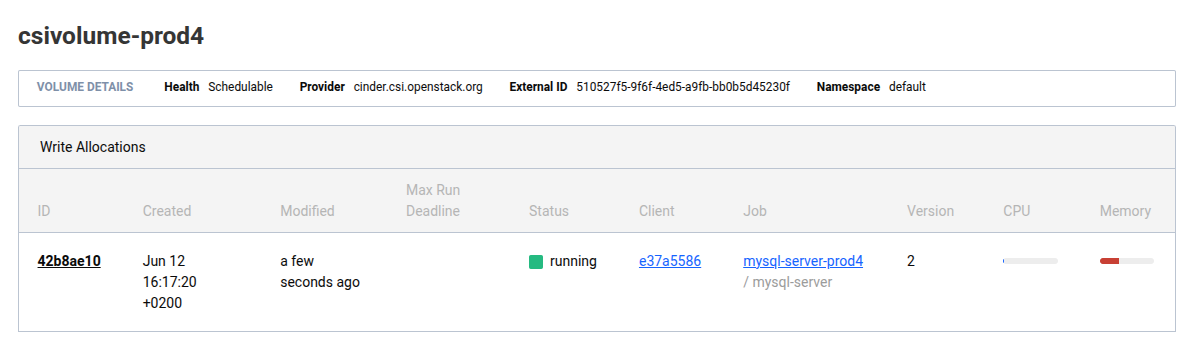
The Nomad web UI shows this:
Hint
Always consider which type of storage you use for databases. Cinder blockstorage might be the right choice for your development database, but you might prefer local ssd storage for production databases.