Quickstart
25 minute read
This document is intended to help you get started quickly with pluscloud v and the associated self-service functions. For the extensive self-services as well as network, storage and VM management, use the VMware vCloud Director documentation.
First Steps
This article covers step by step how to create VMs and/or vApps after the initial network setup and how to finally connect them to external networks or the Internet.
Our support is of course also available for this and other topics.
Help menu
You can find extensive help in technical portal details at VMware Online using the question mark in the top right corner.
Login details
This documentation assumes that you already have your login details (user name and password) and your tenant URL.
With this data you can go directly to the pluscloud vCloud Director portal.
Note
Change initial passwordFor security reasons, it is recommended to change the administrator password when logging in for the first time.
Public IP address
It is also helpful to have your other public IP addresses handy. You can also view these in the configuration dialogs if they are relevant.
Datacenter
In the pluscloud VMware, a tenant is represented as a so-called organization.
Such an organization manages user access and authorizations and contains one or more virtual data centers (OrgVDCs), which provide the computing resources for the virtualized workloads.
OrgVDC Overview
After logging into the pluscloud, you will see an overview of the (OrgVDCs) of your organization.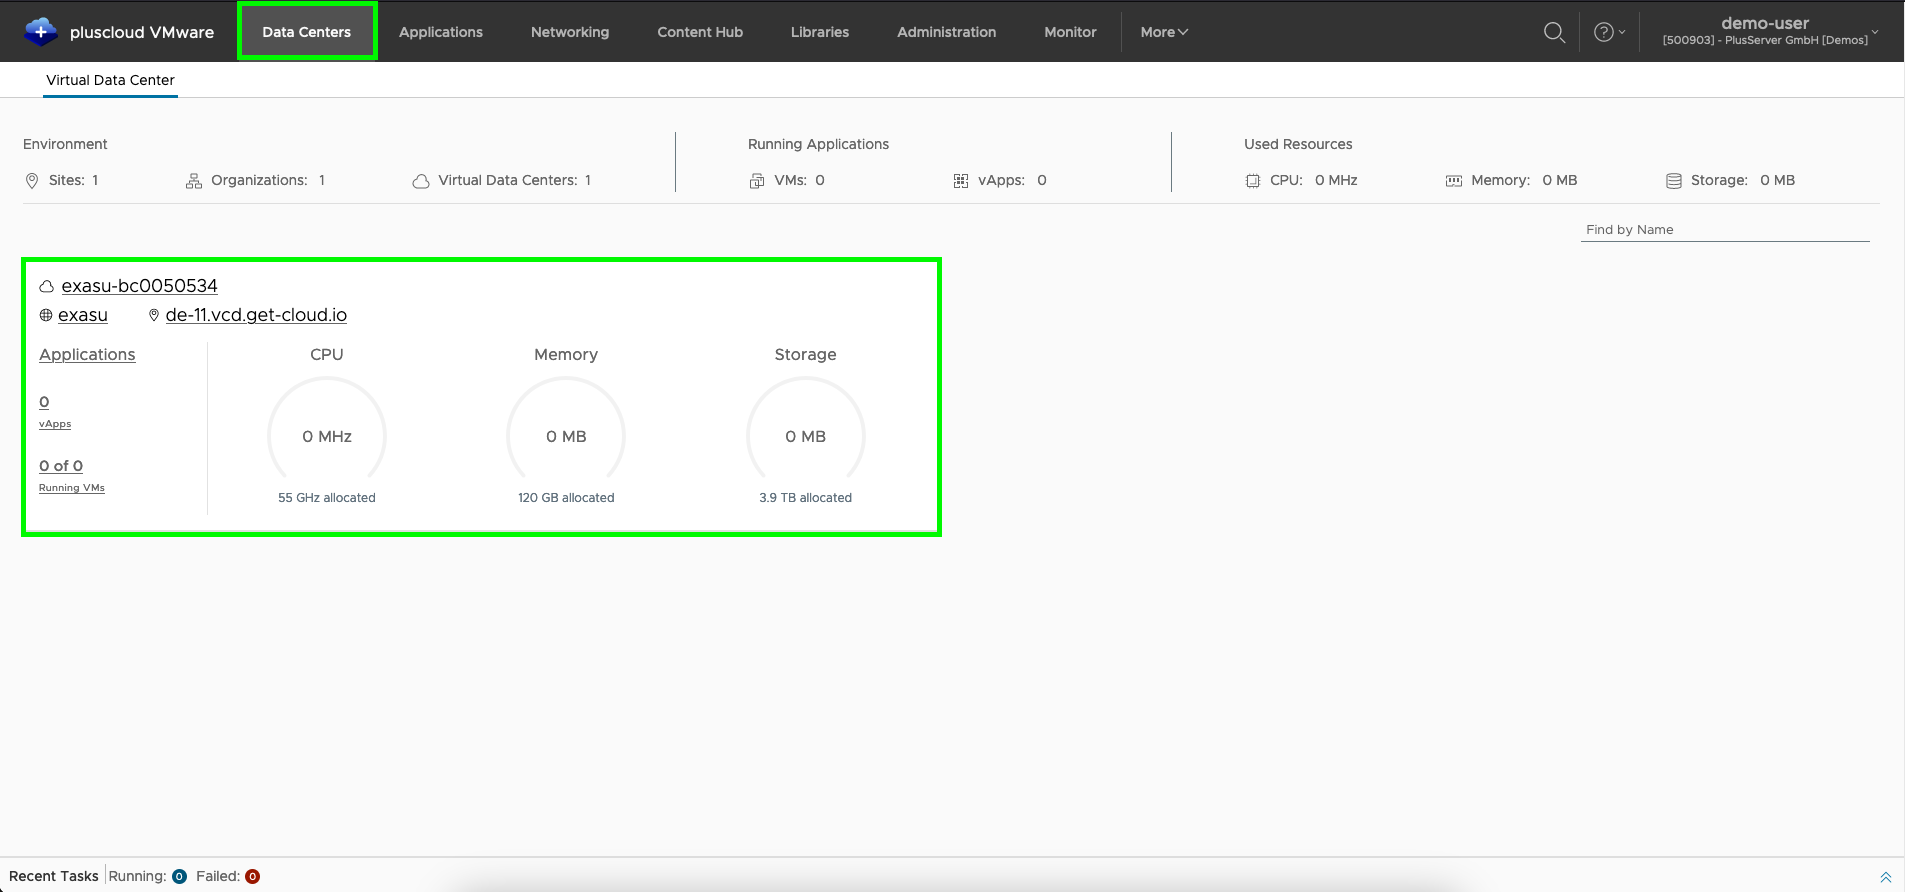
OrgVDC Management
By clicking on the area marked green in the screenshot above, you will be taken to the OrgVDC and can administer it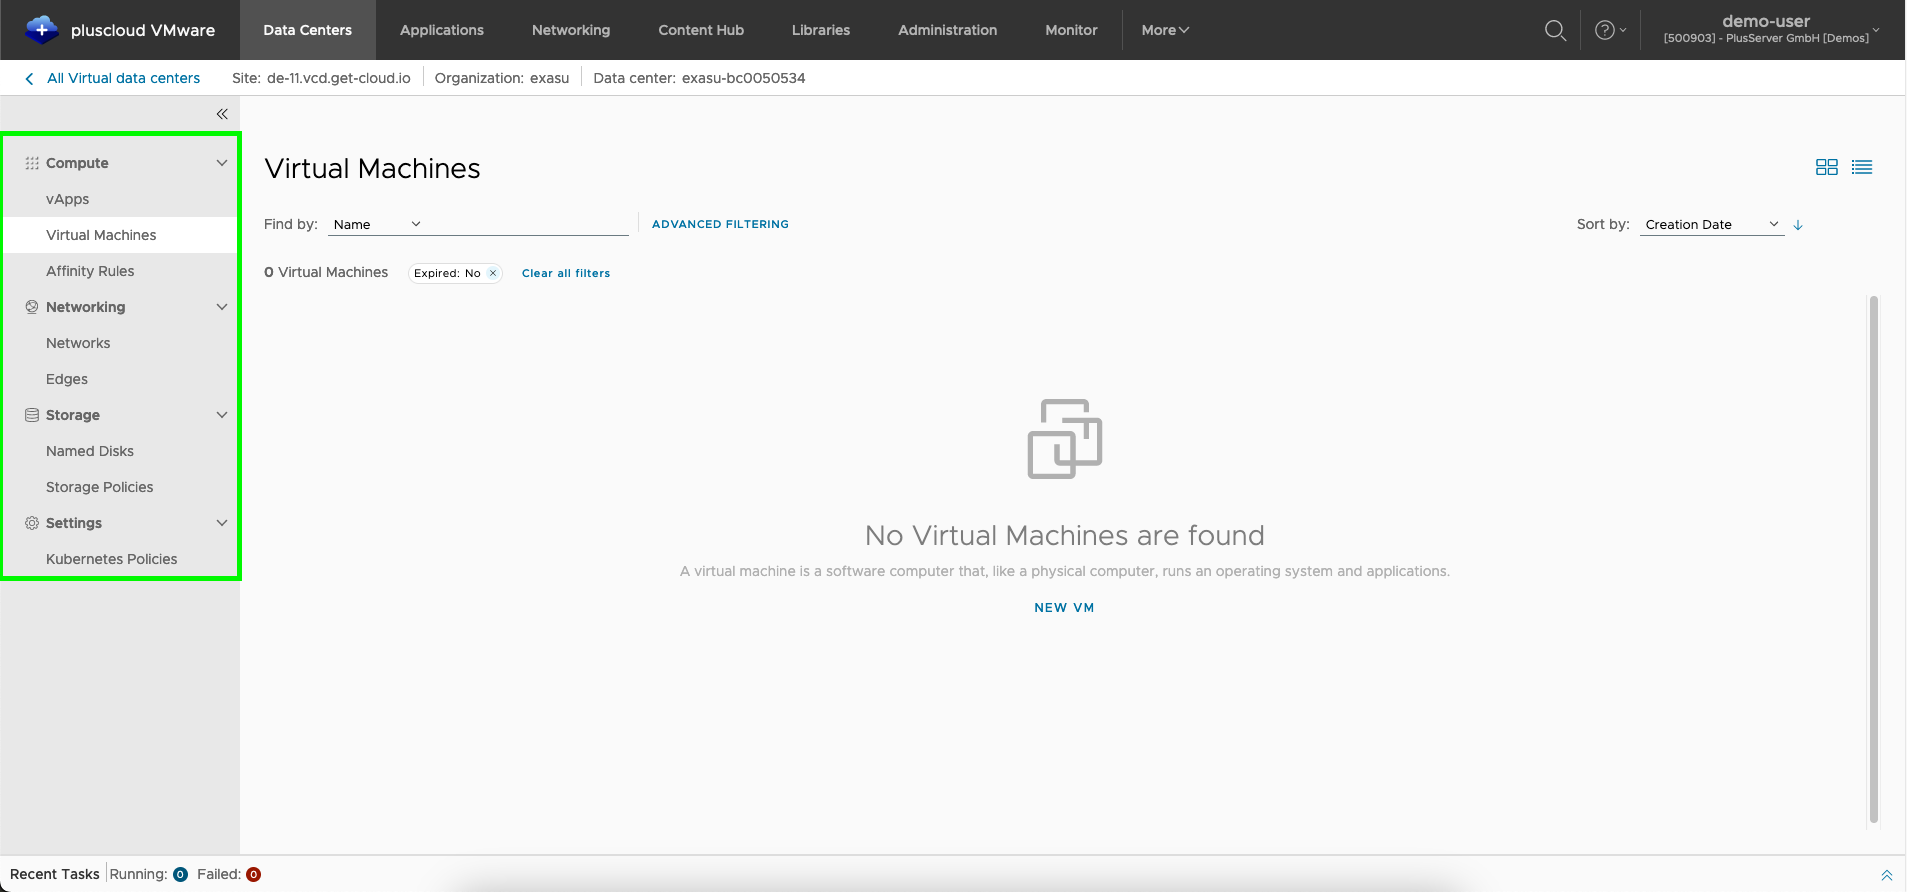
OrgVDC Networks
OrgVDC networks are virtual network segments that are deployed within a OrgVDC.
They are used to connect different components of a OrgVDC.
To provide access to the Internet from within the OrgVDC,
you can use a OrgVDC network that is connected to an edge gateway.
Such a network is usually created when the OrgVDC is deployed
with the name default-network, but can be deleted and/or modified.
Furthermore, appropriate NAT rules must be created on the Edge Gateway to enable data traffic between OrgVDC components and the Internet.
OrgVDC Network Overview
If you click on the Networks menu item in the left navigation menu under Network, you will see all existing networks.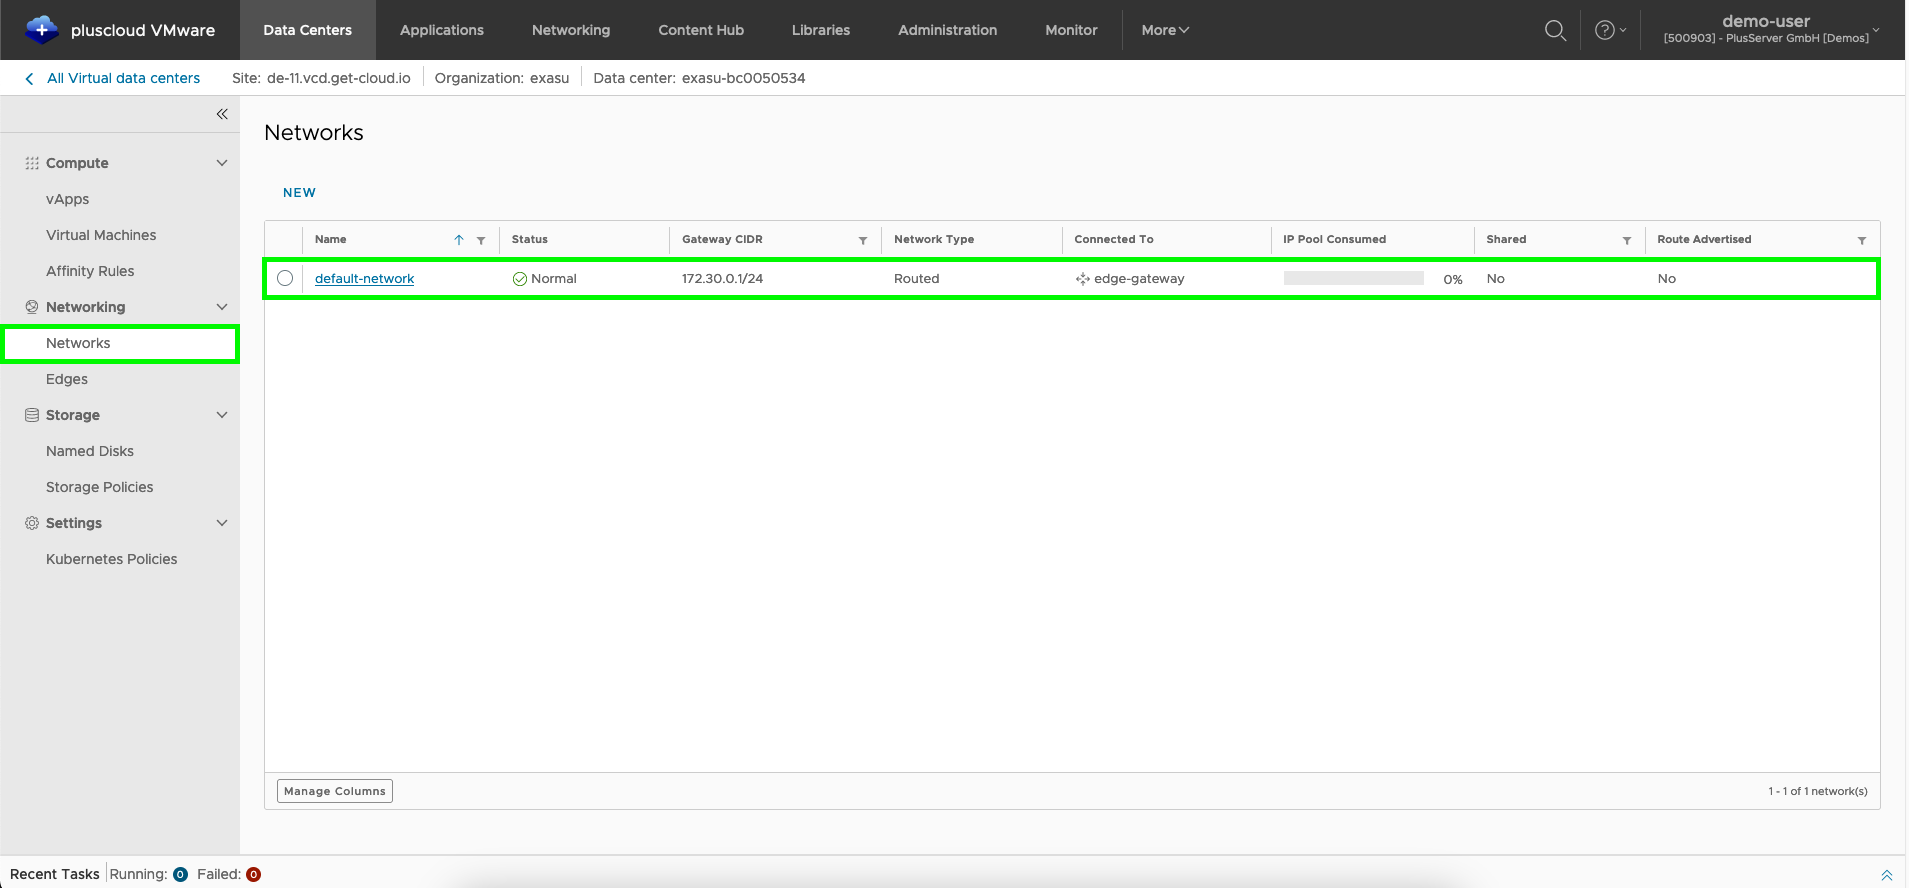
Default Network
Your organization network should have the statusForwarded for the network type.
The first address of the subnet used is bound to the Edge Gateway.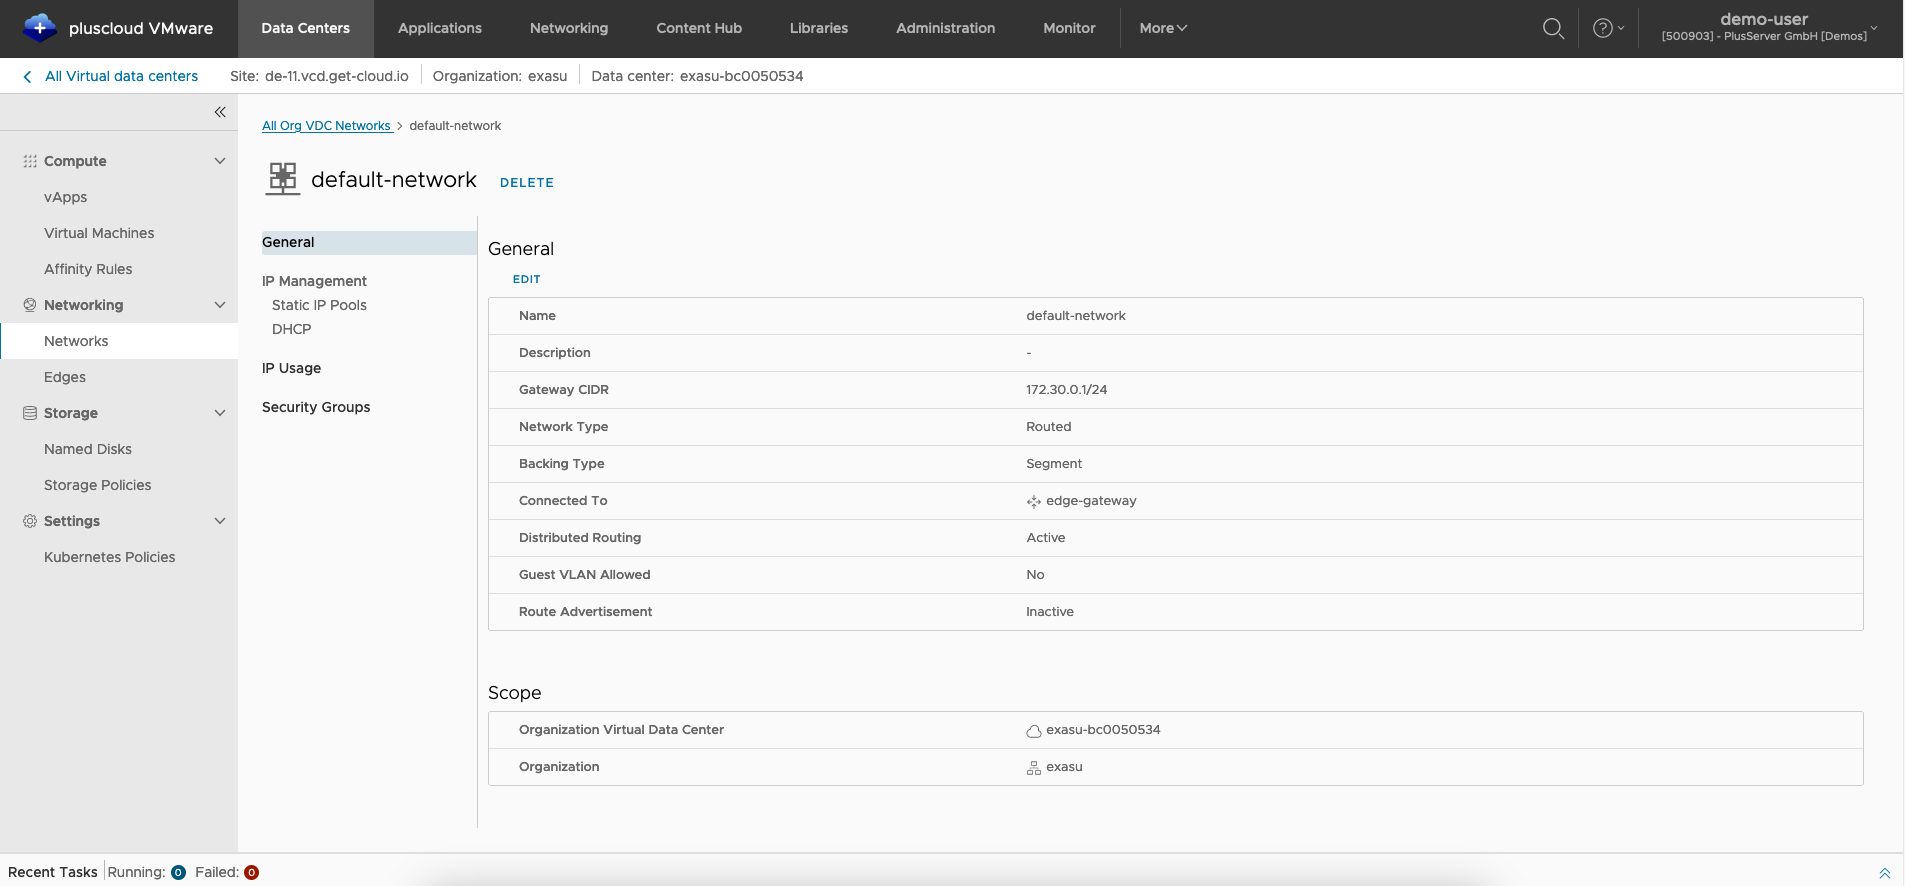
Create new network
You can create a missing or additional organization network as well as other networks using theNew button.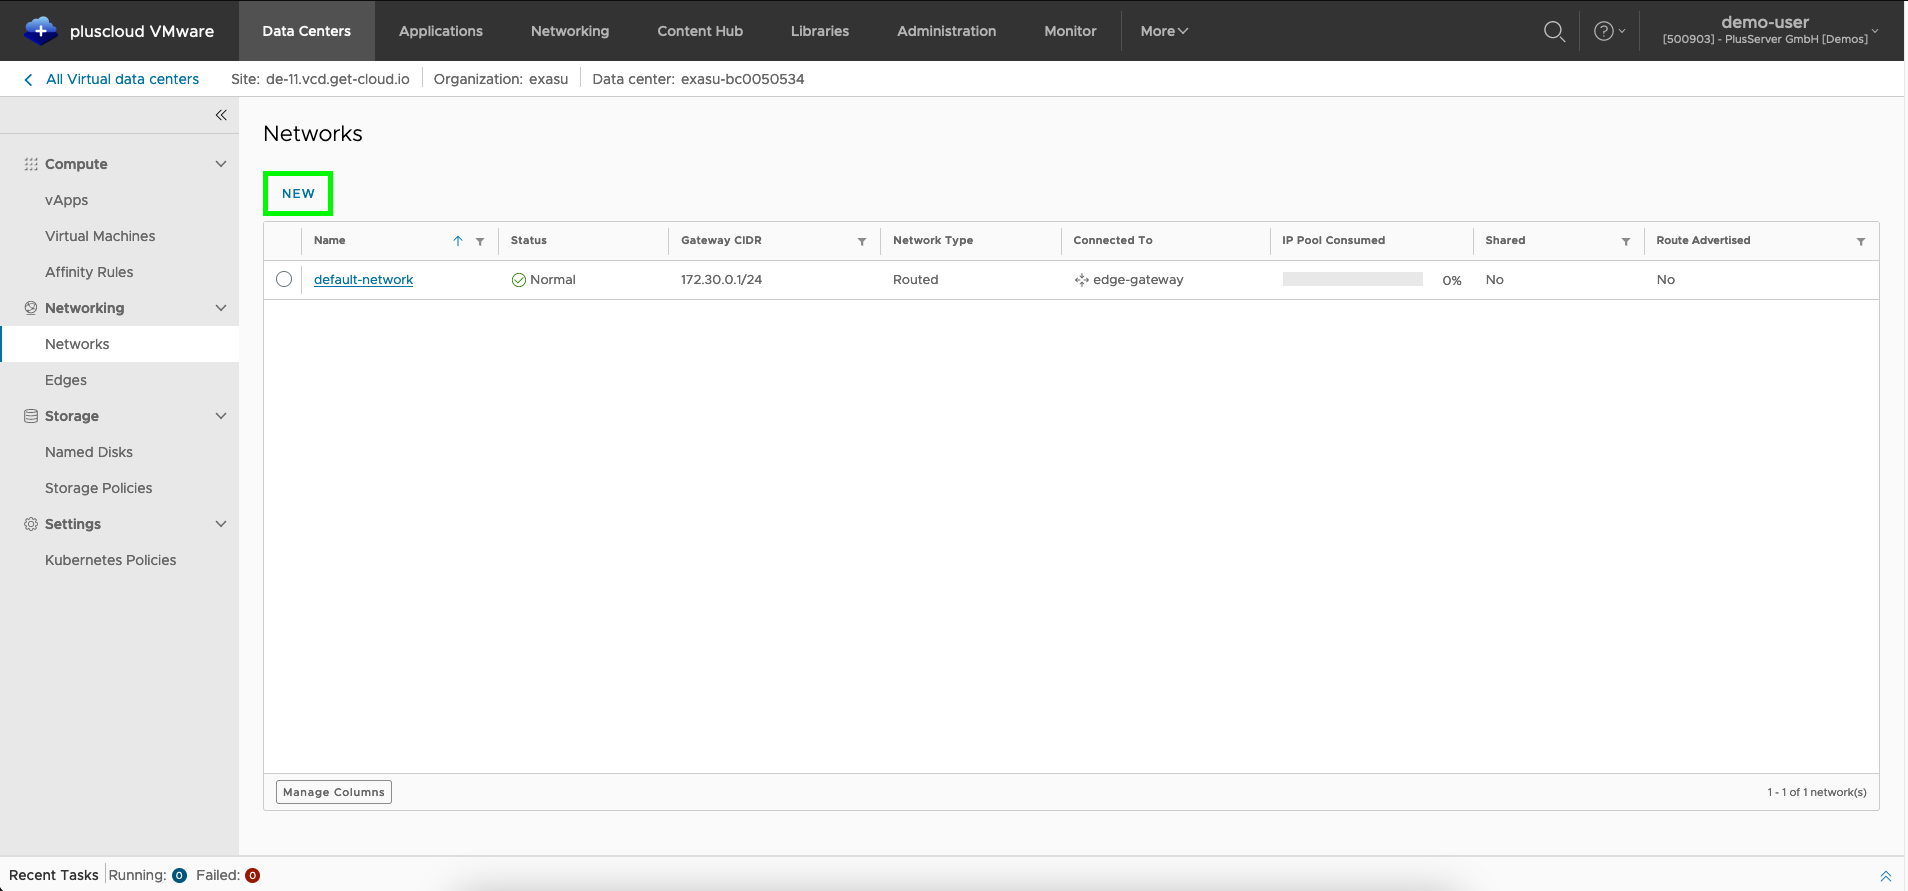
Select area of the network
Here you select the area of validity of a network. In this example, it is the currently selected OrgVDC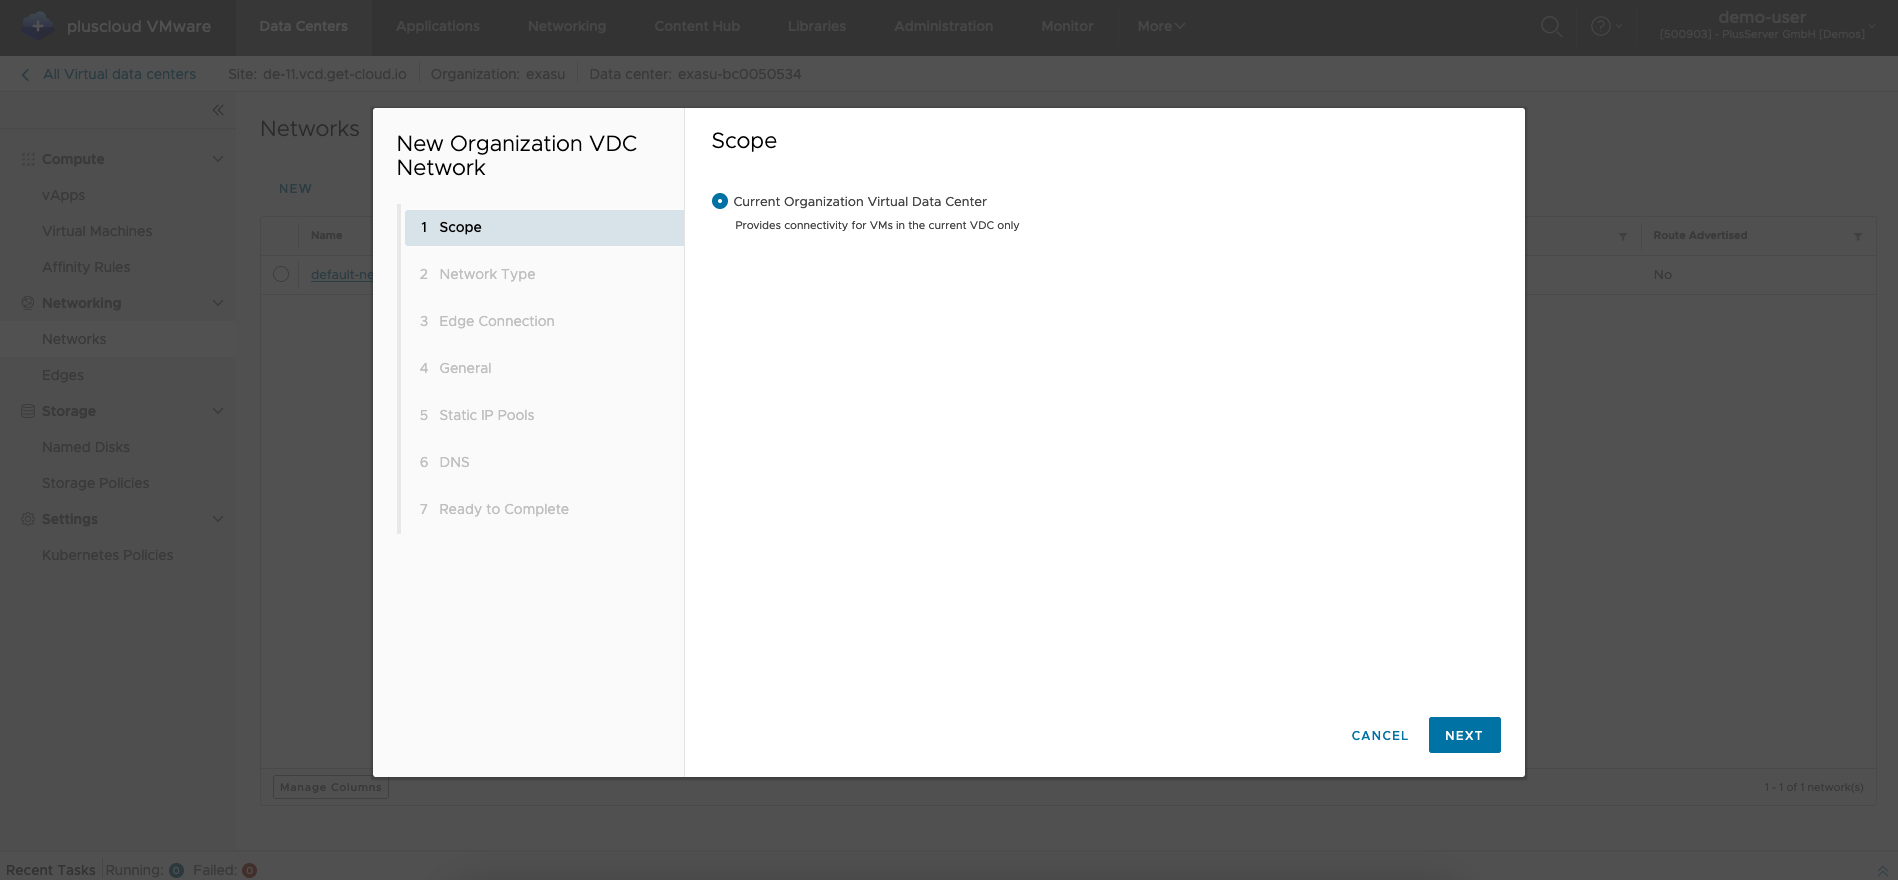
For the type of network to be created, the Forwarded option offers the possibility of selecting your edge gateway and enabling external communication.
Isolated networks are only available to your virtual machines and are decoupled from external connections.
Relevant network parameters
The following parameters are relevant in the wizard for forwarded networks:
| Parameter | Description |
|---|---|
| Scope | Selection of whether the network provides connectivity only for VMs in the current OrgVDC or in the data center group participating OrgVDCs. |
| Type | Distinguishes whether a network is routed or isolated. Only routed networks offer external connectivity and a connection to the edge gateway. |
| Edge Connection | The connection to the existing edge gateway can be established under this point. Internal is normally selected as the interface type. |
| Allow guest VLAN | Enables the creation of VLANs with their own sub-interfaces. This option is usually not required and is not recommended. |
| Distributed Routing | Enables distributed routing |
| Name | Freely definable name for the network to be created. Serves as a reference to connect VMs to the network. |
| Description | Optional free text to store further information (e.g. purpose and use of the network). |
| Dual stack mode | Allows the network to have both an IPv4 subnet and an IPv6 subnet. |
| Gateway CIDR | Specifies the internal IP addresses of the gateway, followed by the subnet in CIDR notation (IP/Netmask). |
| Shared use with other OrgVDCs in the organization | Option to share networks across multiple virtual pluscloud DCs. Usually disabled. |
| Static IP pool | Pool of IP addresses for automatic allocation to network components (such as VMs or vApp gateways) connected to the network. |
| Primary and secondary DNS | The IP addresses of the DNS servers to be used. Usually the edge gateway. |
| DNS suffix | If a specific DNS suffix is required, this can be entered here and will automatically be used for the connected VMs. This suffix is used as the default search domain for name resolution. |
Edge Gateway configuration
An Edge Gateway is automatically assigned to each OrgVDC. This provides access to the Internet for your environment. It also offers various services, e.g. B. Gateway Firewall, NAT, DNS, IPAM and IPsec VPN.
By default, virtual machines have no connection to the outside world.
This must first be enabled using appropriate NAT and firewall rules in the Edge Gateway.
Edge Gateway Selection
The Edge Gateway connections are configured using the Edges menu item in the left menu.
Clicking on the name of the Edge Gateway from the list opens the Edge Gateway administration menu.
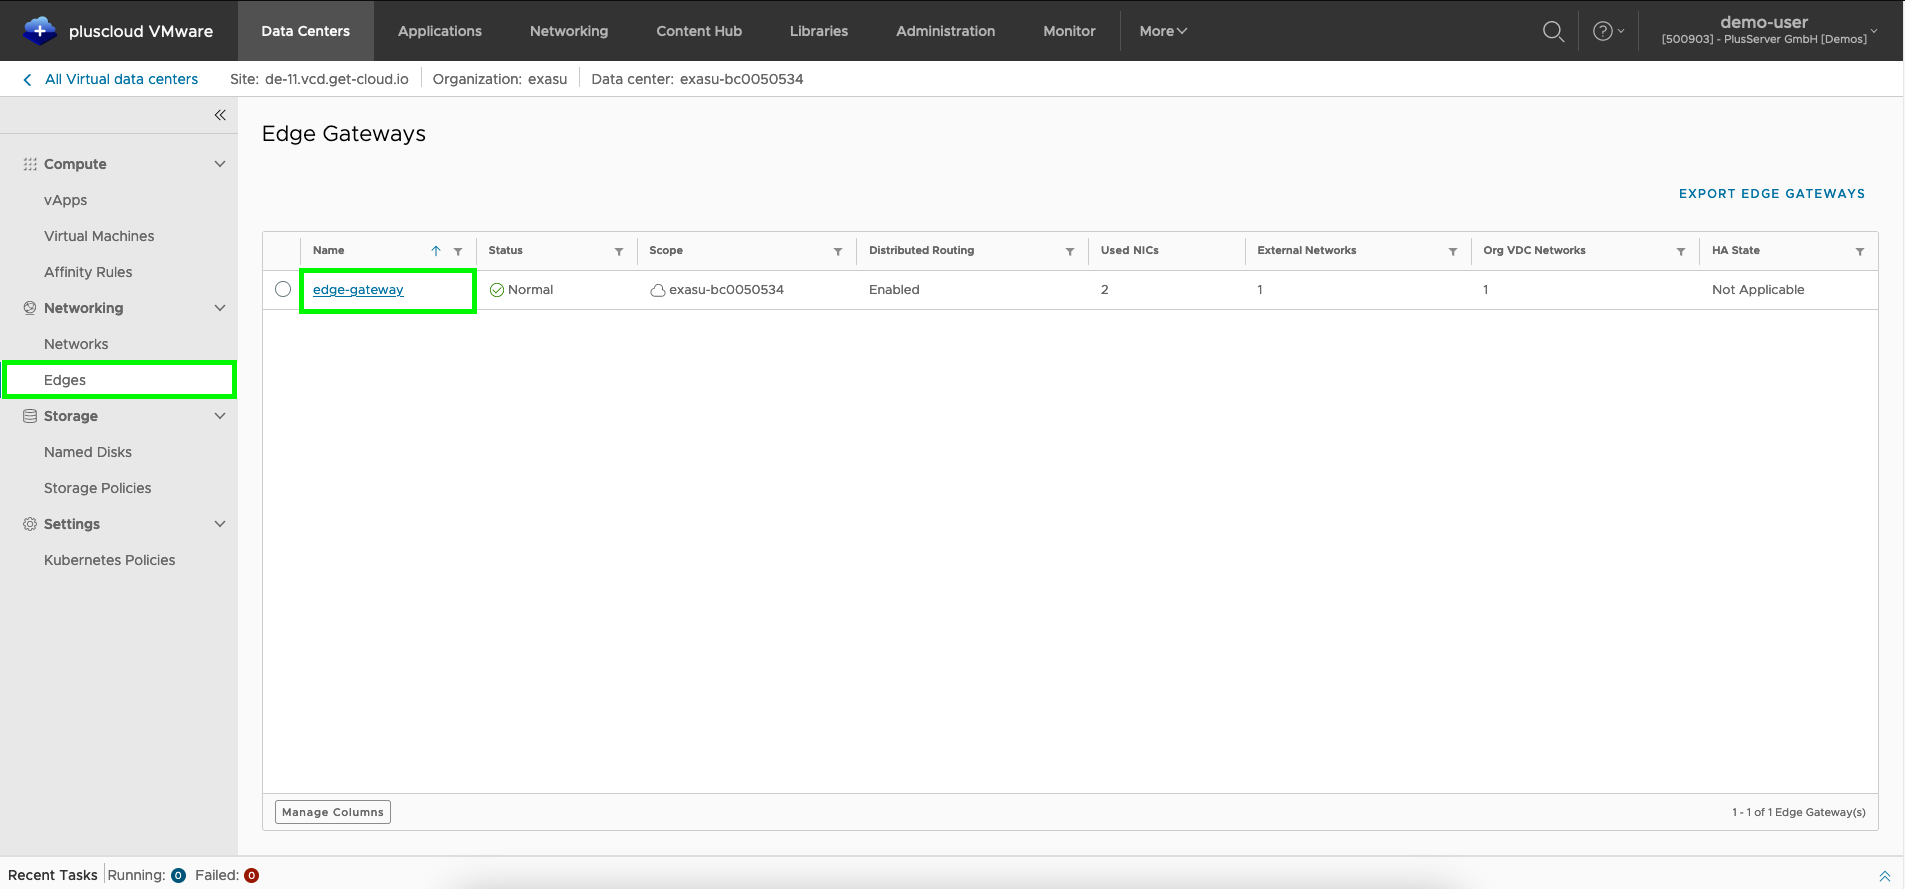
Edge Gateway Overview
Here you will find the individual parameters for configuring the Edge Gateway. Some standards are already preconfigured by plusserver.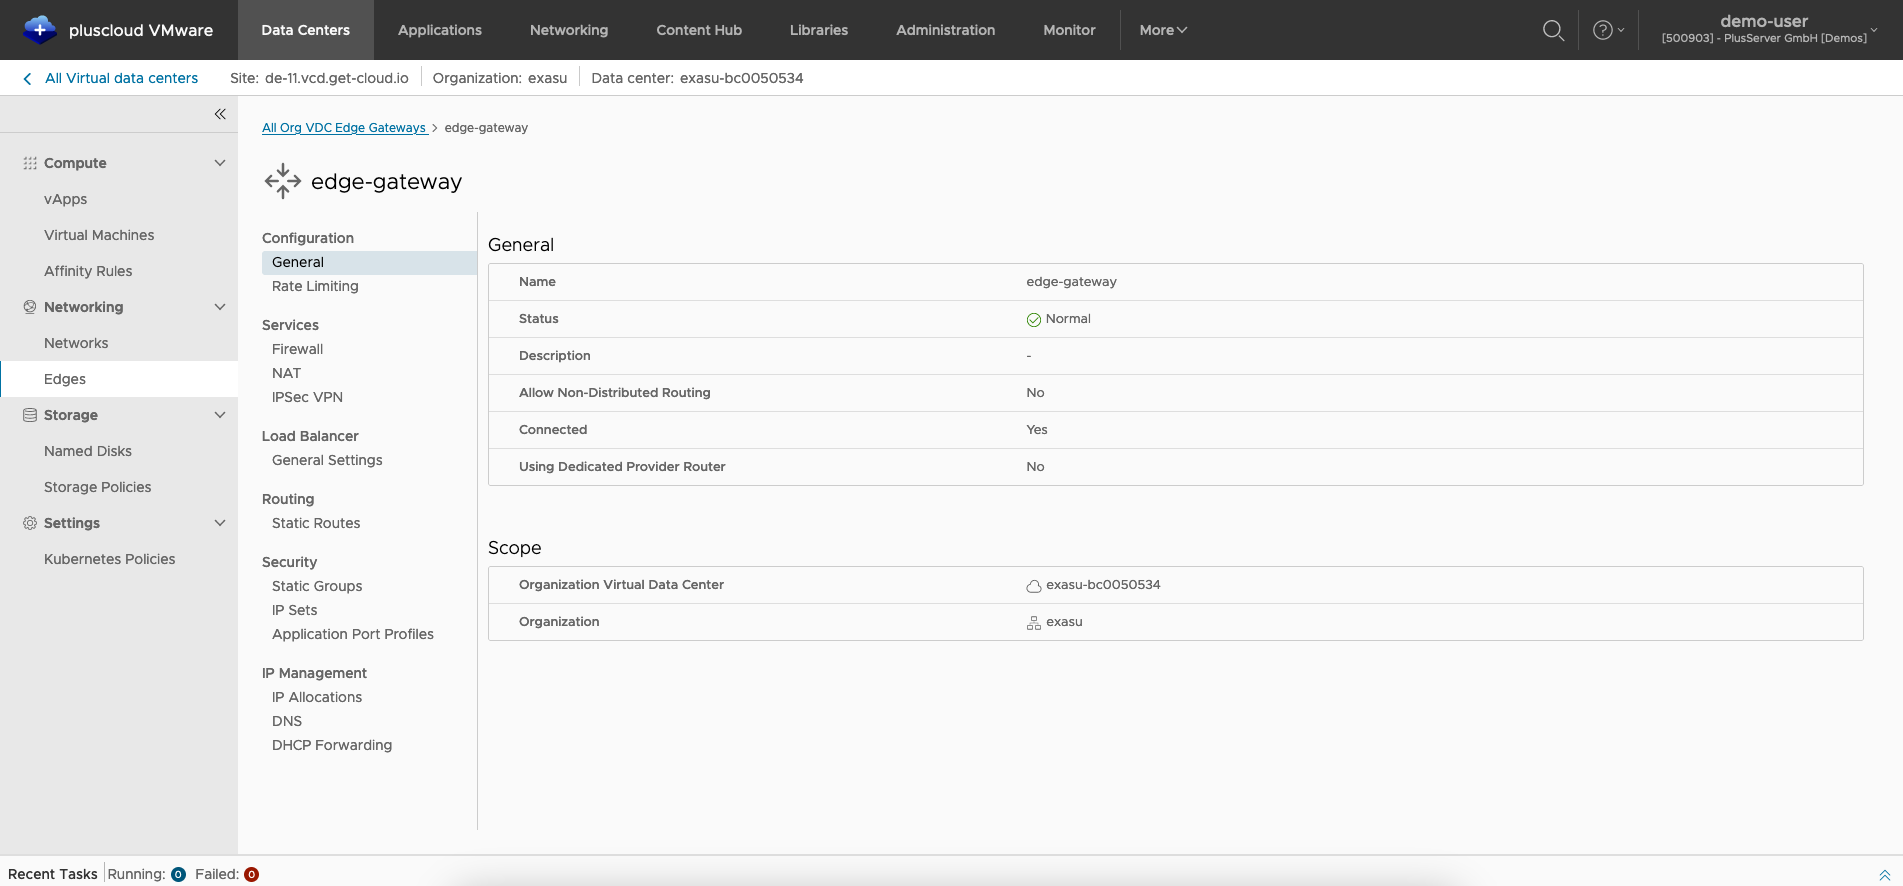
To enable communication between VMs and the Internet, a few firewall rules, application port profiles and NAT rules are necessary.
Application port profiles
We recommend that you set the application port profiles first. The application port profiles are needed to group ports for applications in one entity.
Application profile overview
To do this, theApplication port profiles tab must be selected in the Edge Gateway configuration.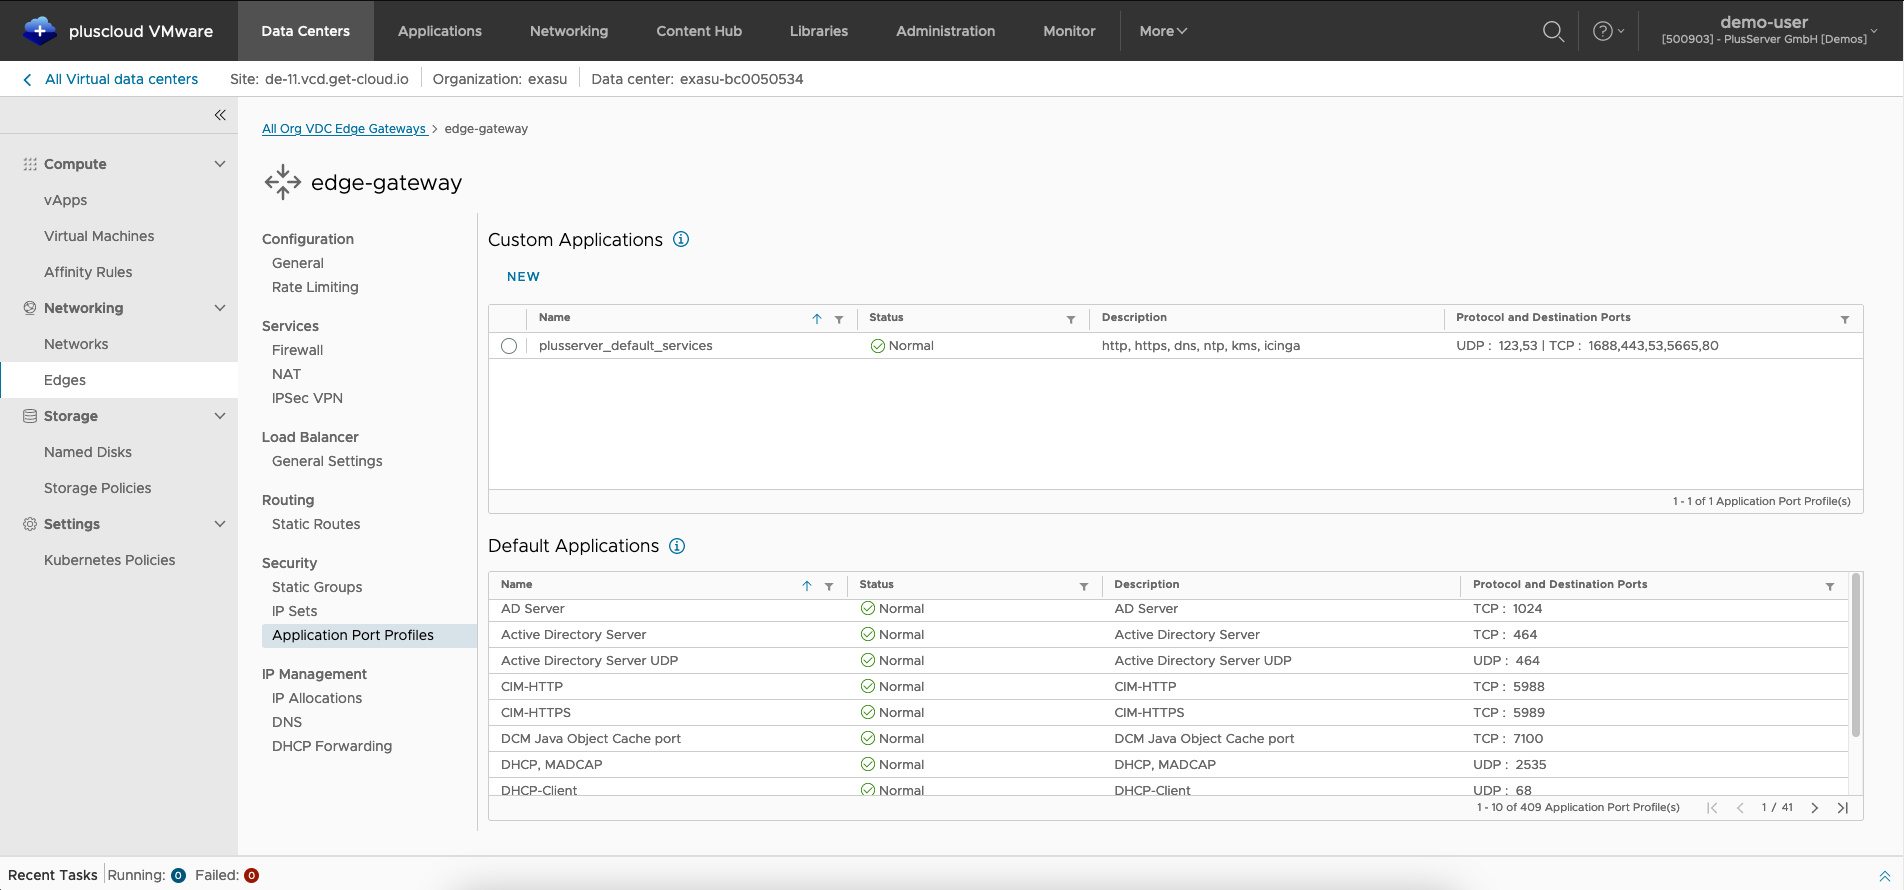
New application profile
Here you can use the “NEW” button to create a new application port profile or check the standard applications and the custom applications.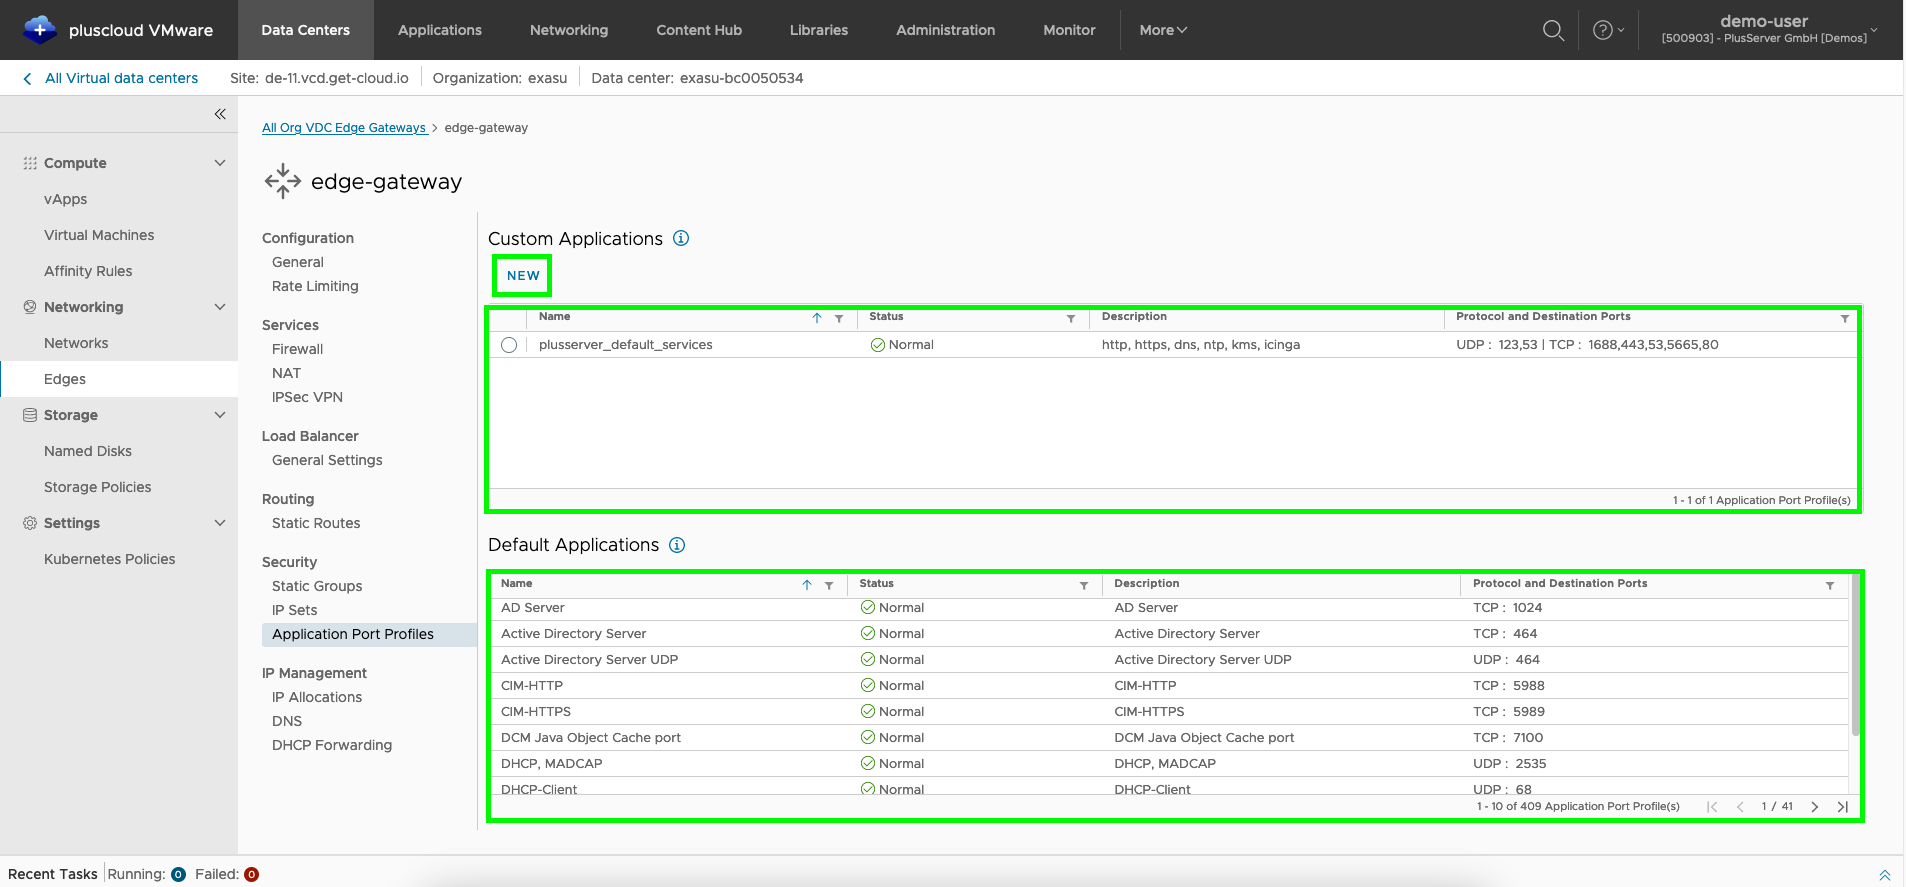
Dialog for new application profile
In this dialog window you can configure the ports for a new application profile. You can add more ports to an application by using theAdd Port Profile button.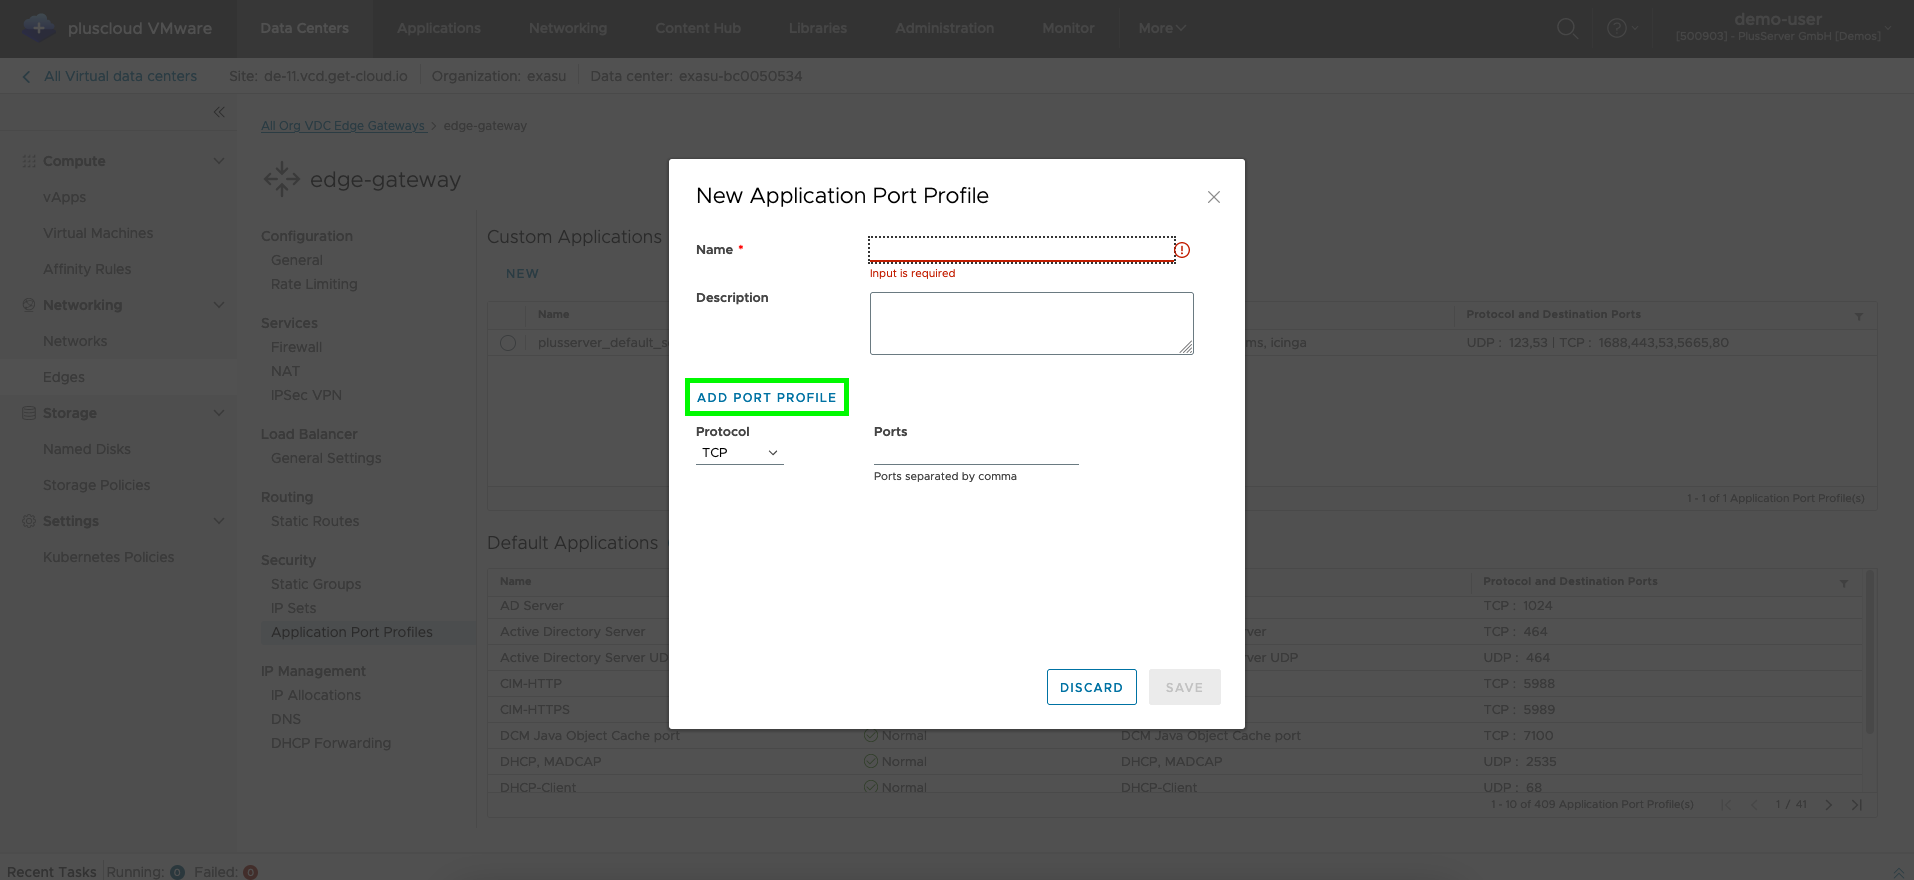
Parameters for an application profile
You can configure the following parameters in an application profile:
| Parameter | Description |
|---|---|
| Name | Freely definable name for the application port profile to be created. |
| Description | Optional free text to store additional information (e.g. purpose and use of the application port profile). |
| Add port profile | Adds another protocol profile. |
| Protocol | Selection of the protocol: TCP or UDP |
| Port | Selection of the port or ports as a comma-separated list of port numbers |
NAT Regeln
NAT rules
We recommend that you set the NAT rules next.
These NAT rules specify how to translate between internal, usually private IP addresses from the RFC1918 address range and public IP addresses.
NAT rules
To do this, the NAT tab must be selected in the edge gateway configuration.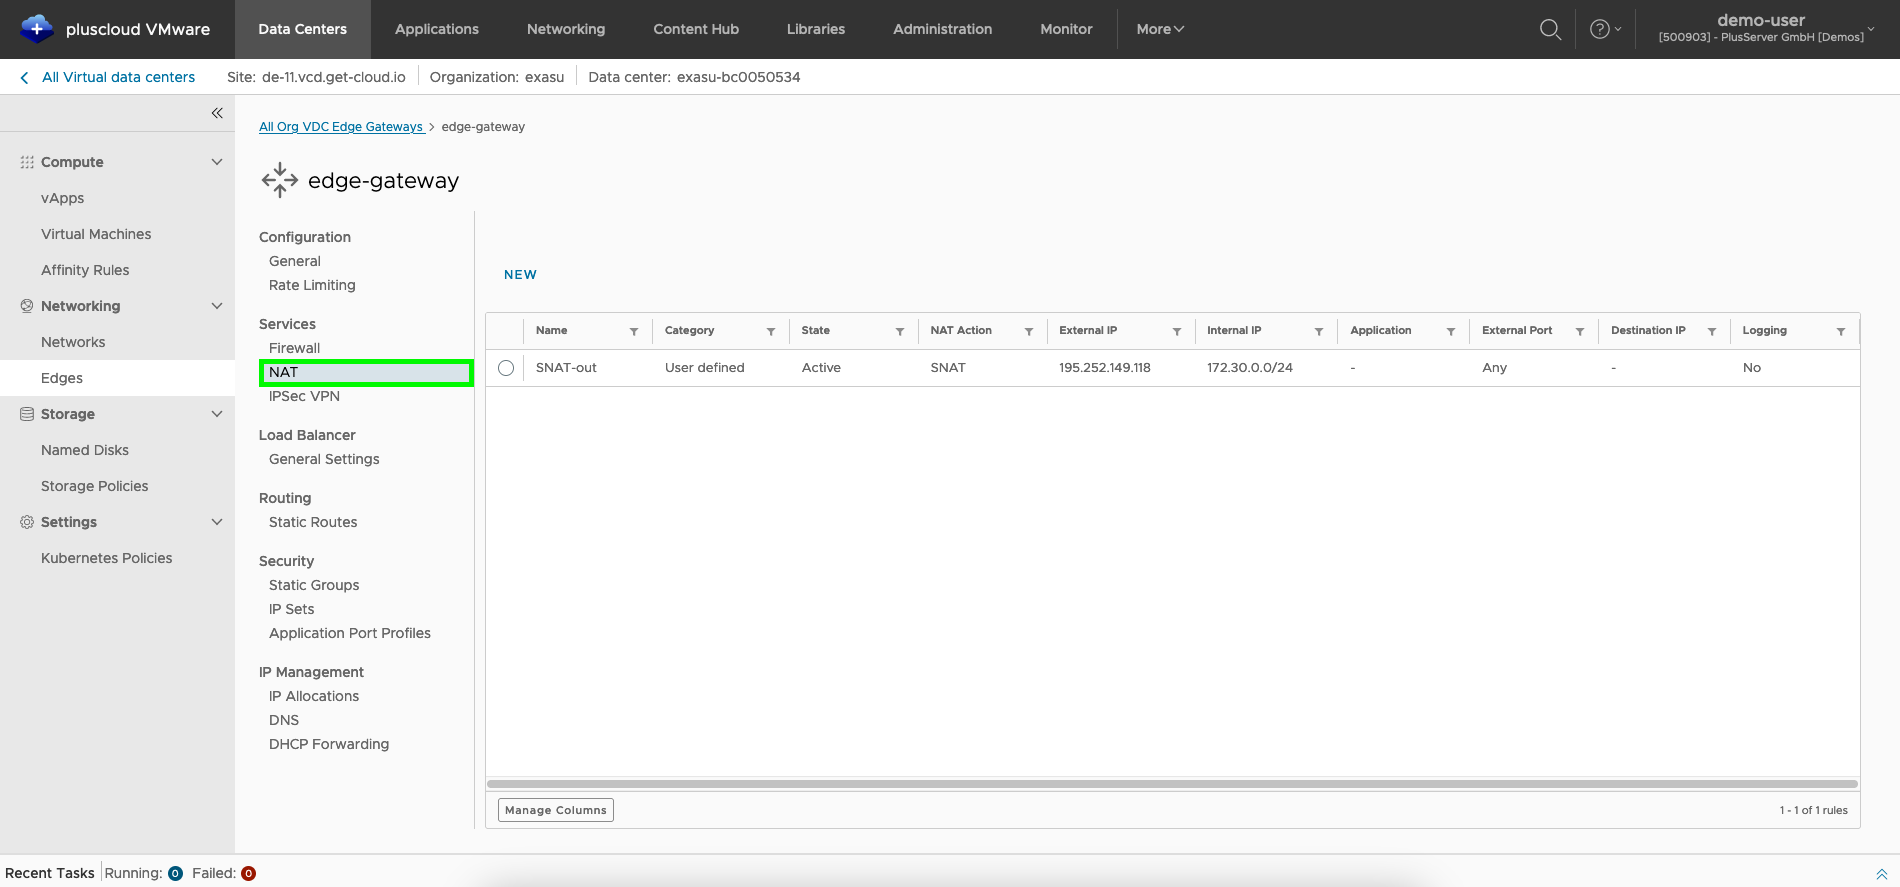
Hinweis
Priorities for NAT rulesIf an address has multiple NAT rules, the rule with the highest priority is applied. A lower value means a higher priority for that rule. You can move the rules using the
MOVE UP and MOVE DOWN buttons to set the appropriate order. Alternatively, you can also move the rules to a defined location using MOVE TO.Create new NAT rule
Open the dialog for creating a new NAT rule using theNew button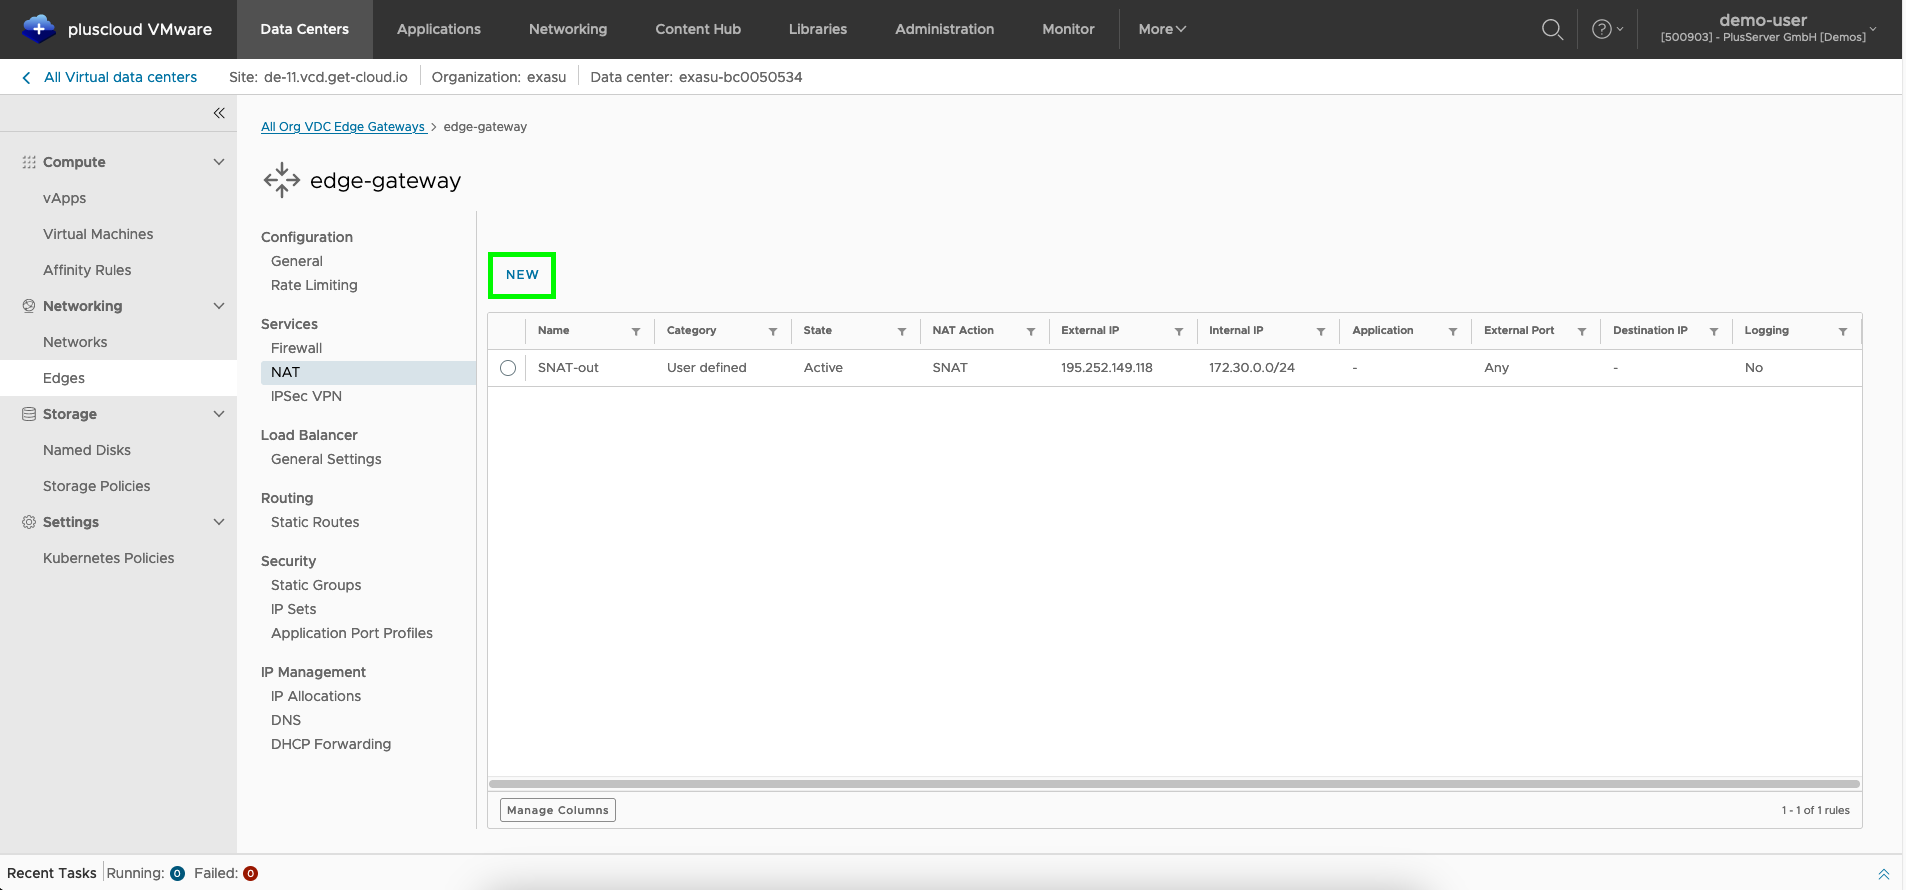
Dialog for creating a new NAT rule
Open the dialog for creating a new NAT rule using theNew button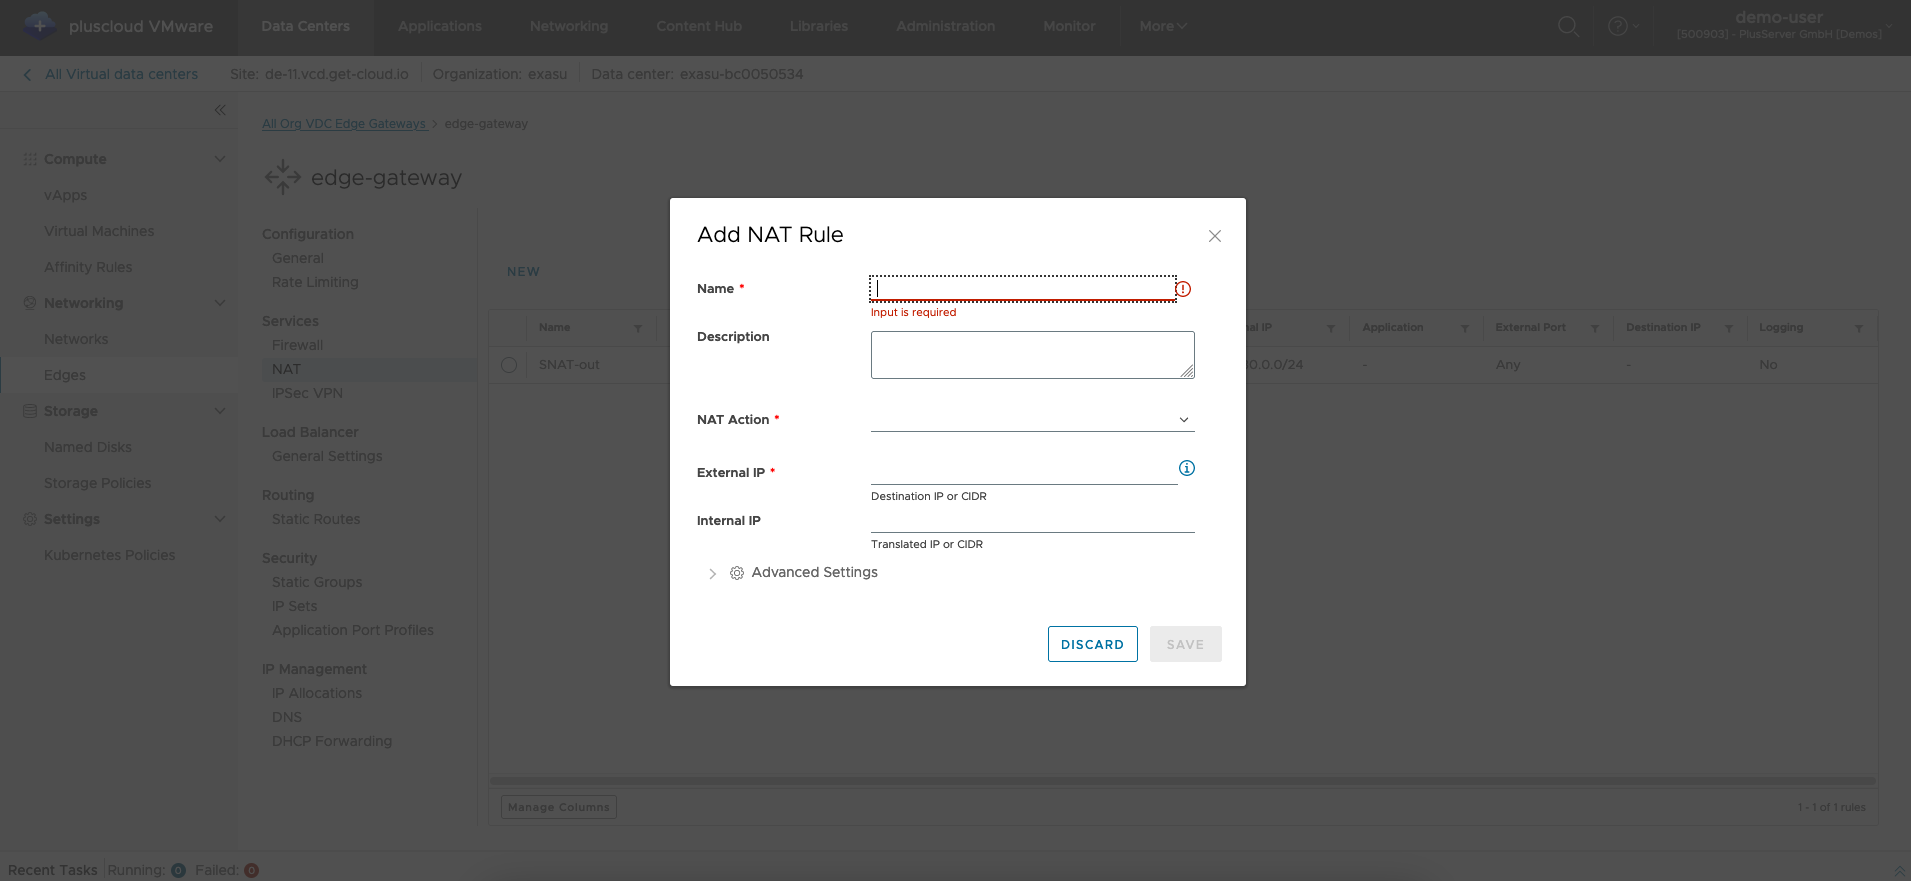
SNAT Parameterers
A SNAT rule represents a specification of how a source IP should be translated to a destination IP. The source IP is usually within the OrgVDC while the destination IP is usually outside the OrgVDC network.
You should usually use SNAT rules if you want to access Internet resources from within the OrgVDC.
You should configure the following parameters:
| Parameter | Description |
|---|---|
| Name | Freely definable name for the NAT rule to be created. |
| Description | Optional free text to store further information (e.g. purpose and use of the NAT rule). |
| Interface type | To create a SNAT rule, SNAT must be selected here. |
| External IP | Here you use one of the public IP addresses assigned to you. |
| External | The “external port” defines the port from the defined external IP address that is used to access the SNAT service. |
| Internal IP | This is the previously defined IP subnet that you use internally. |
| Application | An application profile is selected here. |
You can optionally configure the following parameters:
| Parameter | Description |
|---|---|
| State | If this switch is activated, the NAT is configured statefully. This makes it possible to receive the corresponding responses for outgoing TCP requests. |
| Logging | This option can be used to activate the logging of all traffic for this rule that is integrated in the edge gateway. You cannot view this logging yourself. We recommend that you leave this option disabled unless we instruct you to change your setting. |
| Priority | If an address has multiple NAT rules, the rule with the highest priority is applied. A lower value means a higher priority for that rule. |
| Firewall Matching | Specifies how the firewall determines an address match during NAT if the firewall phase is not skipped. Valid values are as follows: Internal Address Matching Specifies that the firewall is applied to the internal address of a NAT rule. For SNAT, the internal address is the original source address before NAT is performed; For DNAT, the internal address is the translated destination address after NAT is performed; External Address Matching Specifies that the firewall is applied to the external address of a NAT rule. For SNAT, the external address is the translated source address after NAT is performed. For DNAT, the external address is the original destination address before NAT is performed Bypass Firewall phase is skipped. |
| Internal IP | Here you use the public IP addresses or subnets assigned to you. |
| Application | here an application profile is selected which defines the ports. |
DNAT parameters
A DNAT rule represents a specification of how a source IP should be translated to a destination IP.
The source IP is usually outside the OrgVDC while the destination IP is usually within the OrgVDC network.
You should usually use DNAT rules if you want to access a resource within the OrgVDC from outside the OrgVDC.
You should configure the following parameters:
| Parameters | Description |
|---|---|
| Name | Freely definable name for the NAT rule to be created. |
| Description | Optional free text to store further information (e.g. purpose and use of the NAT rule). |
| Interface type | To create a DNAT rule, DNAT must be selected here. |
| External IP | Here you use one of the public IP addresses assigned to you. |
| External port | The “external port” defines the port from the defined external IP address that is used to access the DNAT service. |
| Internal IP | This is the previously defined IP subnet that you use internally. |
| Application | An application profile is selected here. |
You can optionally configure the following parameters:
| Parameter | Description |
|---|---|
| State | If this switch is activated, the NAT is configured statefully. This makes it possible to receive the corresponding responses for outgoing TCP requests. |
| Logging | This option enables edge gateway logging of all traffic related to this rule. You cannot override this logging. We recommend that you leave this option disabled unless we instruct you to change your setting. |
| Priority | If an address has multiple NAT rules, the rule with the highest priority is applied. A lower value means a higher priority for this rule. |
| Firewall Matching | Specifies how the firewall determines an address match during NAT if the firewall phase is not skipped. Valid values are as follows: Internal Address Matching Specifies that the firewall is applied to the internal address of a NAT rule. For SNAT, the internal address is the original source address before NAT is performed. For DNAT, the internal address is the translated destination address after NAT is performed; External Address Matching Specifies that the firewall is applied to the external address of a NAT rule. For SNAT, the external address is the translated source address after NAT is performed. For DNAT, the external address is the original destination address before NAT is performed Bypass Firewall phase is skipped. |
| Internal IP | Here you use the public IP addresses or subnets assigned to you. |
| Application | here an application profile is selected which specifies the ports. |
Gateway Firewall
The Edge Gateway also offers a firewall service that can restrict traffic between outside and inside an OrgVDC. This firewall cannot be used between network segments within an OrgVDC because this internal traffic is not routed through the service router where the firewall rules are evaluated.
Note
Priorities for firewall rules If an address has multiple firewall rules, the rule with the highest priority is applied. A lower value means a higher priority for this rule.Firewall view
You can select the firewall using the corresponding button in the side menu.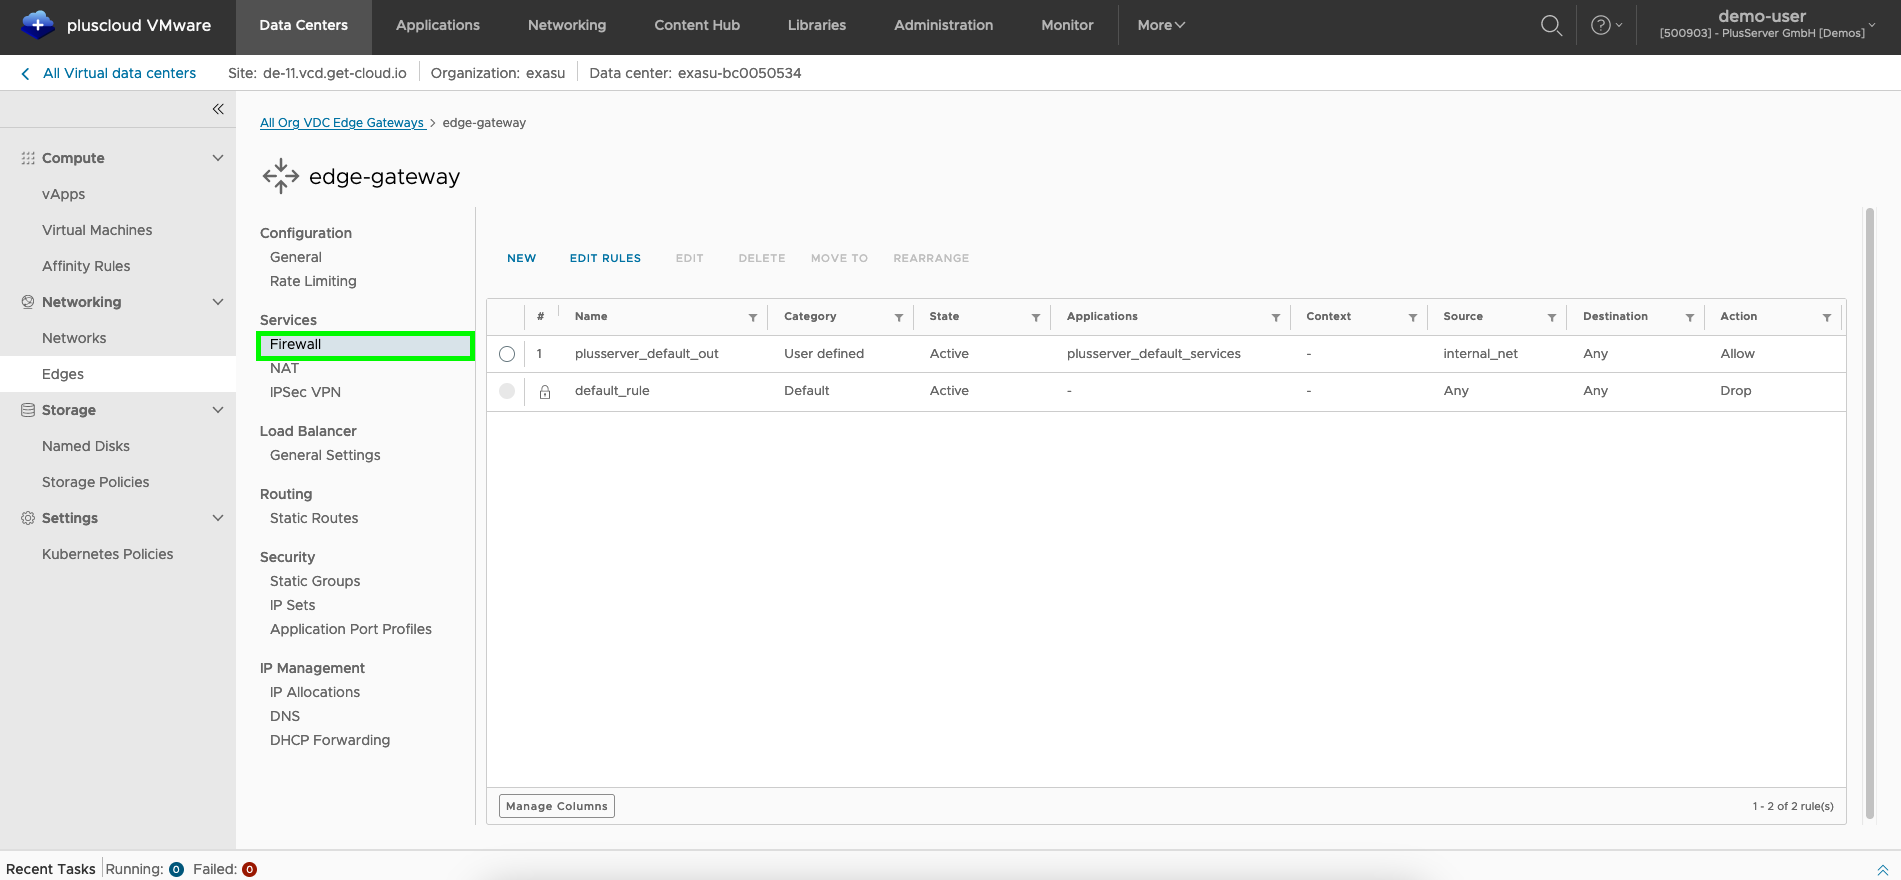
You can move the rules using the MOVE UP and MOVE DOWN buttons to determine the appropriate order.
Alternatively, you can also move the rules to a defined location using MOVE TO.
The firewall rules are processed from top to bottom and the first applicable rule is applied.
The last rule is always included and ensures that network communication is discarded unless it has been explicitly permitted by a previous rule.
Firewall Rules
You can edit the firewall rules by clicking on theEdit Rules button.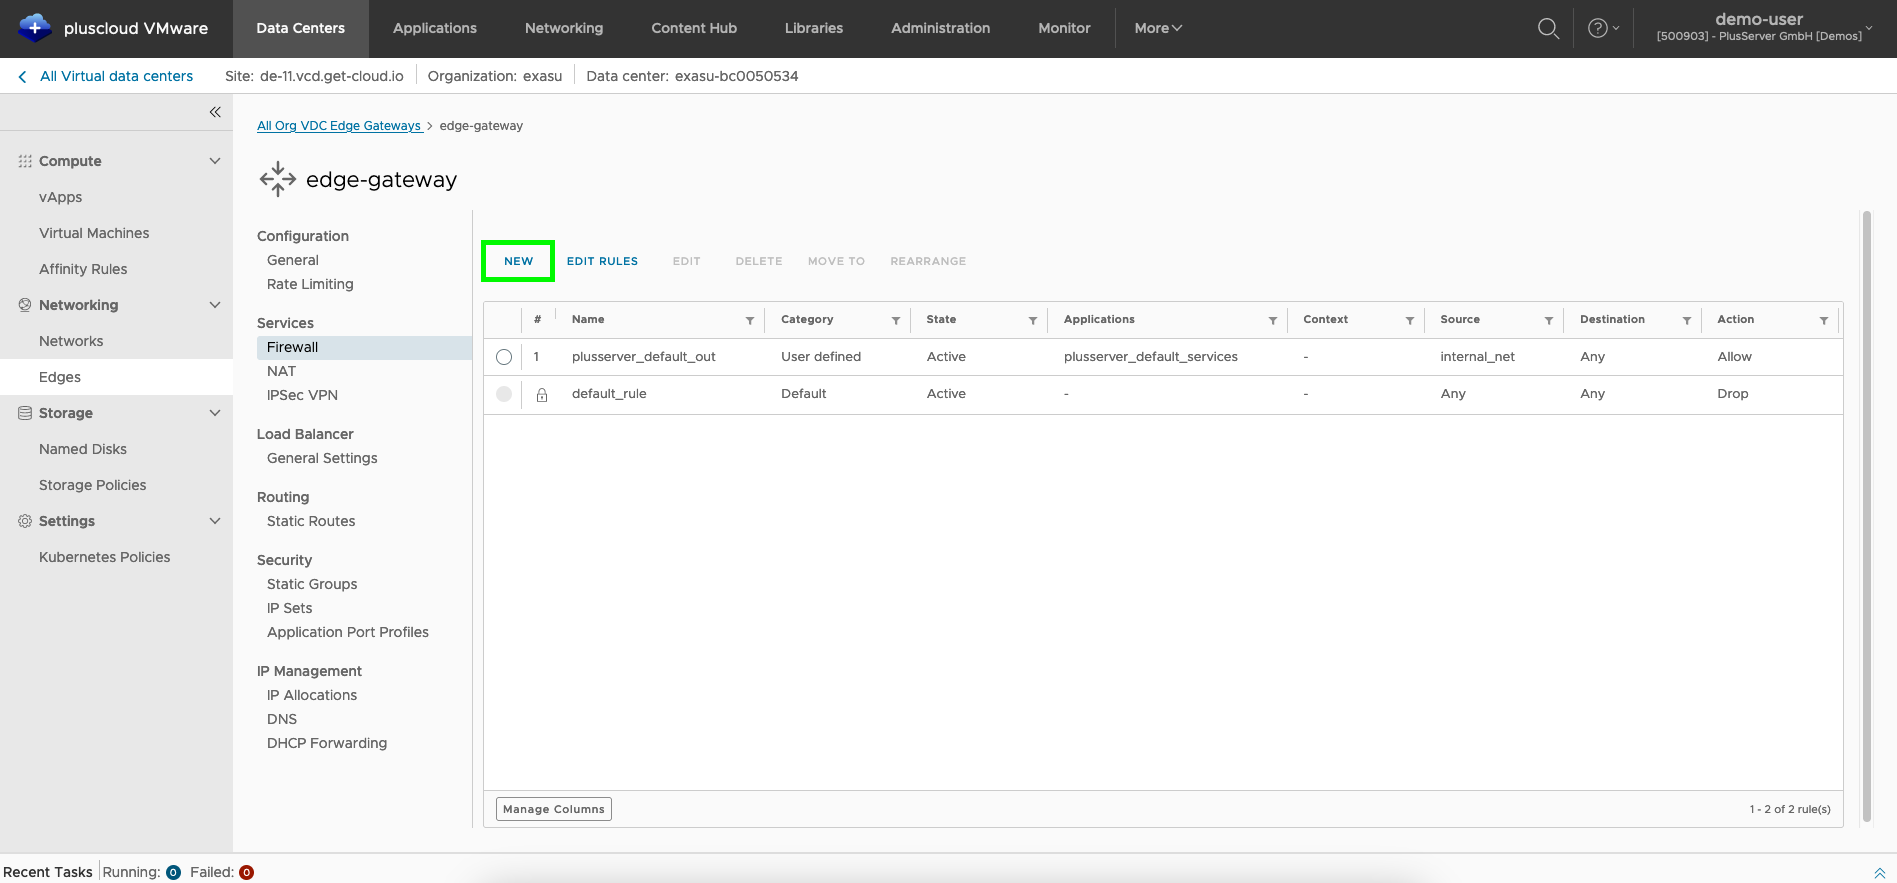
Create firewall rules
Here you can create new rules with NEW ABOVE, which creates a new rule at the top of the list,
or by selecting an existing rule and then selecting NEW ABOVE, which creates a new rule above the selected one.
You should configure the following parameters:
| Parameter | Description |
|---|---|
| Name | Freely selectable name for the rule |
| Category | Type of rule (not editable) |
| State | Defines whether the rule is active or inactive. Inactive rules are ignored. |
| Application | Selection of which application profile should be applied (collection of ports for an application) |
| Source | Origin of data communication (example: DNAT - any source / SNAT - internal network) |
| Destination | Recipient of the data communication (example: DNAT - internal network / SNAT - any line) |
| Action | Determines whether the data communication is permitted, rejected or rejected with the corresponding information |
| Protocol | Selection of the communication protocol used for the rule |
| Logging | This option can be used to activate the logging of all traffic for this rule integrated in the edge gateway. |
Click Save to accept the configured rules.
Note
PSMANAGED rules
Please make sure to leave the PSMANAGED rules (plusserver_default_out) in place.
These have a direct influence on the booked services.
If these do not exist, the management/function on the part of plusserver will be restricted.
Load balancer
The load balancer is an additional option that is subject to a fee.
This guide therefore does not cover load balancing.
IPSec VPN
An Edge Gateway offers limited options for setting up a VPN with IPSec.
This is not required for all setups and is therefore not described further in this guide.
Virtual workloads
Virtual workloads are virtual machines (VMs) that you can optionally group using so-called virtual applications (vApps).
vApps
vApps are used to group logically related virtual machines. For example, if you have a web application that consists of a web server VM, an application server VM and a database VM, it is a good idea to combine these three VMs together in a vApp.
vApps view
You can view the existing vApps and create new ones using the vApp menu item.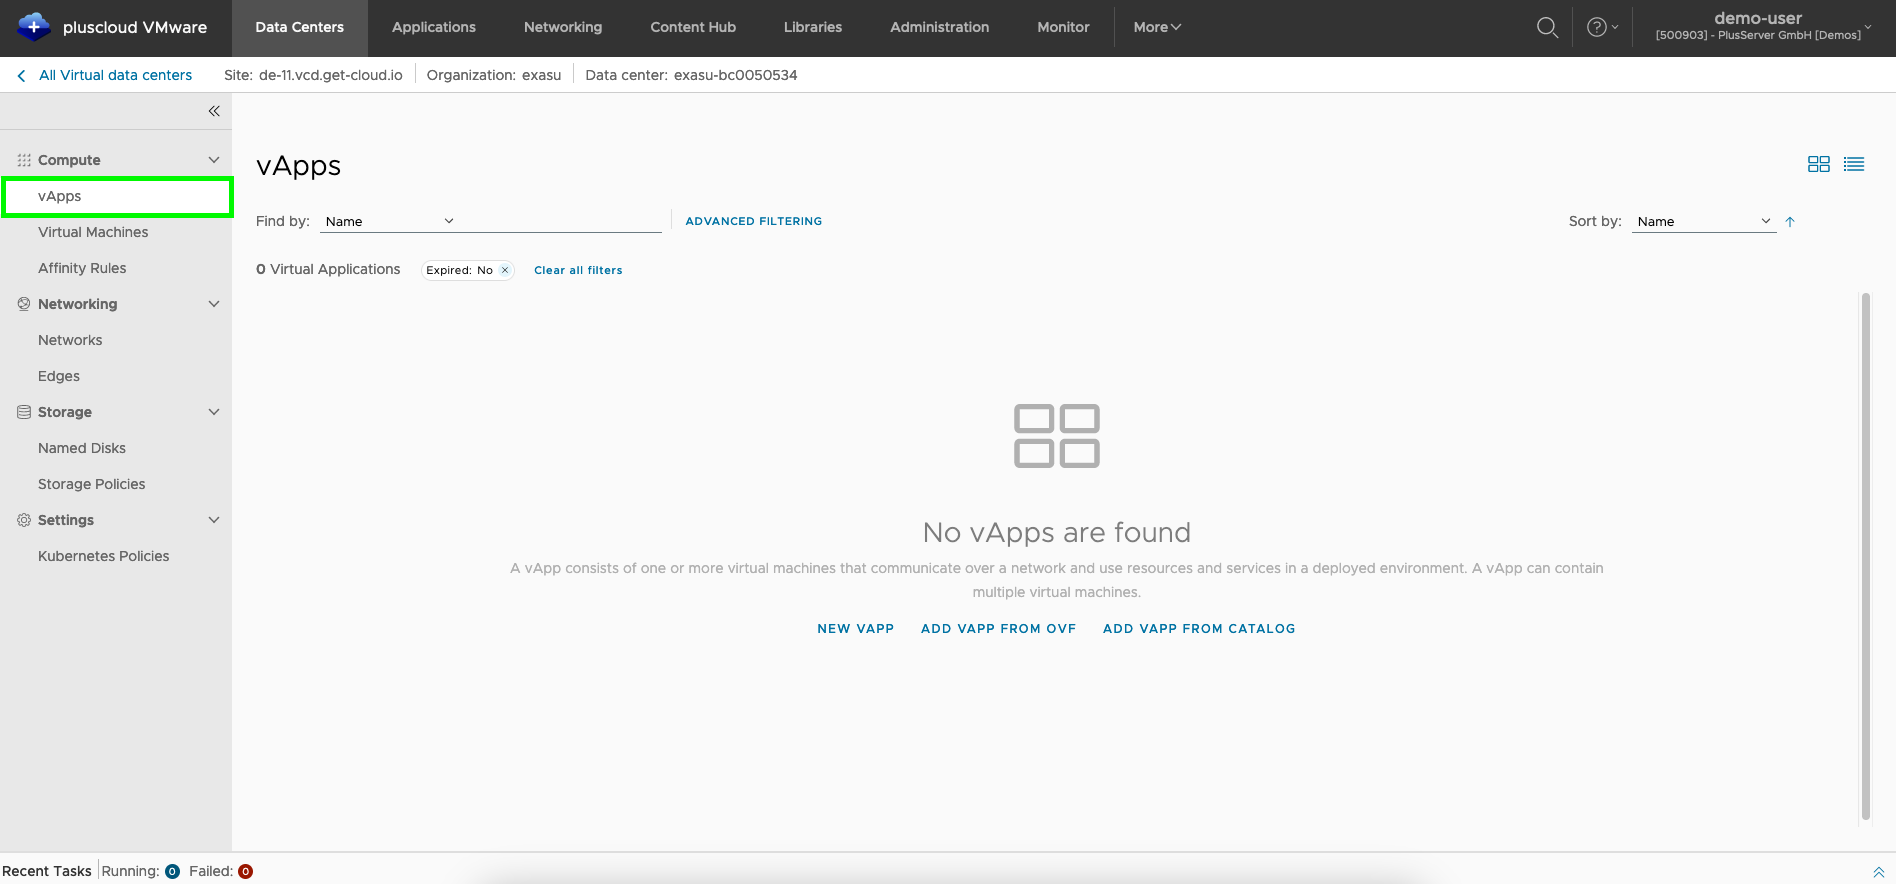
Create vApps
Creation is done using the New vApp or Add vApp from an OVF file button. The former adds an empty vApp for a standard deployment. The latter adds a preconfigured environment from an OVF container file.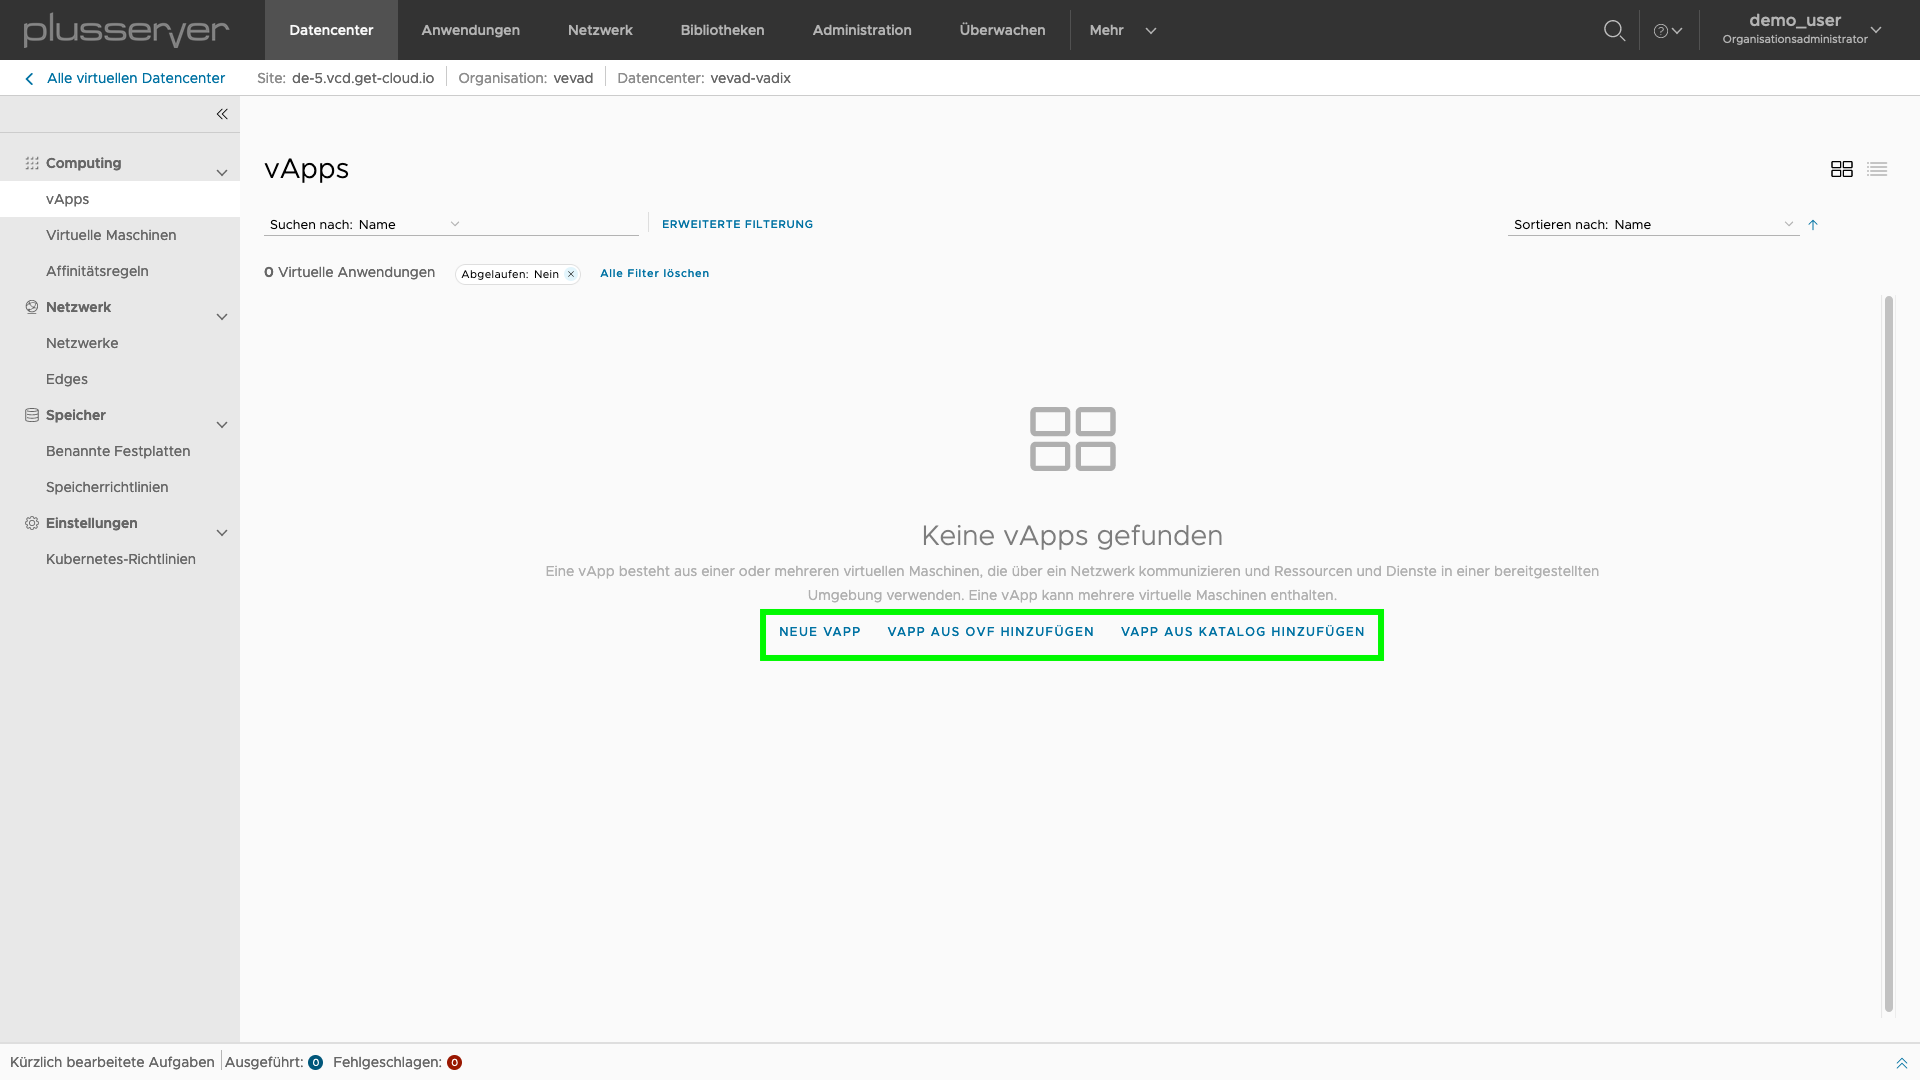
When creating a vApp, only the name is mandatory.
In the example, a vApp with the name test is created.
Everything else can be done afterwards or at the VM level.
Add vApp Network
In the vApp overview, you can add a network using the Actions menu item.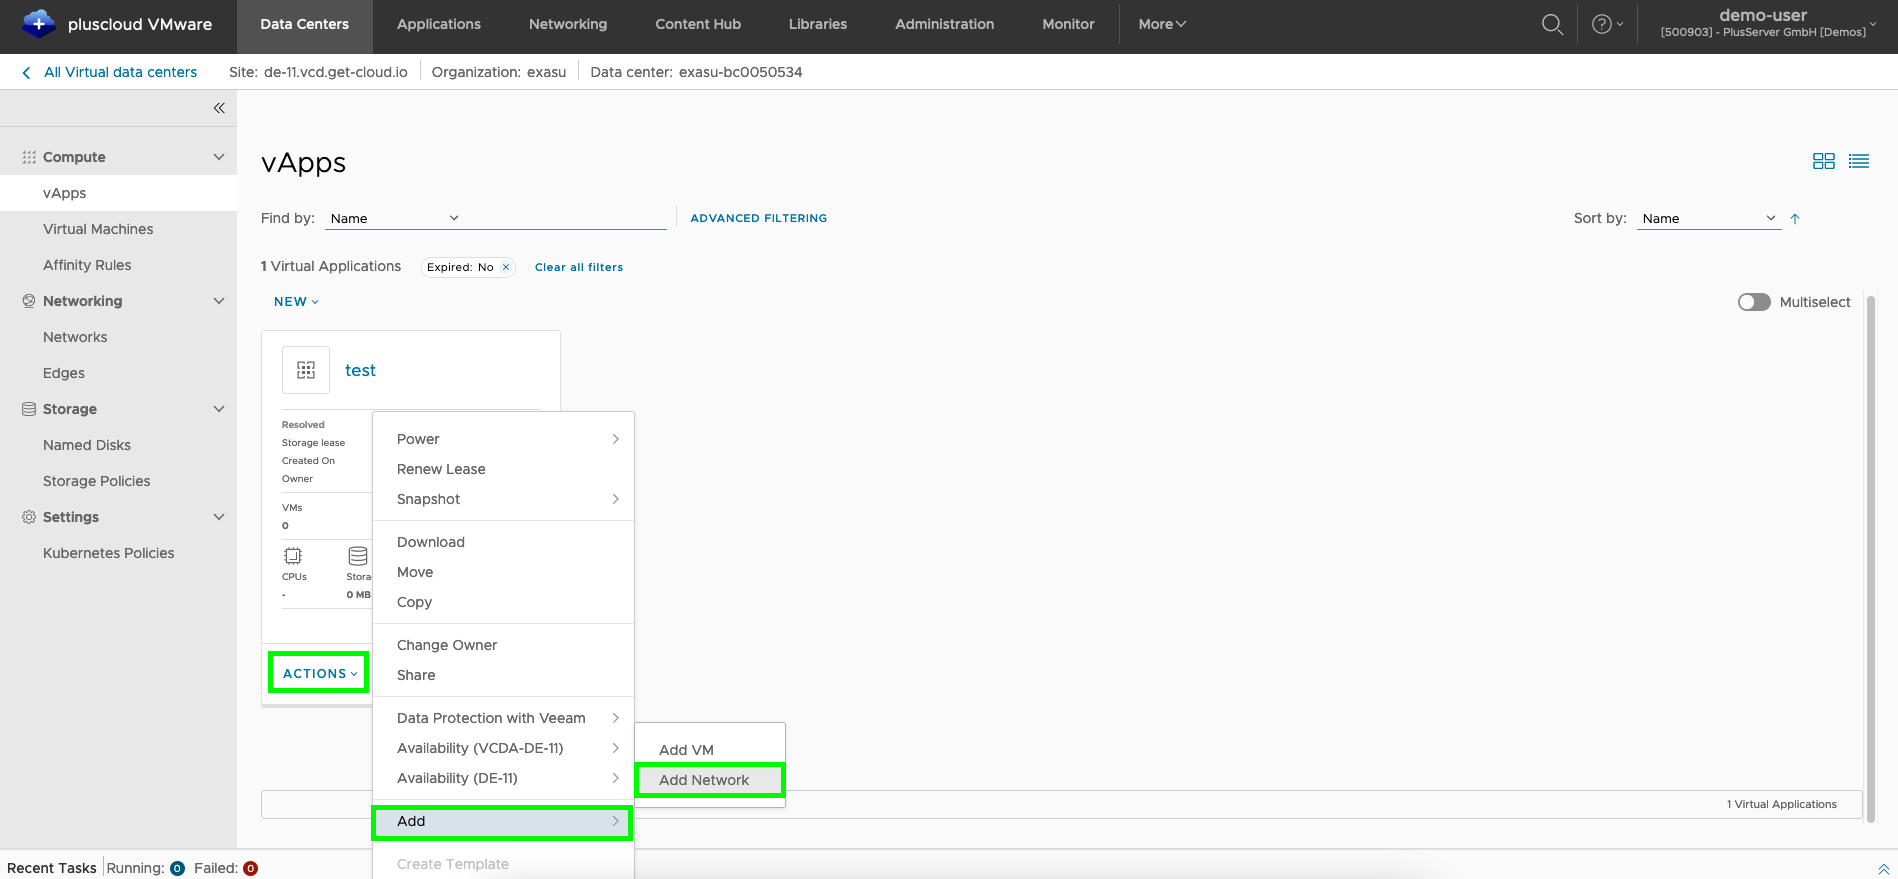
Virtual machines
In virtualization, one or more virtual IT systems are run on physical IT systems using a hypervisor.
The hypervisor uses software to provide the VM with virtual hardware that is encapsulated for this system and isolated from other VMs, and which the VM can use like regular hardware from your perspective.
Virtual machines can be created in two ways.
Create VM in vApp
On the one hand, you can select the menu itemActions in the vApp created in the previous step and then use Add VM.
Optionally, an expiration date for the vApp can be set under Extend Lease, at which point the vApp should be stopped.
By default, vApps do not expire.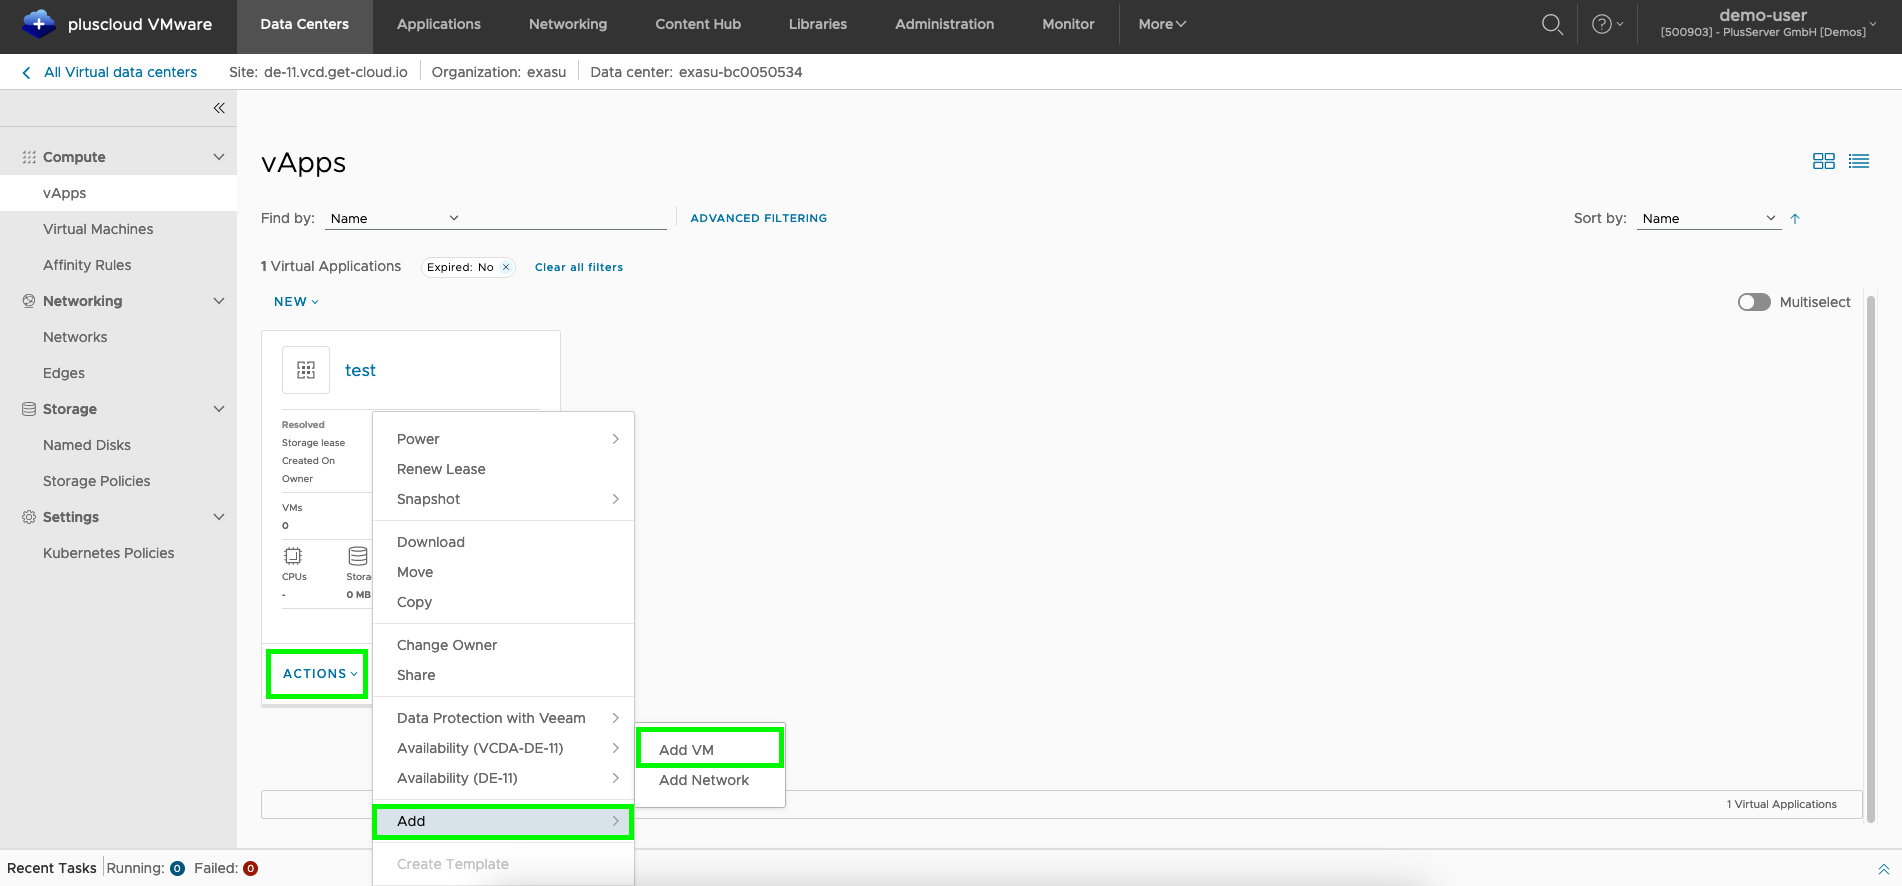
Create VM outside of a vApp
On the other hand, you can select the menu itemVirtual Machines in the sidebar.
Here you can view the existing VMs and create more using the New VM button.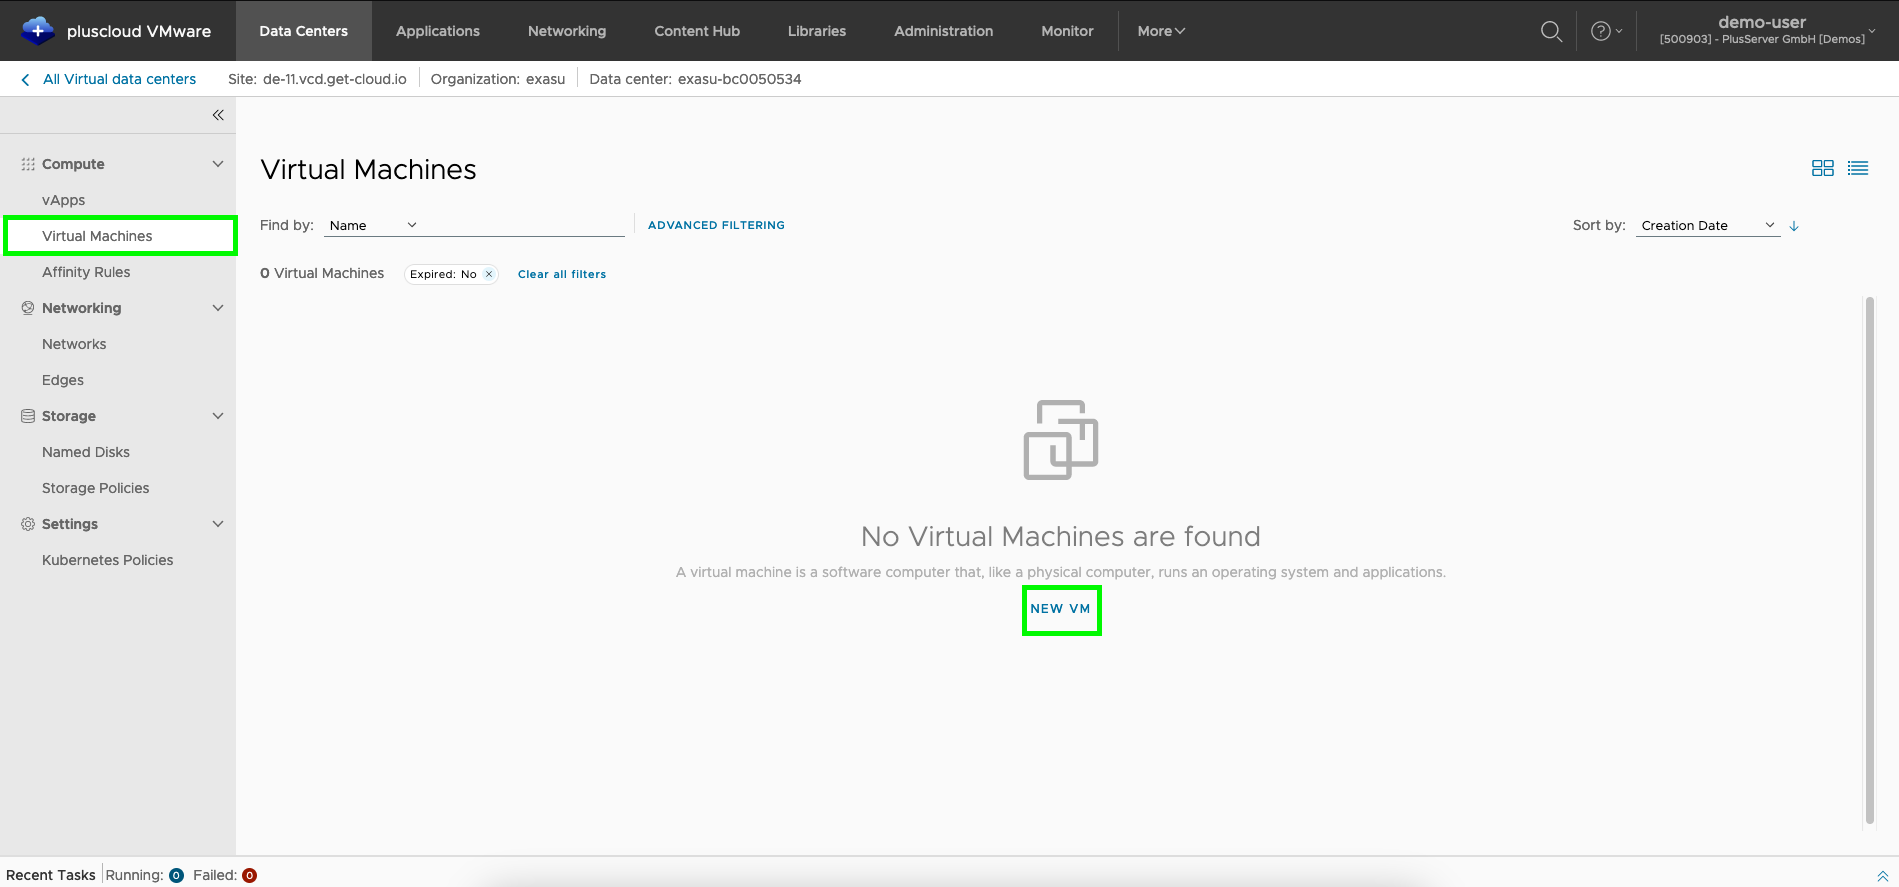
Create VM form
In both cases, you will see the same dialog for creating a new VM.
When creating virtual machines, you can basically choose between two alternatives:
- Creation from a template (template = connection of template with operating system, resources and configuration)
- Creation of a new VM
VMs that are created directly via the vApp are also logically assigned to it directly.
VMs that are created via the Virtual Machines menu item are not initially assigned to a vApp.
However, they can be assigned to a vApp later via Actions and Move to....
If you want to adjust the VM’s resources before switching it on, please deactivate the Switch on checkbox.
You will not find the checkbox in the vApp dialog. The VM takes on the power status of the vApp here.
To get the checkbox, you must choose the path described above via Virtual Machines → New VM.
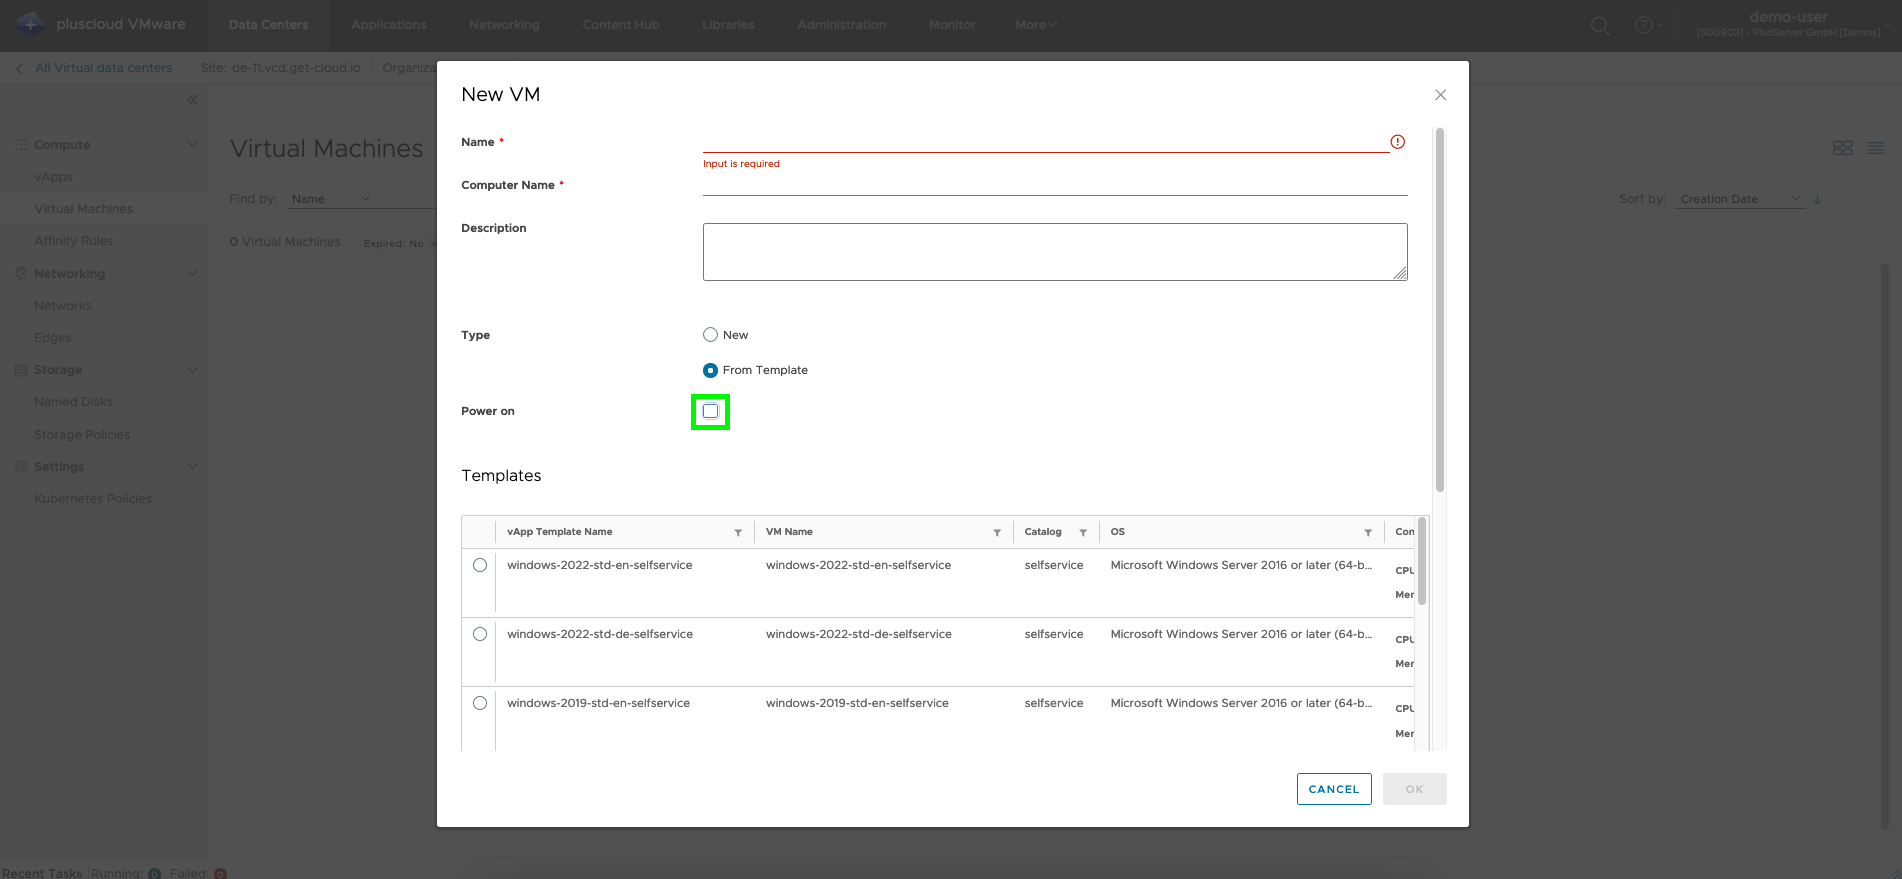
The relevant parameters vary depending on the selection.
Scroll down if necessary to see all the options.
Create VM from template
Templates for VMs, also called VM templates, are used to accelerate and repeat the provision of VMs.
A VM template bundles vCPU, vRAM and vDisk resources with a pre-installed operating system.
This saves you from having to carry out the entire installation yourself.
This is therefore the default setting for new VMs.
When instantiating a VM template, the configurations and the hard disk(s) of the template are copied and can be adjusted.
Changes made to the template after instantiation are not applied to the VM.
VM templates prepared by plusserver can be found in the selfservice catalog.
You are responsible for updating, patching and configuring these VM templates.
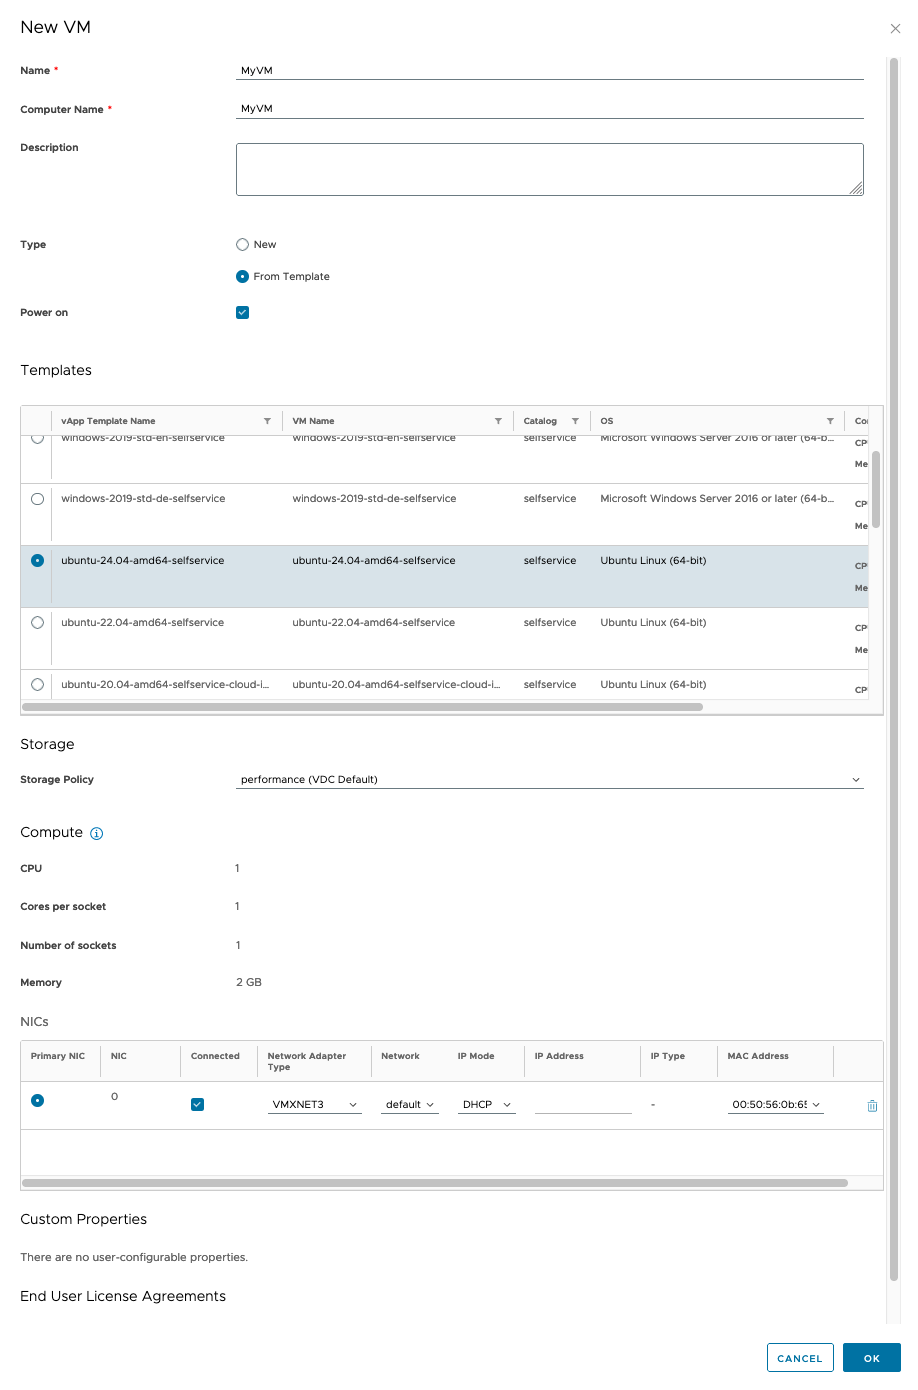
You can configure the following parameters for VMs that are created from a template.
| Parameters | Description |
|---|---|
| Name | Name of the VM |
| Computer name | Host name of the computer |
| Description | Free text field for a short description of the VM |
| Type | New for a new VM or From template to build on a VM template. |
| Power on | Status of the VM after creation. If enabled, the VM will start automatically after creation. |
| Templates | List of templates from the catalog |
| Use custom storage policy | Allows you to override the performance class that the VM’s virtual disk template uses |
| Storage policy to use | Specifies the performance class of the VM storage. |
| Network adapter | Set up connectivity to an existing network and decide whether the IP is assigned via DHCP or manually. You can add network adapters later using the hardware details |
Create VM from start image
You can also create a completely new VM from a start image. The start image is an installation medium, comparable to a virtual installation DVD. Here you can flexibly install any compatible operating system, but you are also completely responsible for checking compatibility, selecting and installing the right drivers and making the correct settings.
We recommend that you only choose this installation method if your usage scenario is not possible with the templates provided.
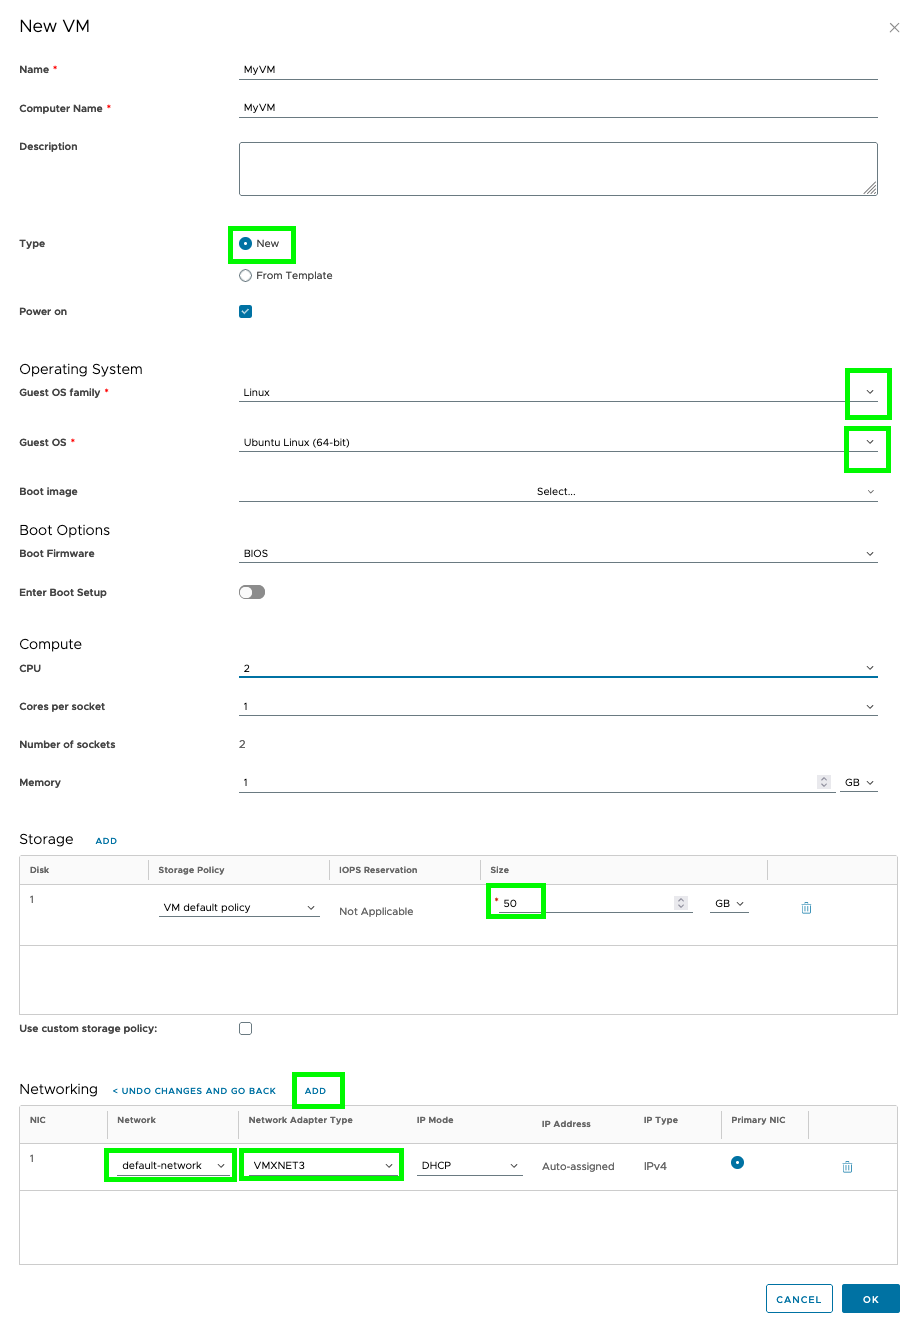
Here there are significantly more setting options even before creation. You can configure the following parameters for new VMs.
| Parameter | Description |
|---|---|
| Name | Name of the VM |
| Computer name | Host name of the computer |
| Description | Free text field for a short description of the VM |
| Type | New for a new VM or From template to build on a VM template. |
| Power on | Status of the VM after creation. If activated, the VM is started automatically after creation. |
| Operating system family | Basic distinction whether Linux, Microsoft Windows or others |
| Operating system | Detailed selection of distribution and version, e.g. Debian 9 64bit |
| Start image | Selection of the start image |
| Size (memory) | Predefined or user-defined selection of the VM size (number of virtual CPUs, cores per CPU, RAM) |
| Storage | Number and size of attached hard drives, selection of storage policy |
| Network adapter | Screenshot of establishing connectivity to the existing network, specifying the network card type (preferably VMXNET3) and deciding whether the IP is assigned via DHCP or manually; adding additional network adapters |
The set sizes for RAM and CPU can be adjusted at any time afterwards using the Edit button. The size of a data storage device (memory) can only be increased afterwards, not reduced. Depending on the configuration and operating system, this usually requires temporarily switching off the VM.
VM guest login
To successfully log in to a VM, you need the correct access data. If you installed the VM from a boot image, you should have created the corresponding access data during the installation. For the templates in the selfservice catalog, the standard of the respective operating system is used as the administration user. For Windows, this is Administrator and for Linux, usually root.
VM Details
The information about the VM can be called up in the detailed view of the VM. The quickest way to access the detailed view of a VM from the VM overview page is to click on theDetails button.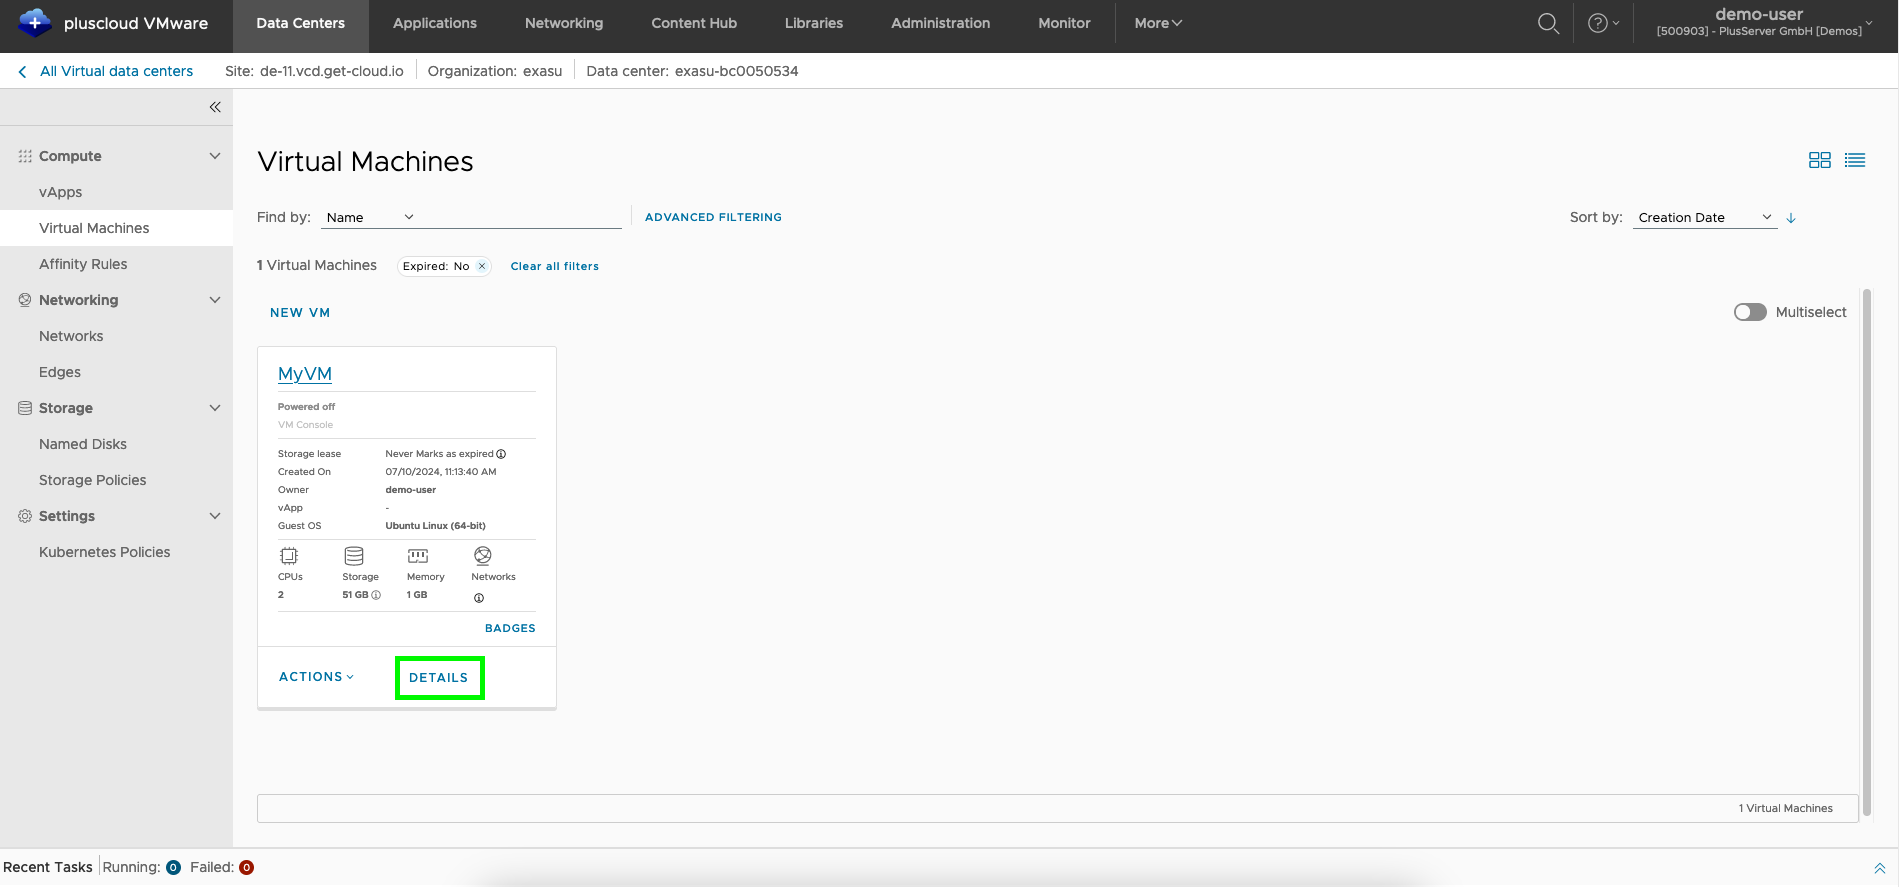
VM guest operating system customization
The initial user password is generated by VMware as part of the guest operating system customization and can be found underVirtual Machines → Details → Guest operating system customization → Edit.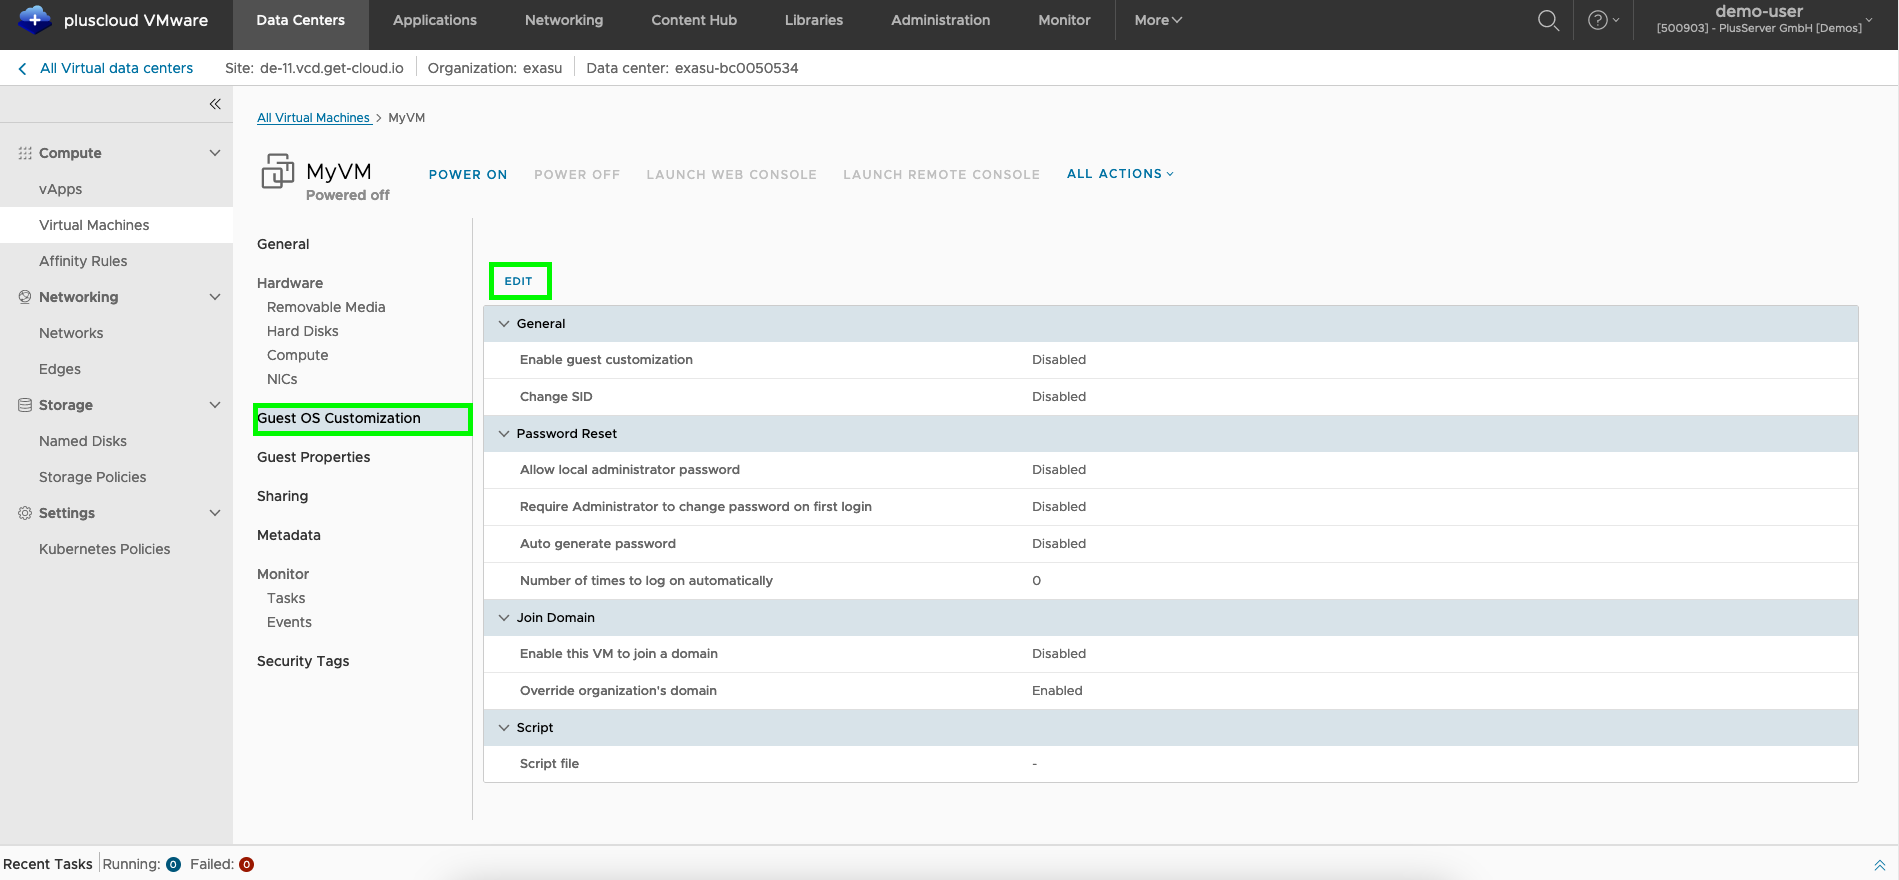
Change VM password
To change the password, the VM must be shut down and the check mark next to “Generate password automatically” must be removed. You can then enter any password.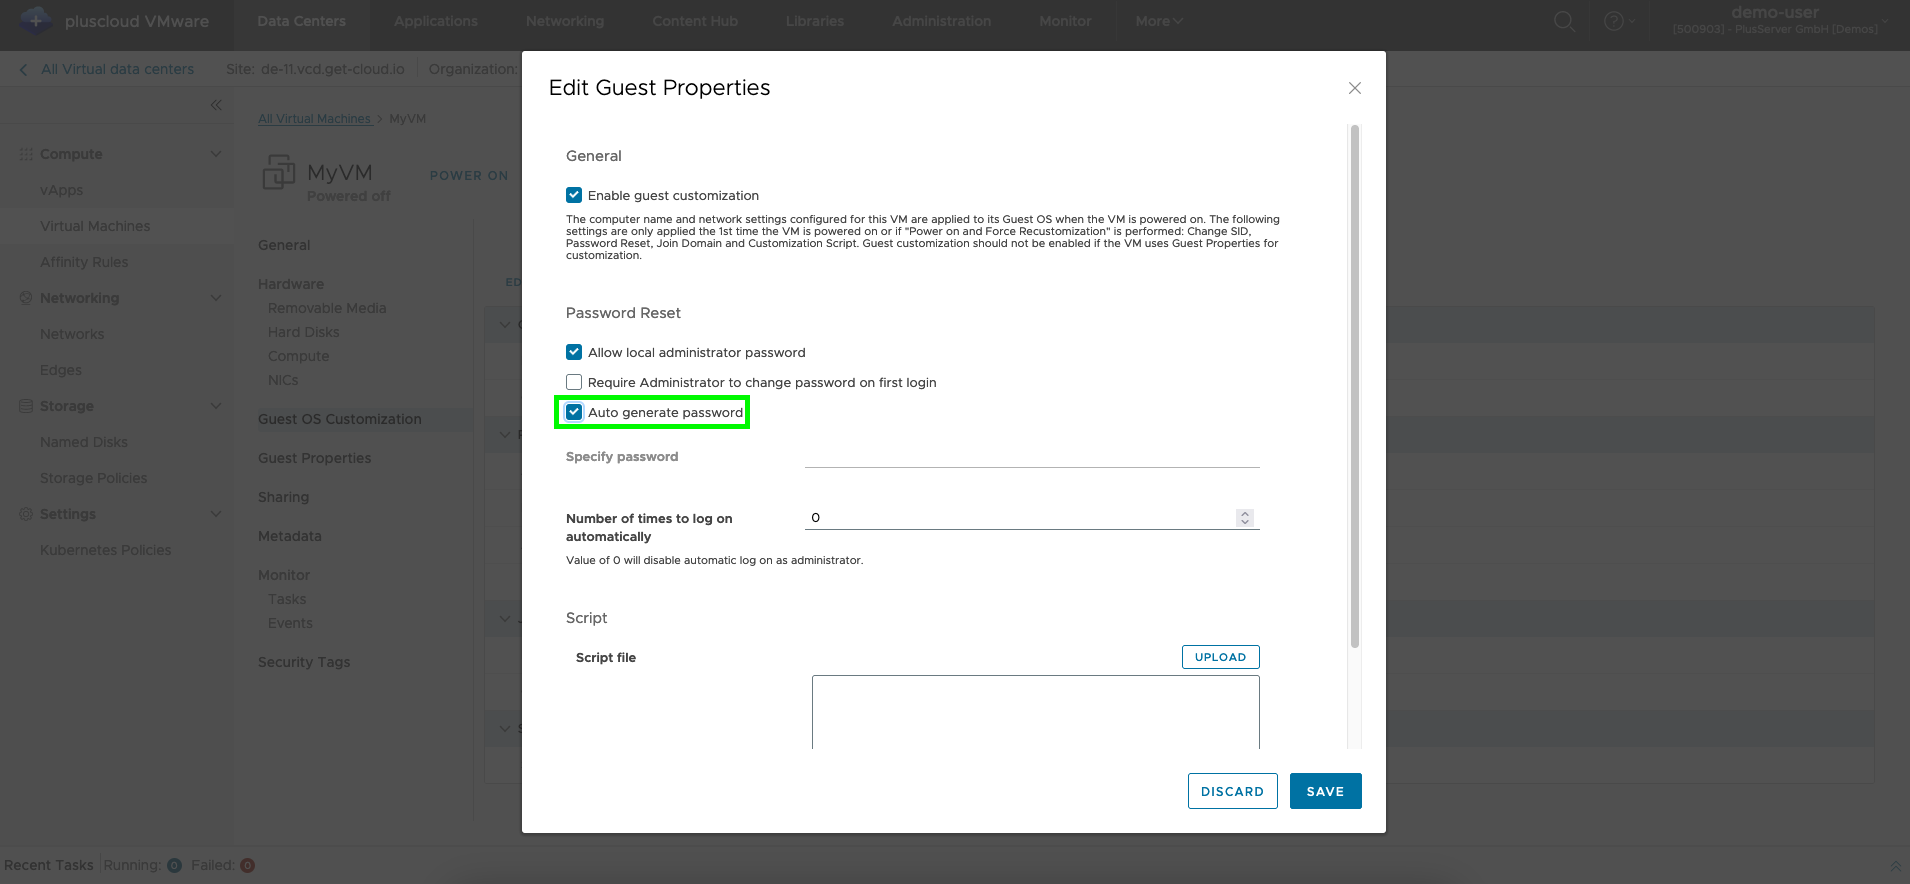
Change VM Password
In order for the password to be set permanently, the VM must be switched on using the actionSwitch on, force new adjustments.
It is important that the VM is switched off beforehand. Shutting down the vApp is not enough.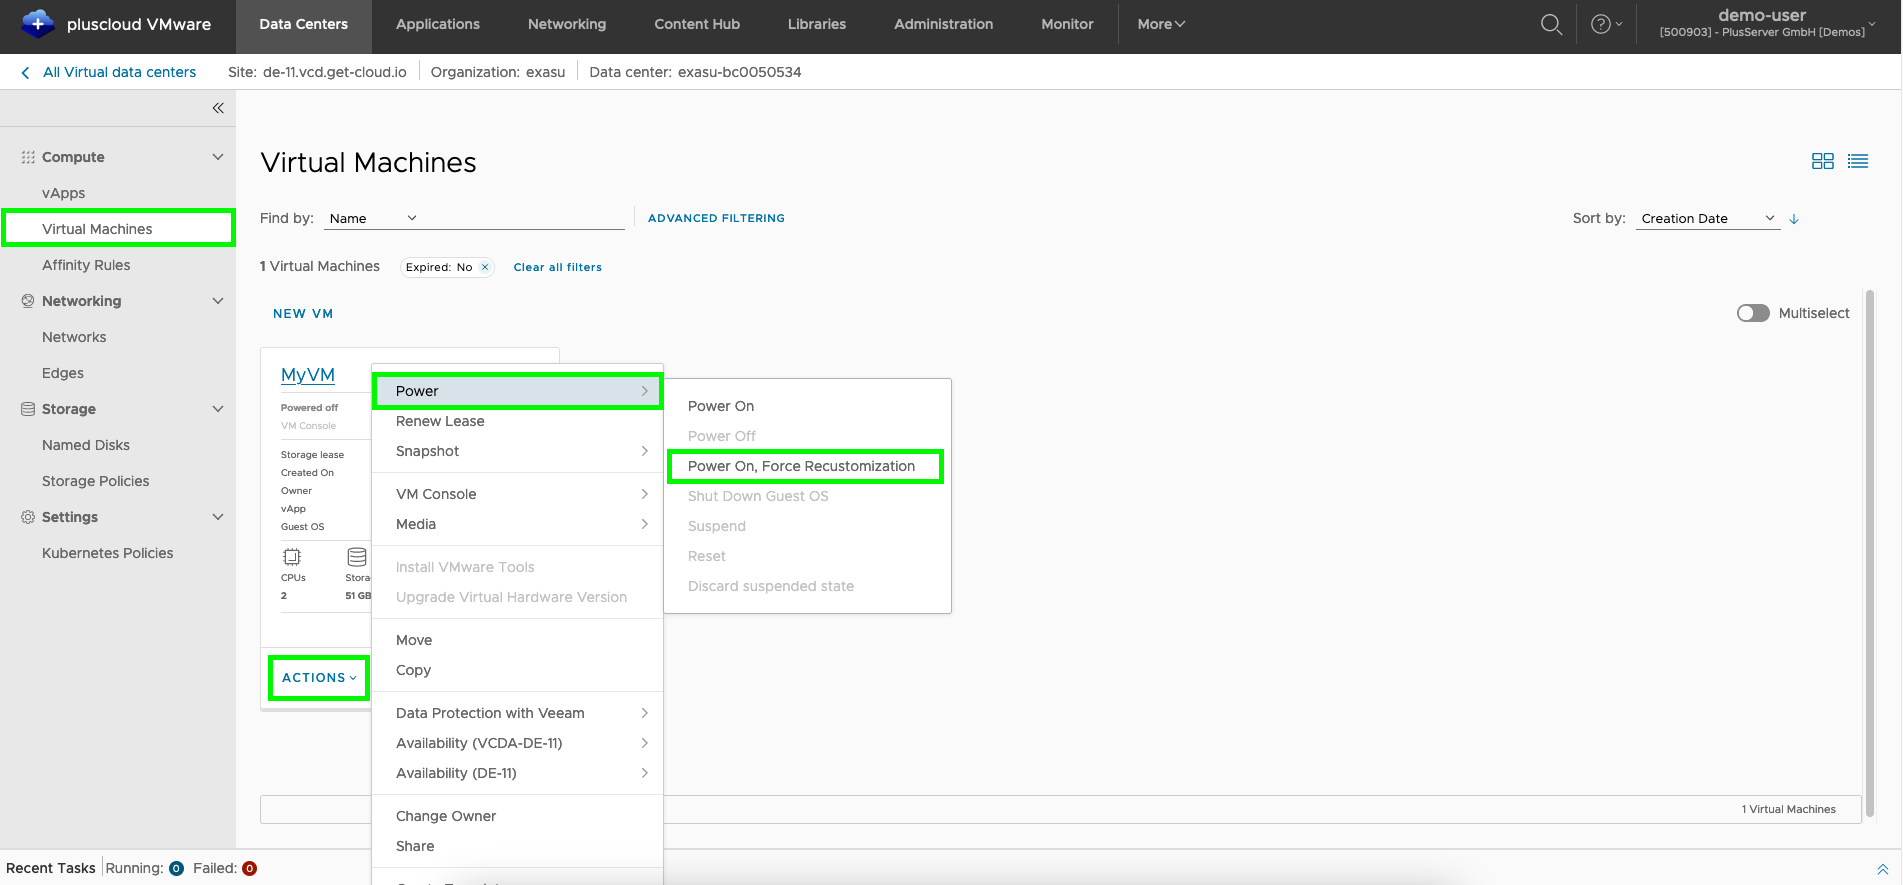
VM network connection
VM Details
The information about the VM can be called up in the detailed view of the VM. The quickest way to access the detailed view of a VM from the VM overview page is to click on theDetails button.
VM network adapter overview
The information about the VM can be called up in the detailed view of the VM. The quickest way to access the detailed view of a VM from the VM overview page is to click on theDetails button.
The network connection can be established later in the virtual machine via Details → Hardware → Network adapter.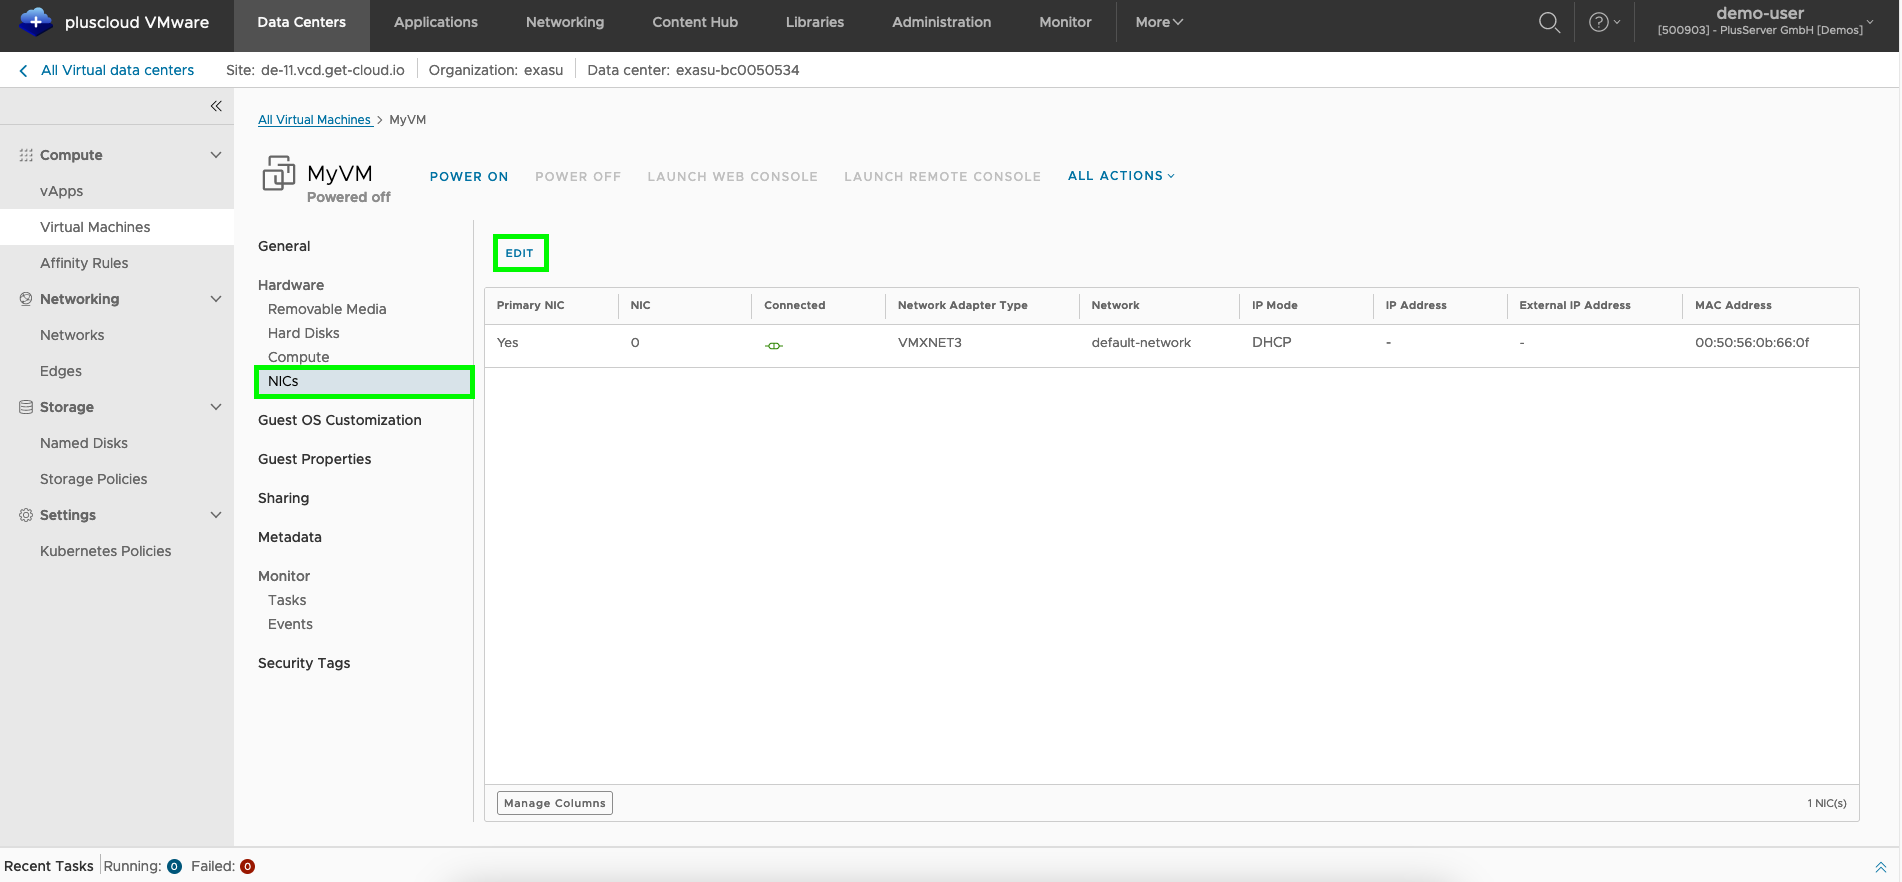
VM network adapter editing
Under Network adapter and Add, a new virtual network interface is assigned to the VM, which in turn can be assigned to an existing network. An IP can be assigned via DHCP or manually.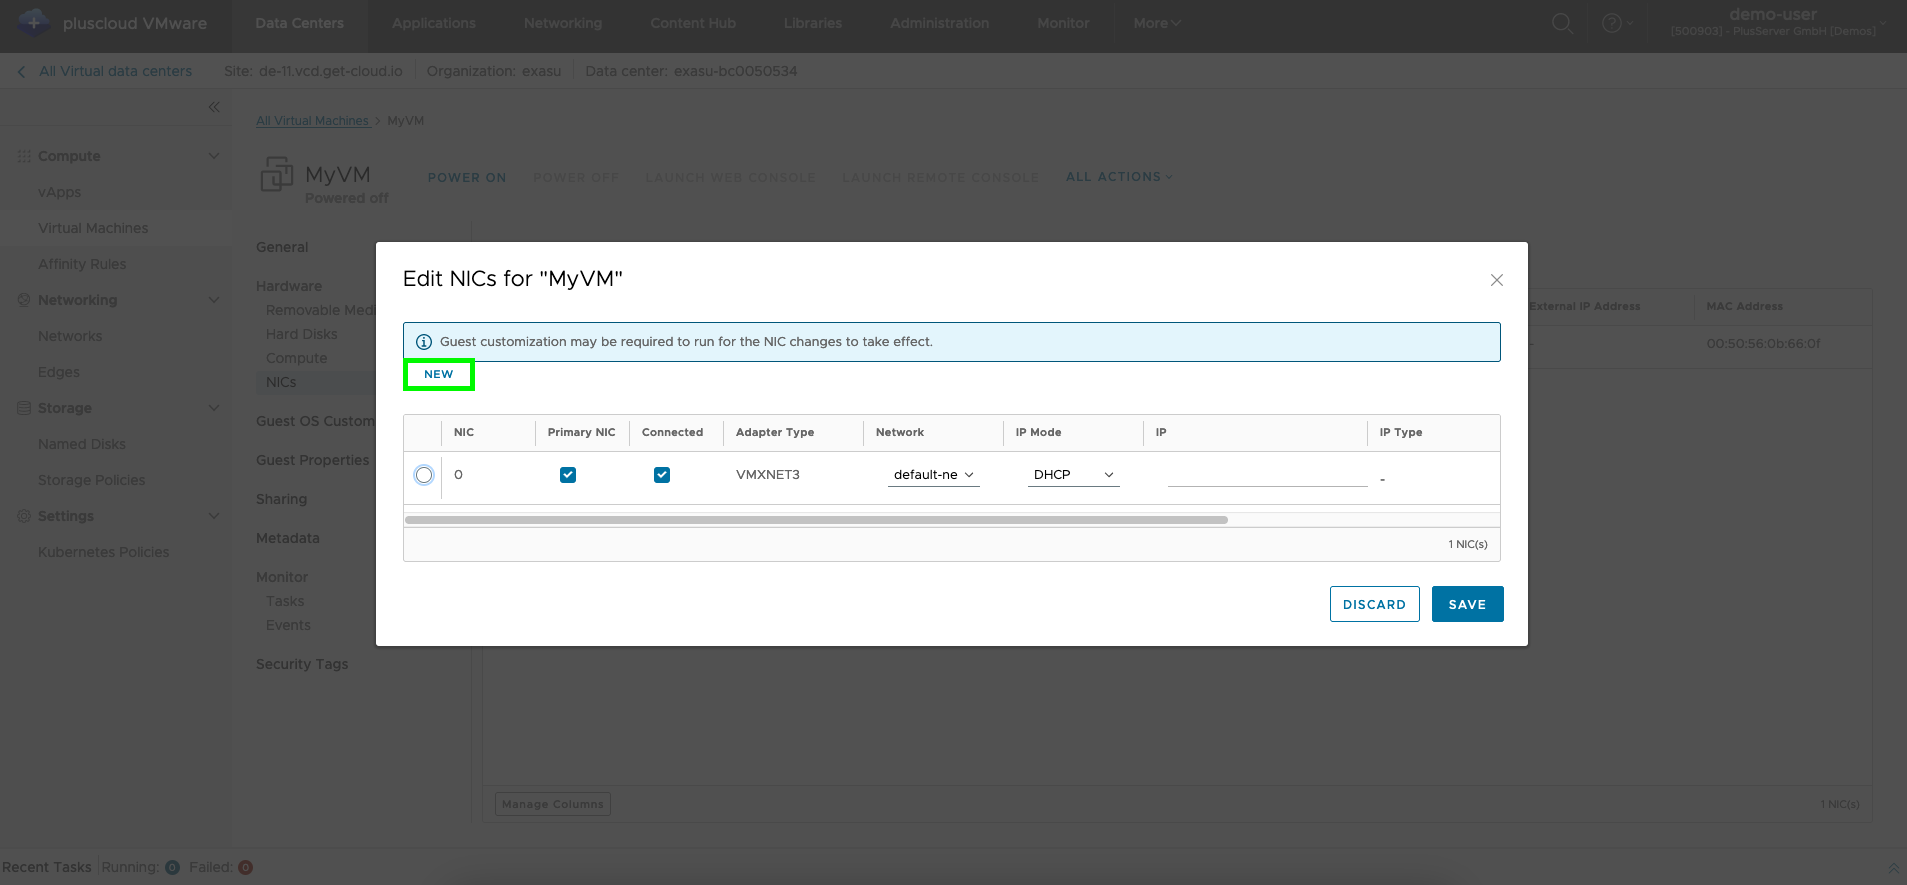
VM hard disks
The hard disks of a VM are used for data persistence. Each VM should have at least one hard disk configured that contains the operating system. We recommend creating one disk for the operating system and another disk for application data. This will separate the data between the technical data and the application data. This reduces the risk that the correct functioning and maintainability of the operating system will be affected due to an unexpectedly high volume of application data. You can also use different storage policies for the respective disks, which generally allows you to achieve a better balance between costs and performance.
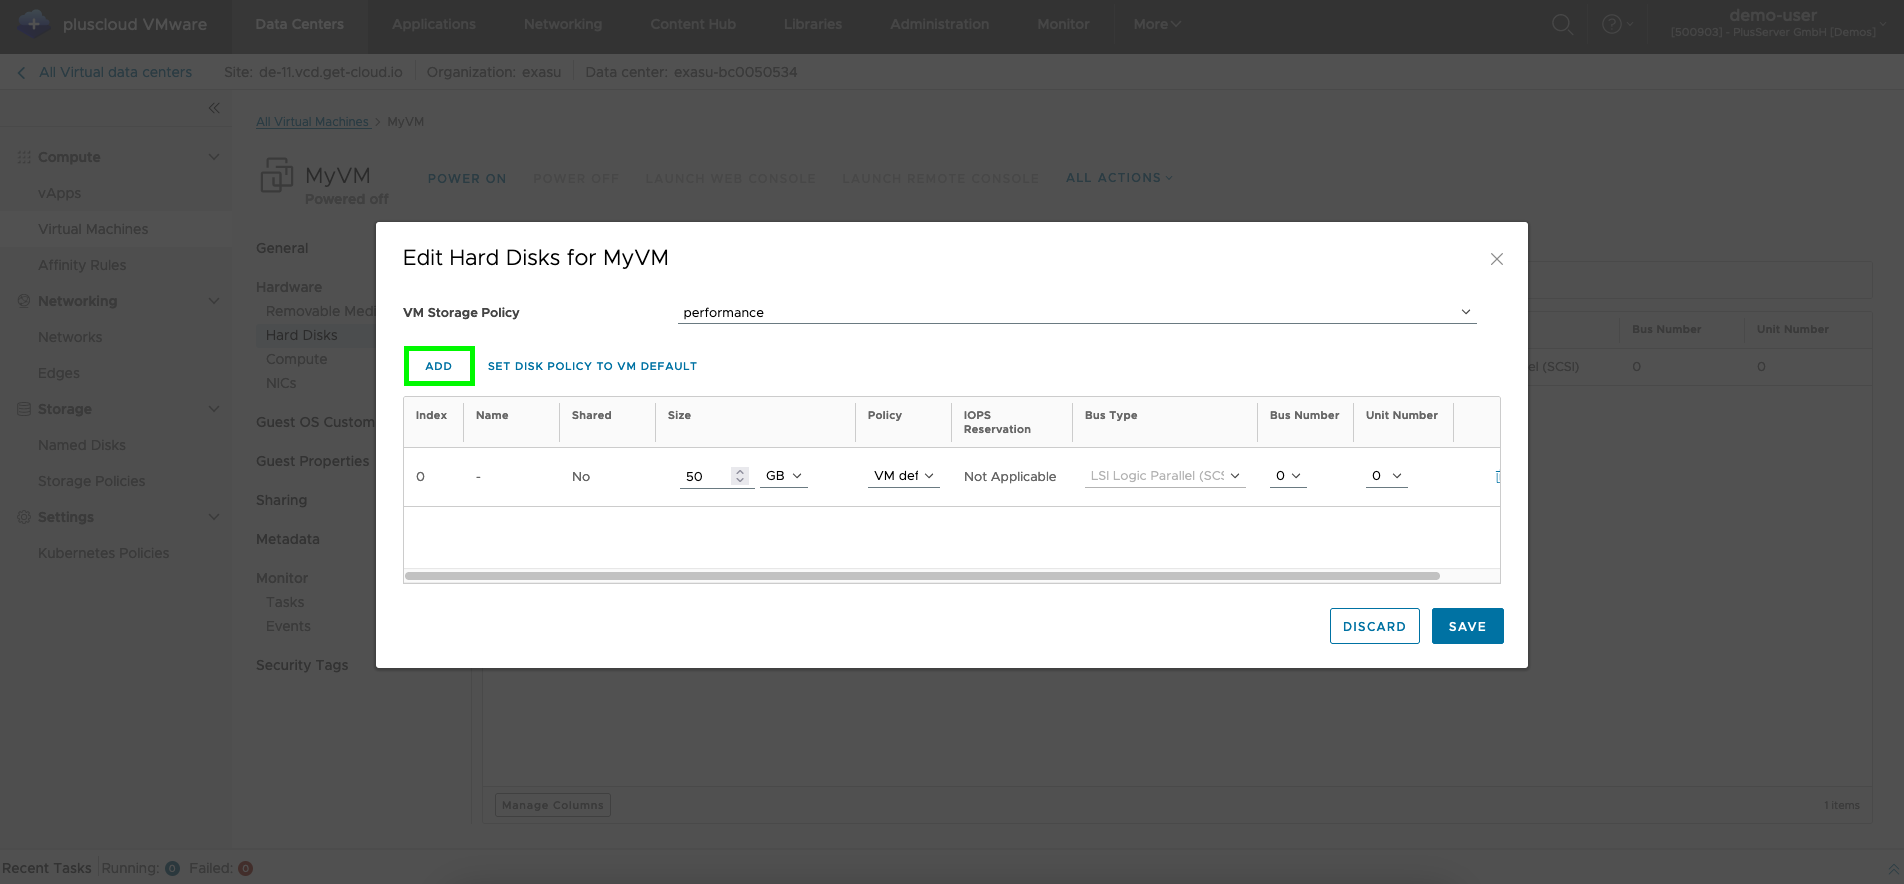
VM hard disks
In the details of a VM in the hardware area, you can assign additional hard disks to it using Add.
When creating/editing hard disks, make sure you use the correct desired unit: MB or GB.
Up to 15 virtual hard disks can be configured per VM. Each of the disks can be up to 8 TB in size.
The disks can be distributed across up to 4 virtual storage controllers, with each storage controller having its own bus.
Each unit number can only be assigned once per bus.
The combination of unit number and bus number must be unique for each hard disk in the VM.
The changes must be confirmed by clicking on Save.
Affinity rules
With affinity rules you can configure preferences or hard dependencies regarding the placement of VMs on the underlying hardware.
Affinity and anti-affinity rules
Under the menu item Affinity rules you will find an overview of all existing affinity rules. Affinity rules and anti-affinity rules can be created under the itemNew.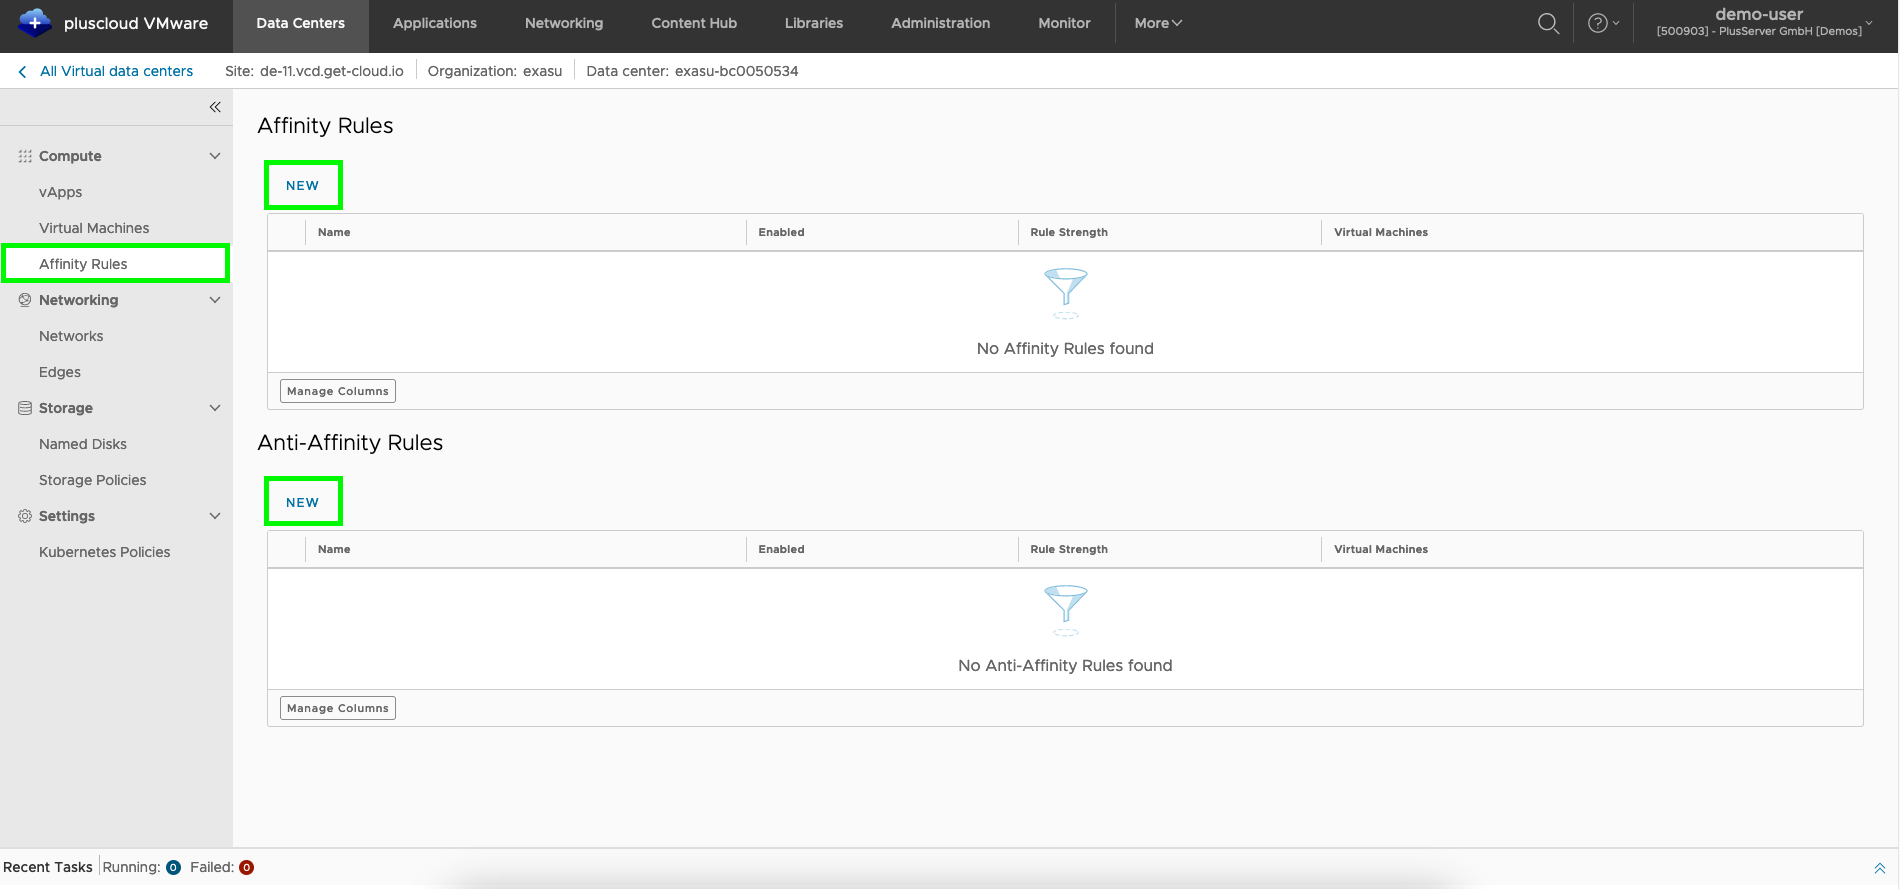
Create affinity rule
With an affinity rule, you specify that a selection of VMs should or must be placed together on the same physical hardware.
This can, for example, help to minimize network latency between two VMs or increase data throughput between the VMs.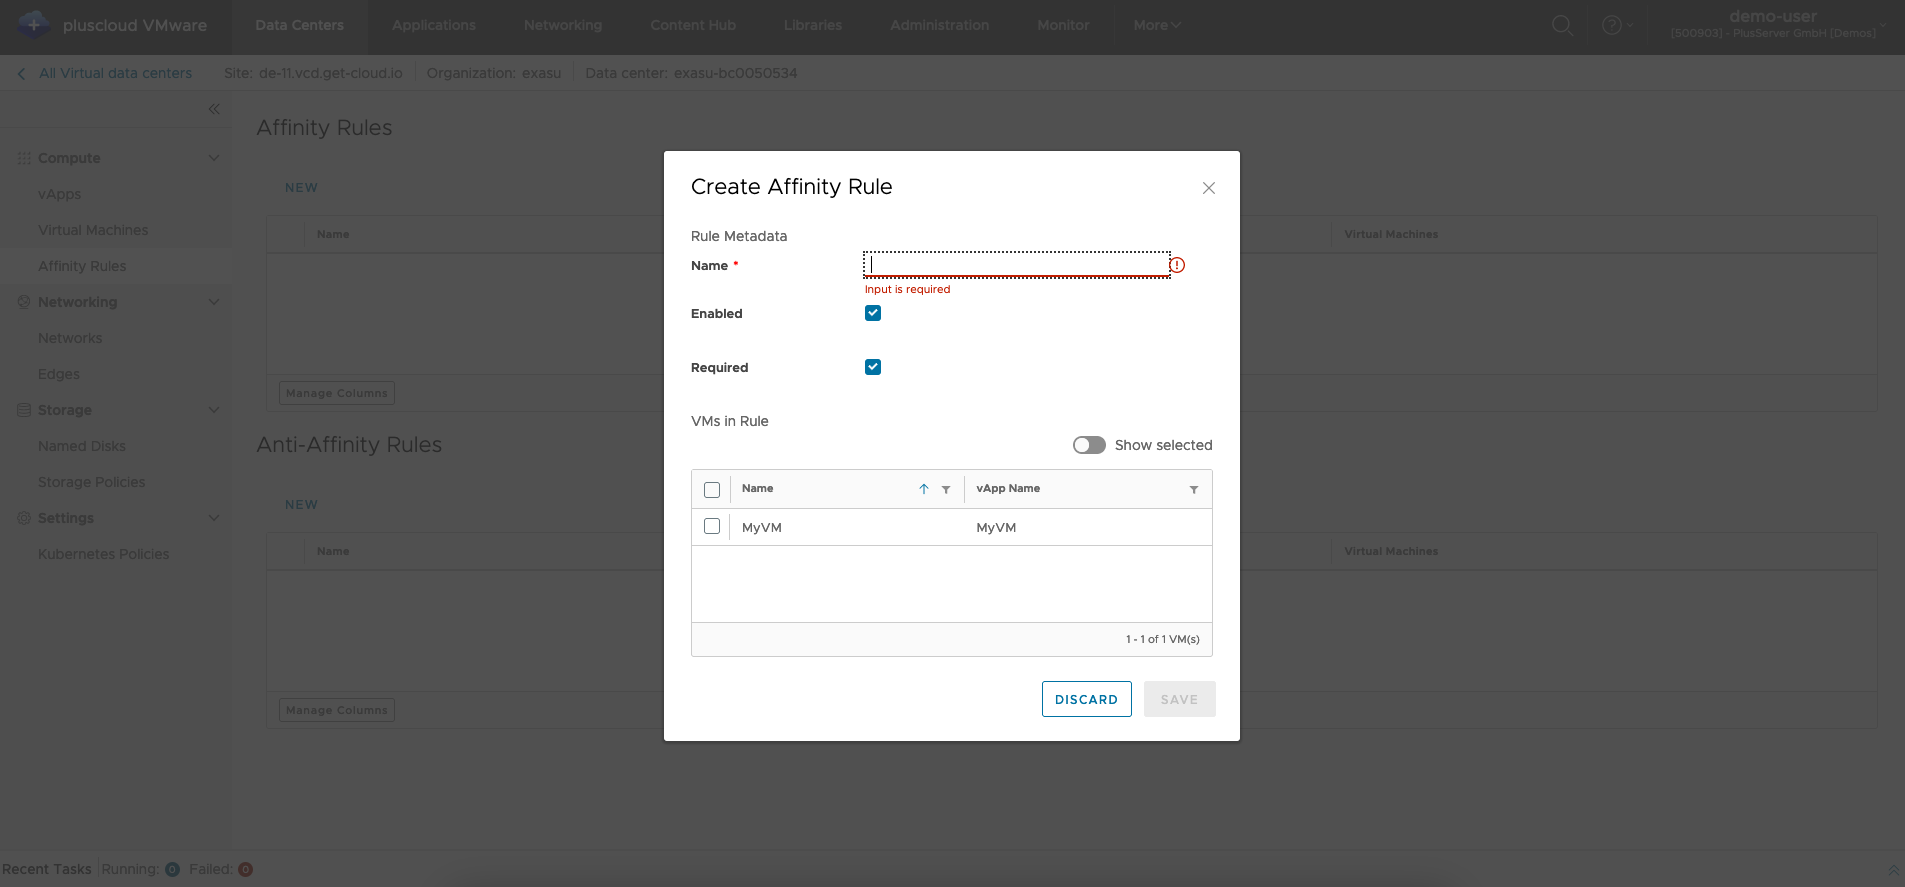
Required checkbox, the rule is strictly adhered to.
If the VM Scheduler cannot adhere to the rule, an error message is displayed.
It is possible that VMs cannot be started.
If the Required checkbox is deactivated, the scheduler is authorized to start the VMs on different systems if it is not possible to start all VMs on the same hardware.
Create antiaffinity rule
With an affinity rule, you specify that a selection of VMs should or must be placed together on the different physical systems.
You should use these rules if you operate several similar VMs for redundancy reasons.
With an antiaffinity rule, you can ensure that the VMs do not run on the same hardware and thus the failure of a hypervisor only affects one of the VMs.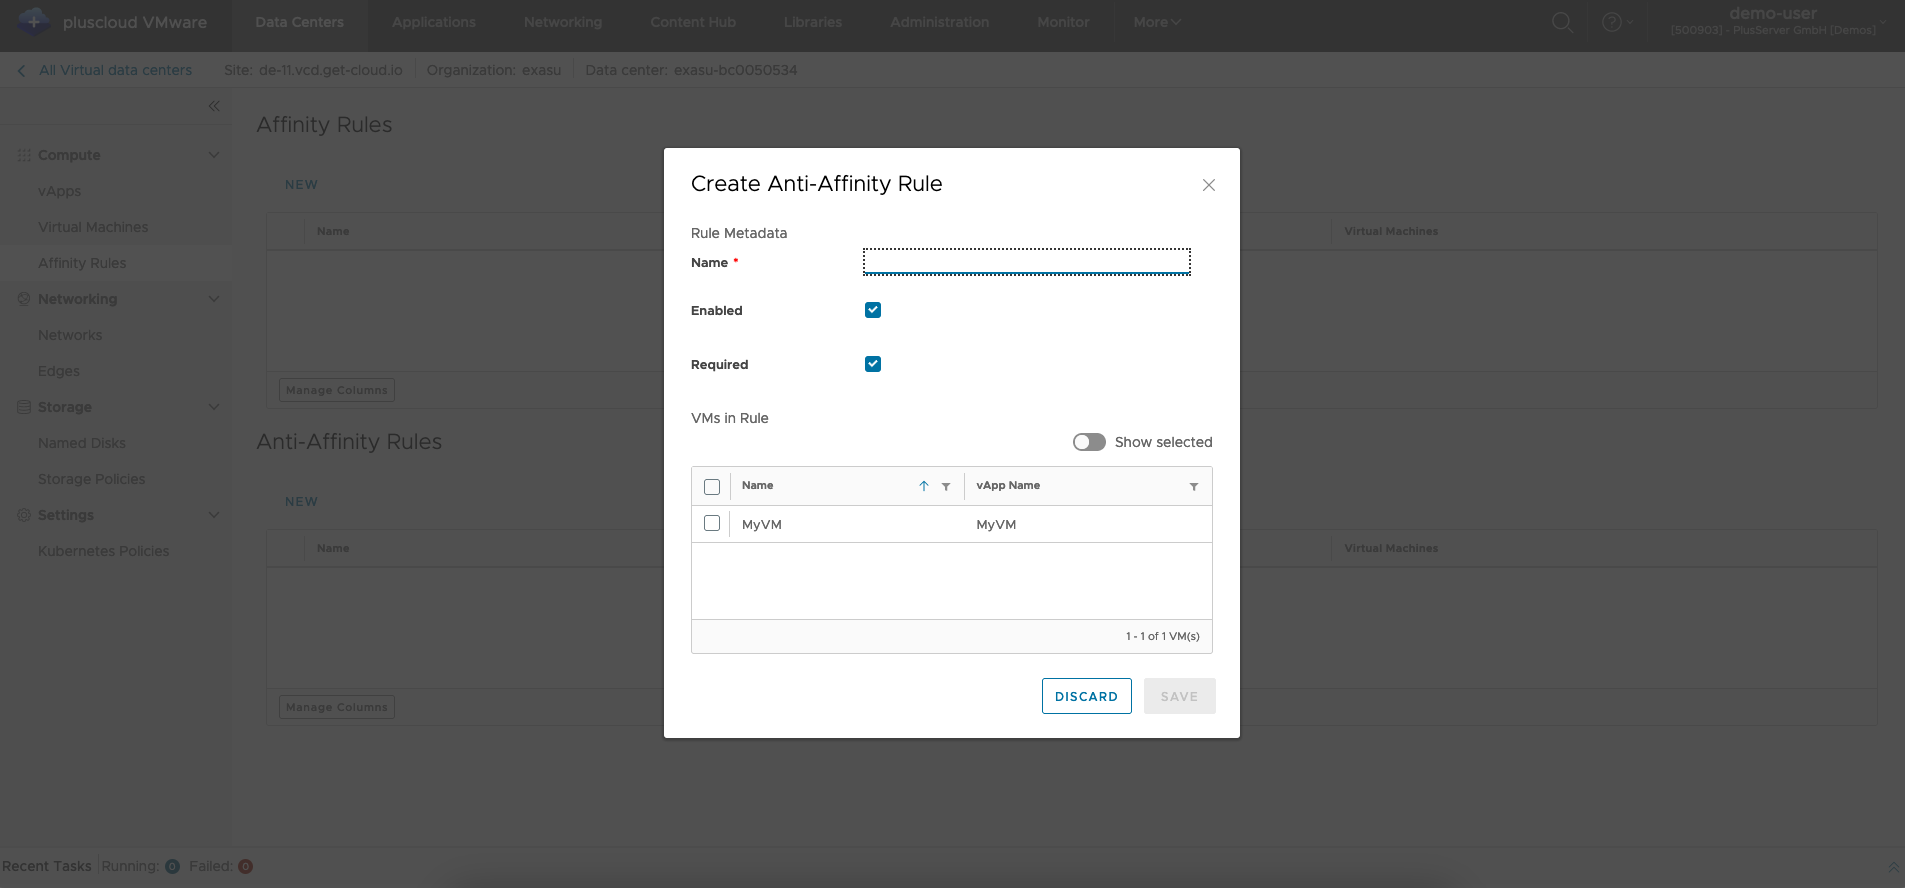
Required checkbox, the rule is strictly adhered to.
If the VM scheduler cannot adhere to the rule, an error message is displayed.
It is possible that VMs cannot be started.
If the Required checkbox is deactivated, the scheduler is authorized to start the VMs together on one system if it is not possible to distribute all VMs across different hardware.
Storage policies
Storage policies define different storage classes, which differ in terms of performance parameters and price.
Storage policies
Under the Storage policies menu item, you can see how much of which storage class is available and what is occupied. In the Default column, you can see which storage class is selected as the default when creating a VM.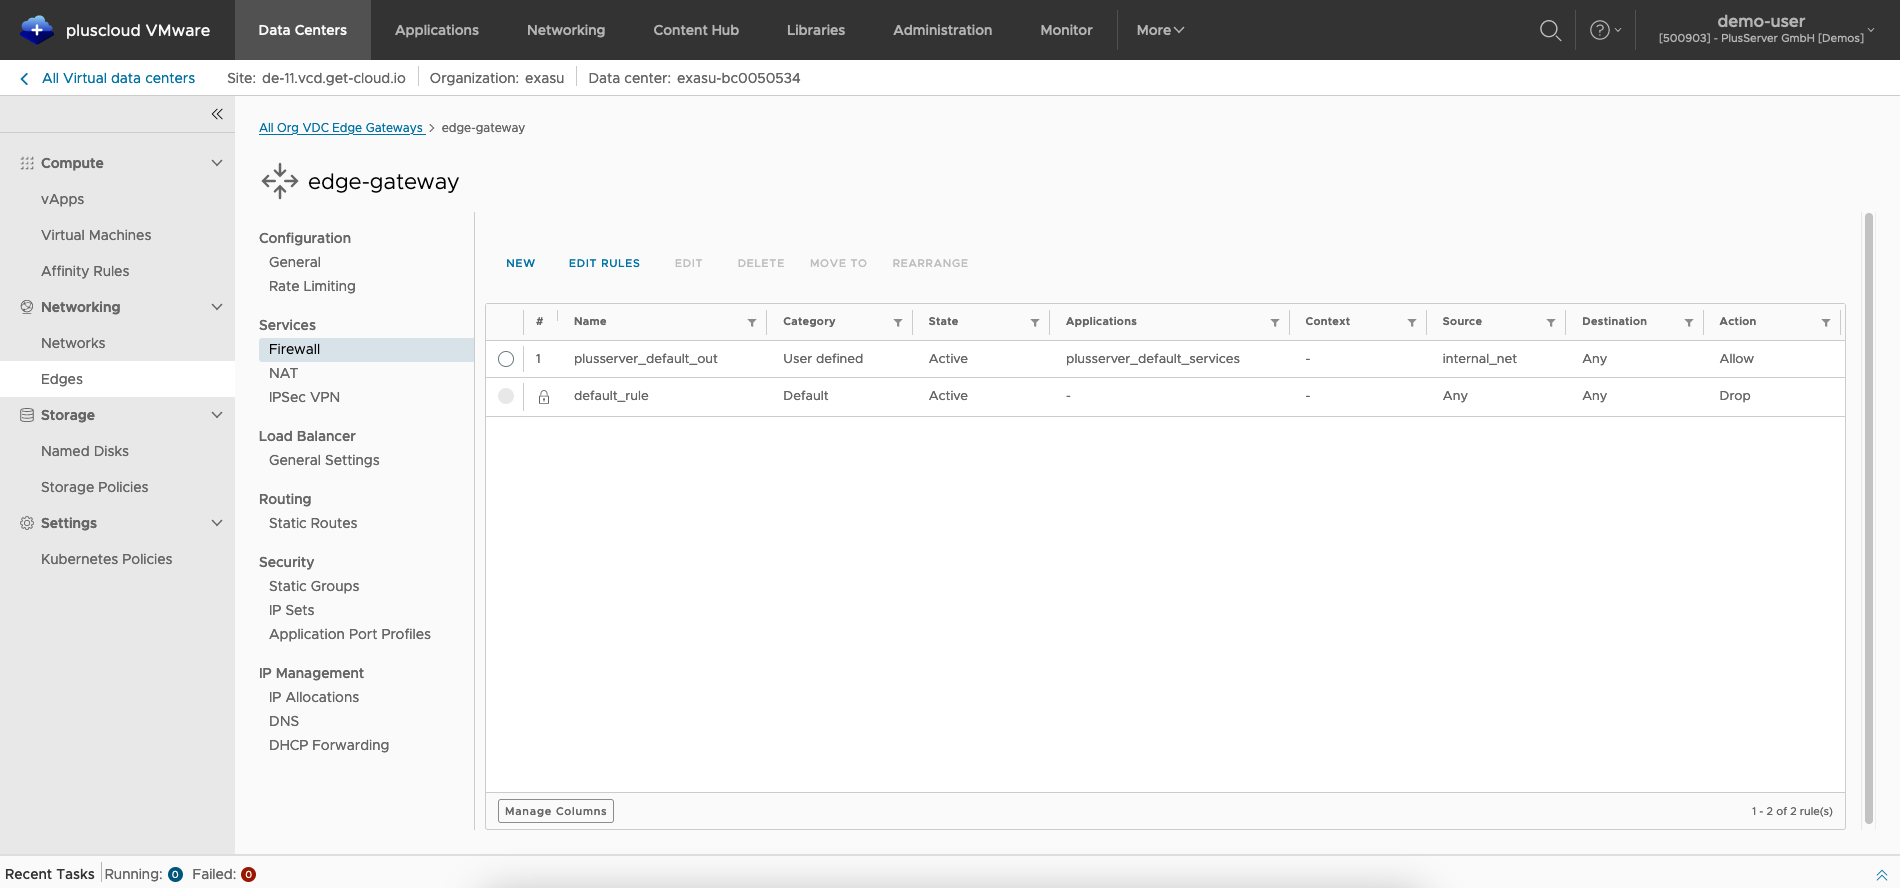
Storage limits
In principle, storage is available without limits, although the size of a single hard drive is limited.
Security limits are set that can be increased at any time.
The limits are intended to ensure that resource usage does not explode and cause costs, as could happen, for example, due to faulty automation scripts.
The limits are checked and adjusted at least once every 24 hours.
Backup
Optionally, you can use the integrated self-service backup portal based on Veeam in the vCloud Director for paid backups of your VMs.
Data backup with Veeam
You can manage the backups yourself with the role Organization Administrator.
You log in via the vCloud Director.
You do not need to log in to the backup portal separately.
Menu entry for Backup Portal
The self-service backup portal is linked in the vCloud Director portal and can be accessed via the menu itemData backup with Veeam.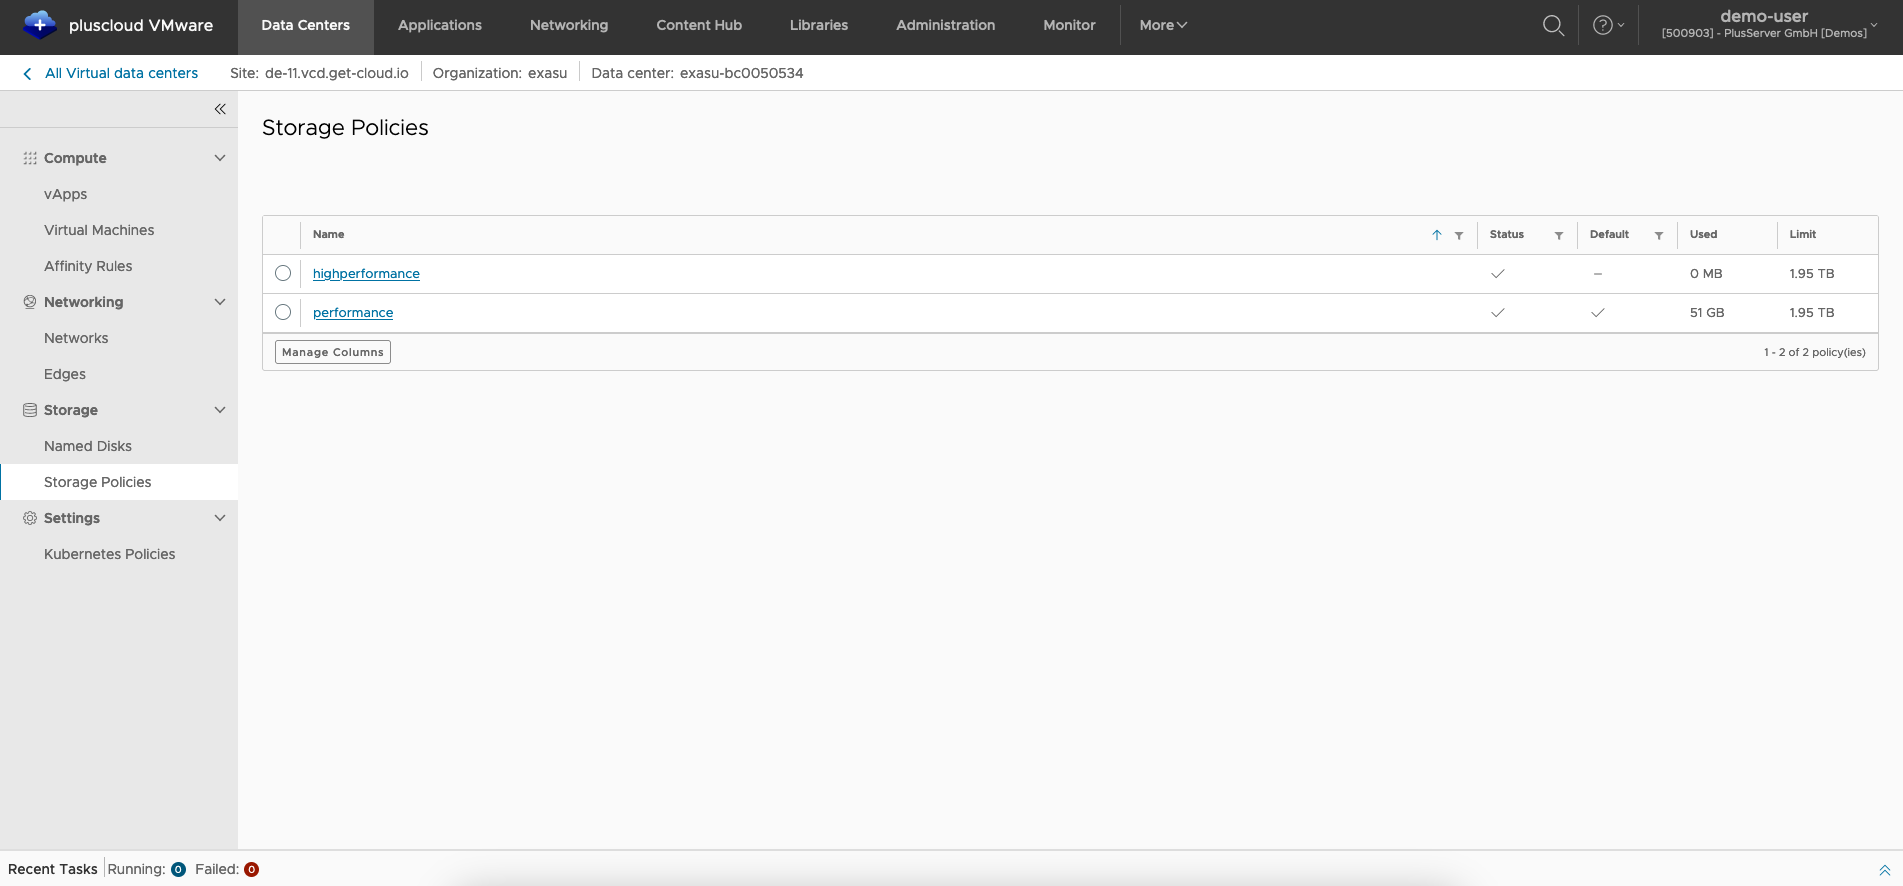
Backup Portal
Backup portal dashboard
The dashboard shows the statistics on the backups, especially on VMs, backup jobs and backup storage. There is a view for the last 24 hours and the last 7 days (here: the last 24 hours).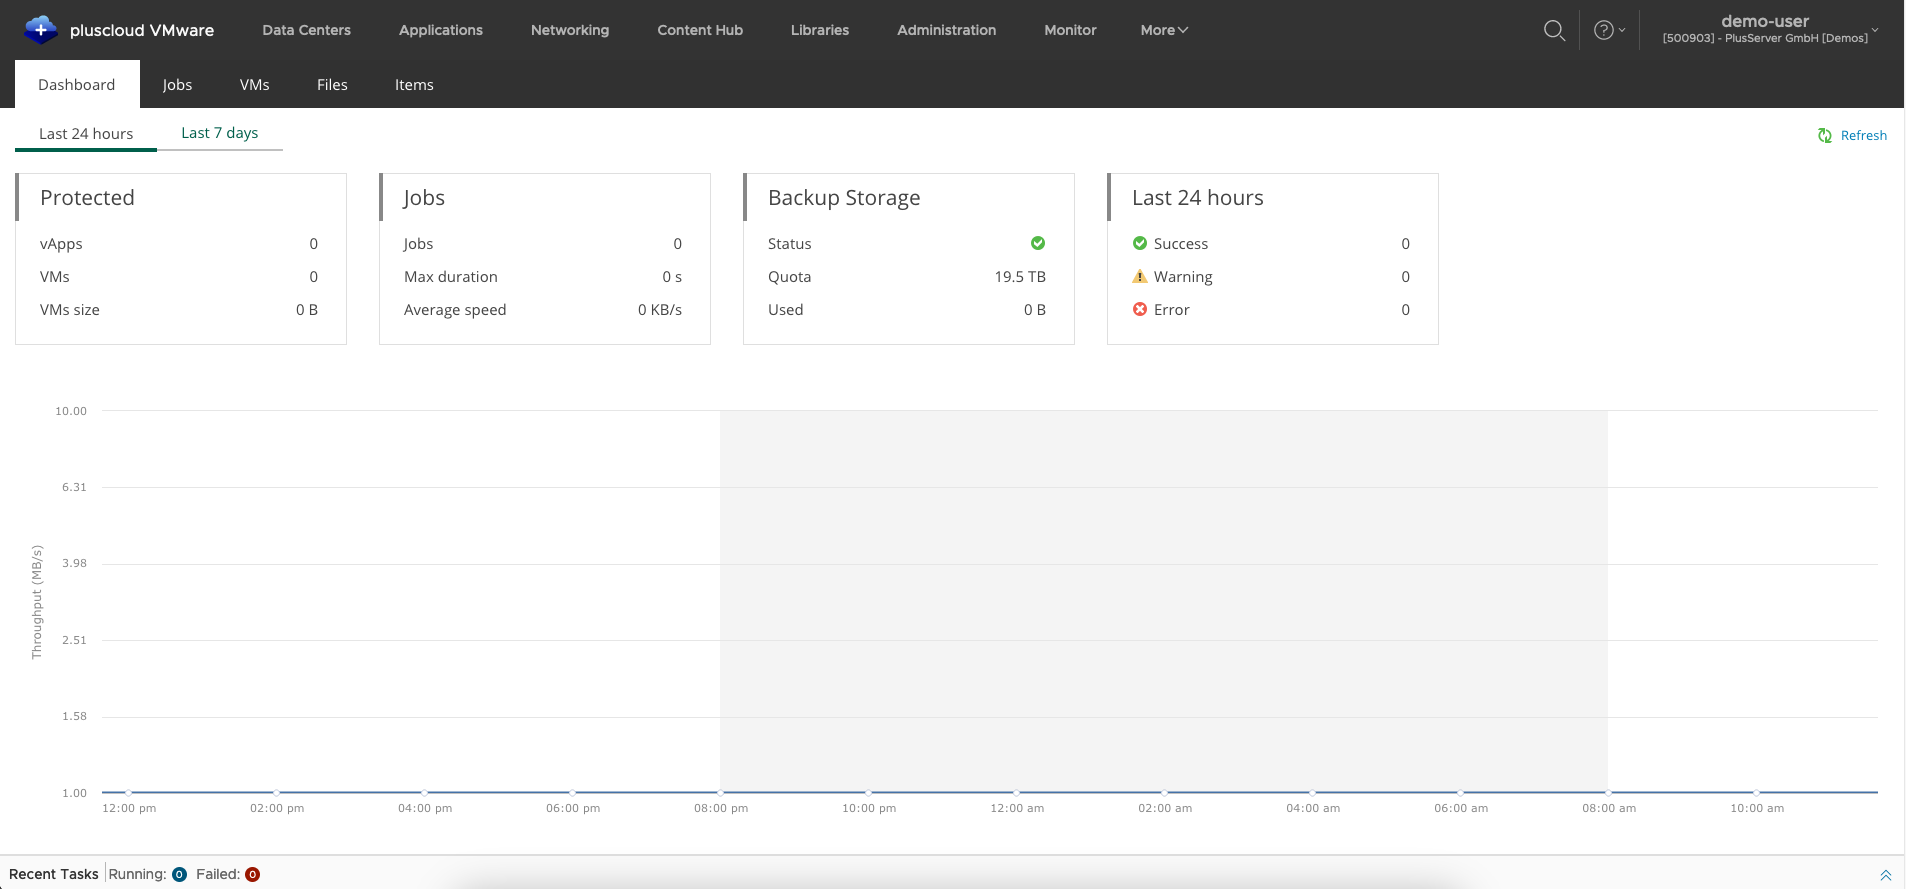
Protected widget of the backup portal
The Protected widget shows information on the number of successful backups of vApps and VMs as well as the total size of all successfully backed up VMs for the selected period.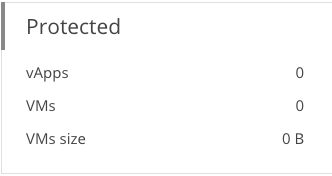
Jobs widget of the backup portal
The Jobs widget provides information on the number of backup jobs created, the maximum duration and the average data backup speed.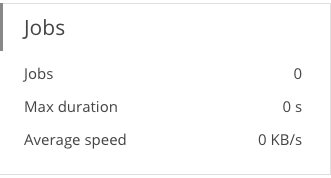
Backup storage widget of the backup portal
The Backup Storage widget provides information on the allocated quota and the amount of data used.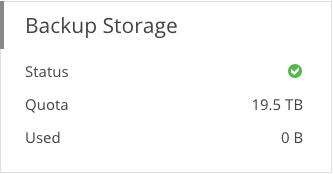
- Green: More than 10% backup storage is still available
- Yellow: Less than 10% backup storage is still available
- Red: There is no more storage available
Backup jobs
Backup jobs control the creation, rotation and storage of data backup copies.
Job tab of the backup portal
In the job tab you can create, edit, delete, activate and deactivate backup jobs.
You can also display detailed information about the individual jobs.
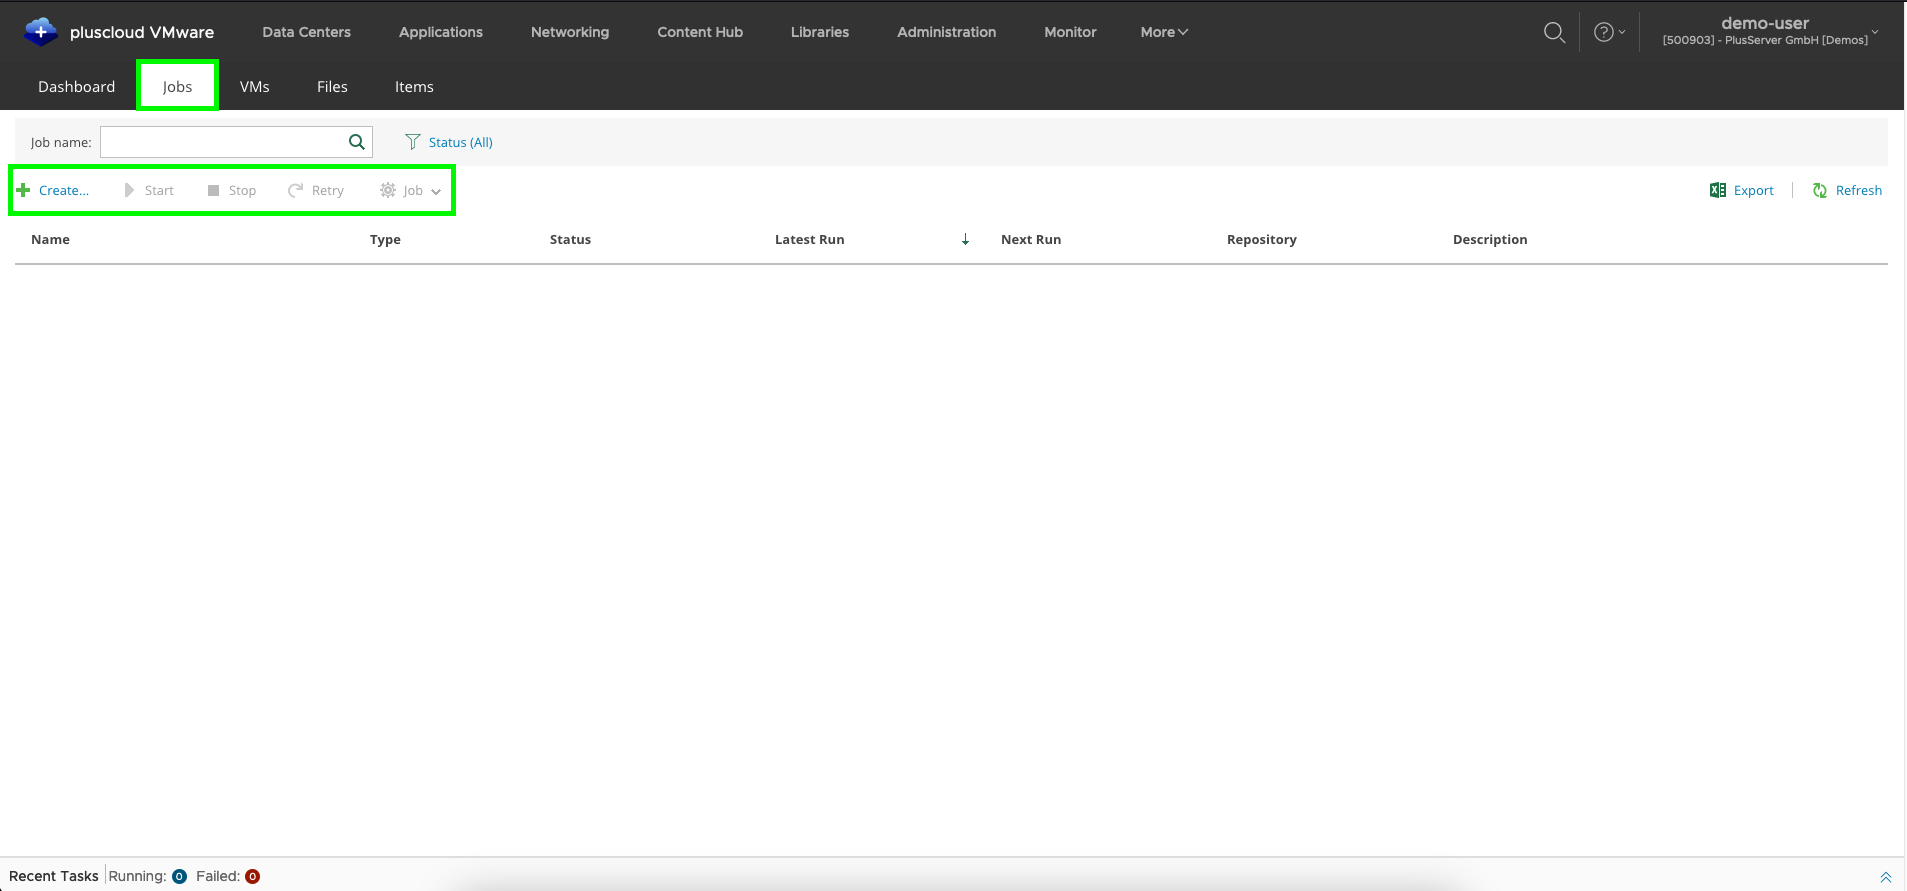
Create backup job: button
You can start creating a new backup job on the job page by clicking on theNew button.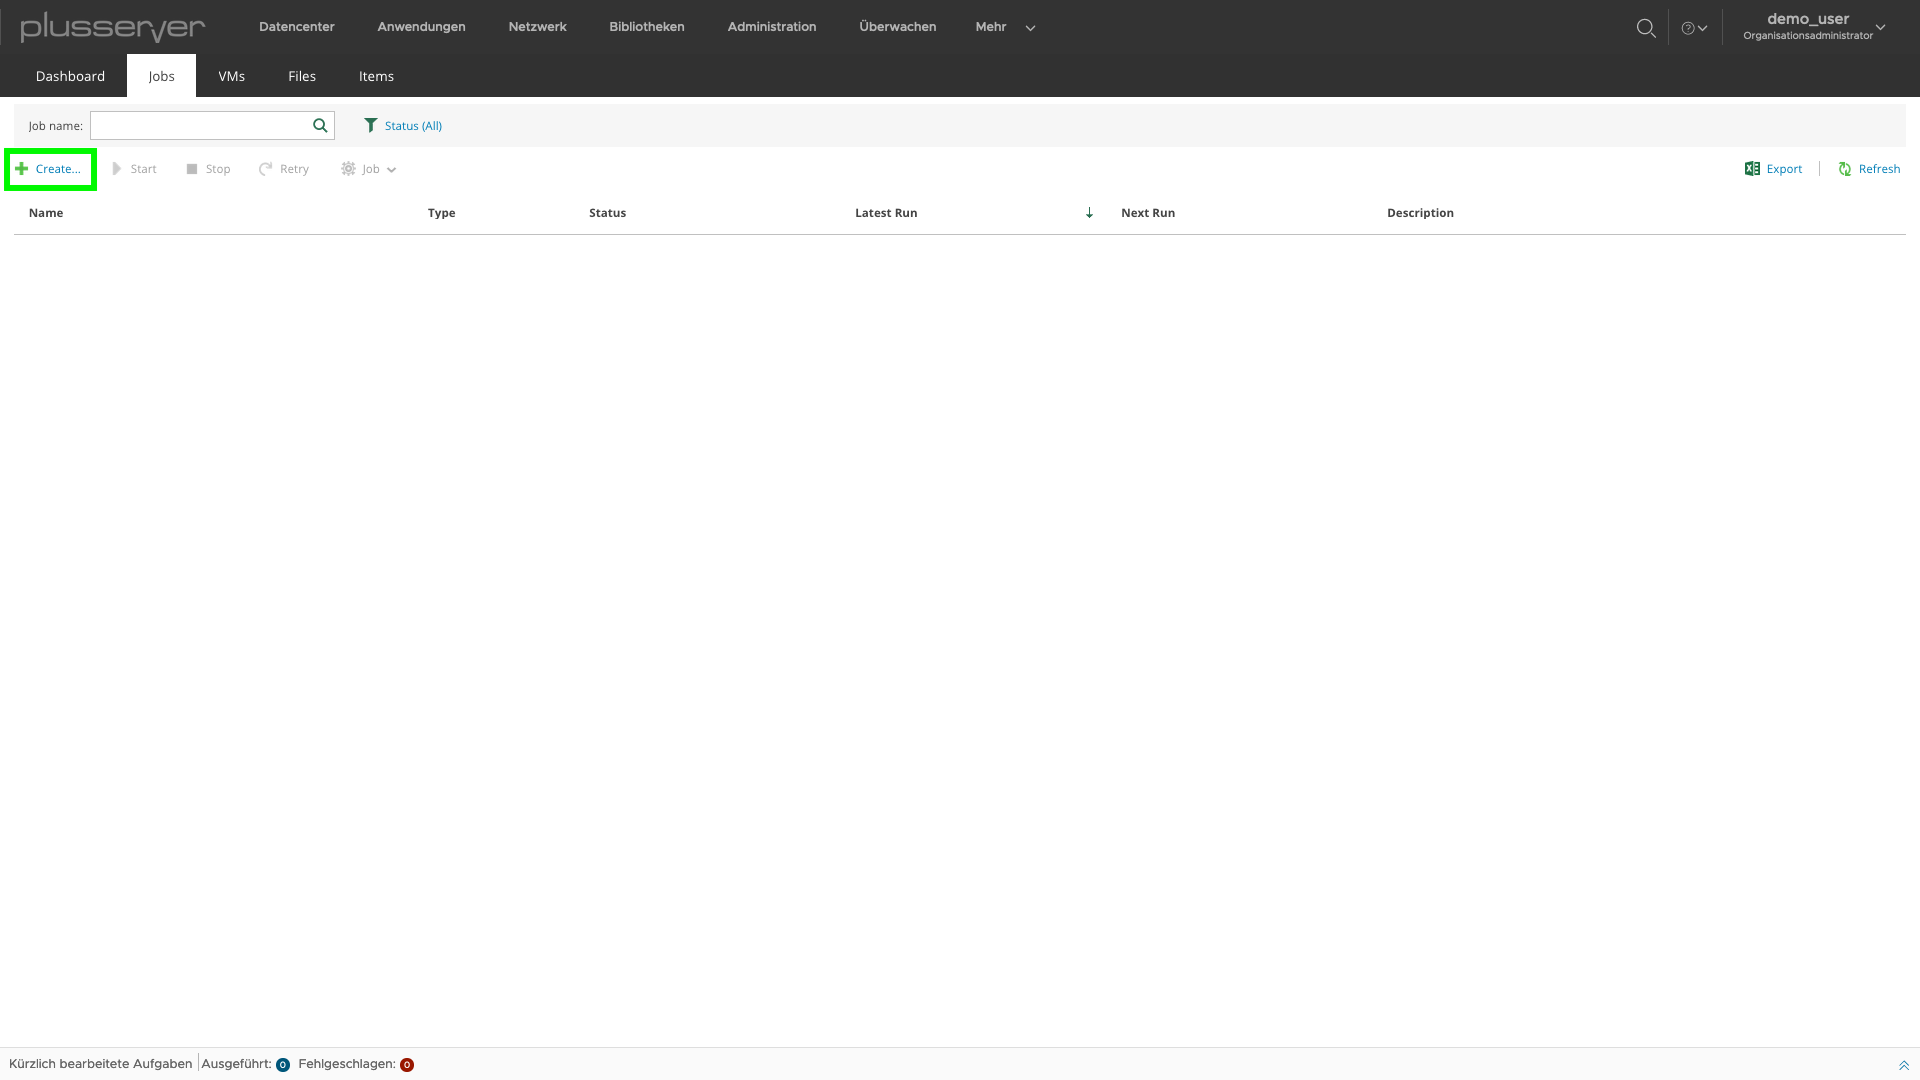
Creating backup job: settings
The wizard asks for a name for the backup job to be created. You also define the number of recovery points (here: 14). You can also set up more complex retention policies here.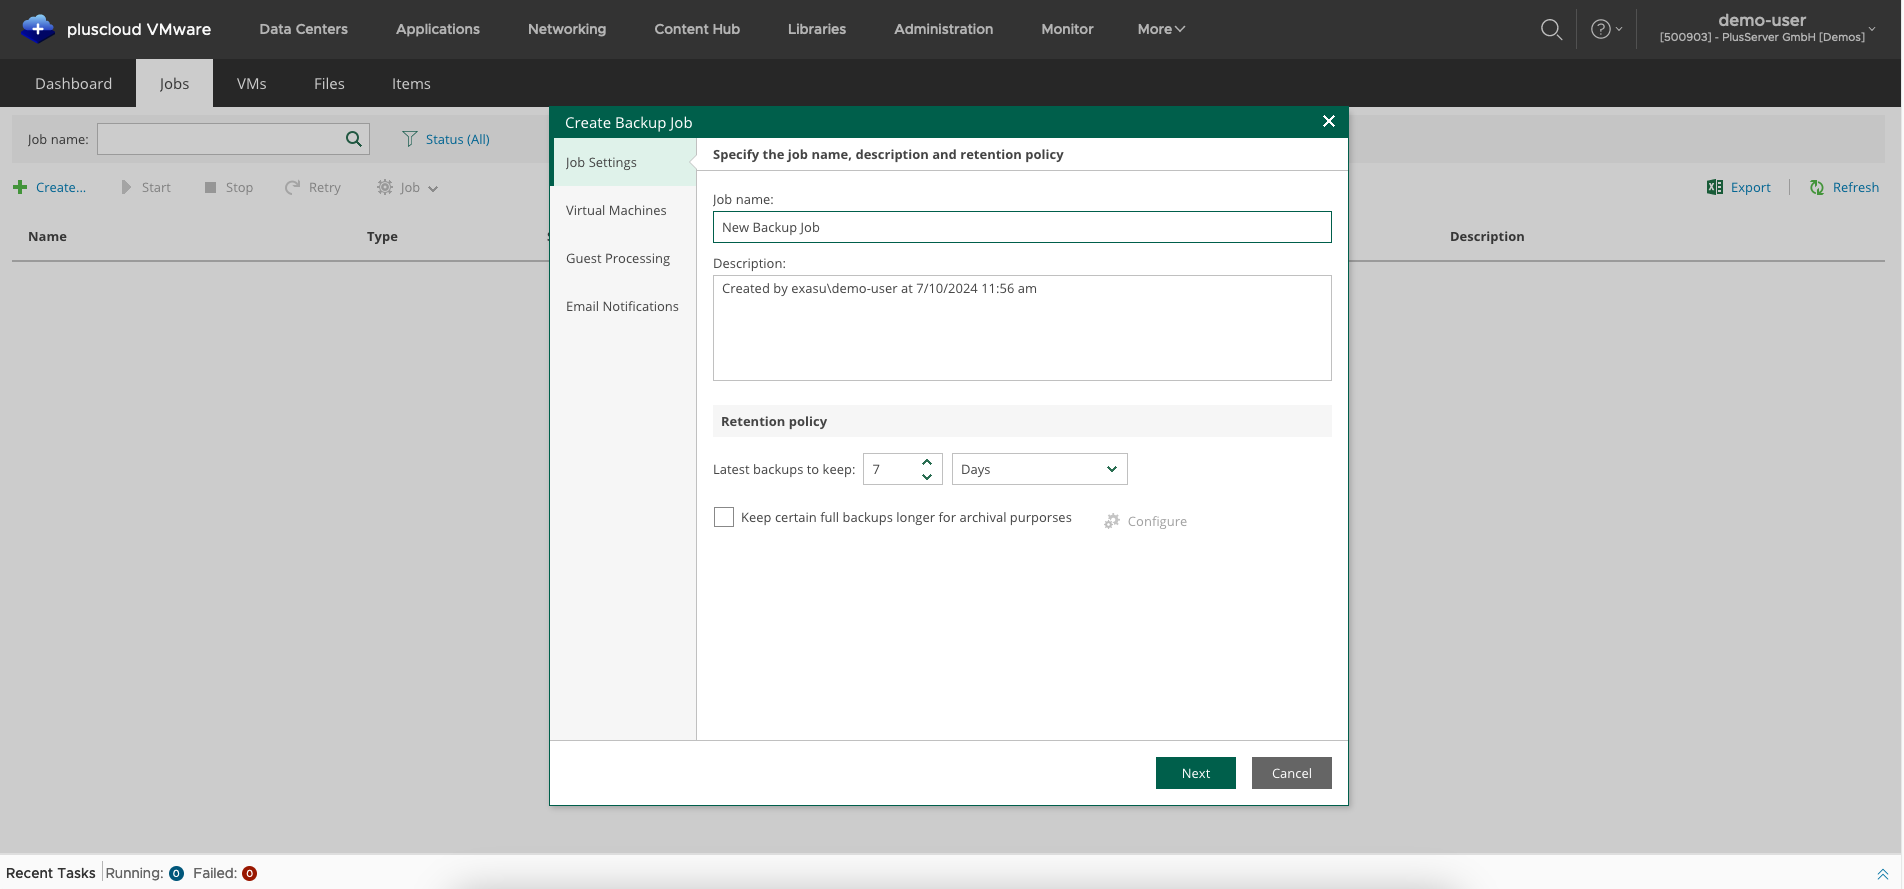
–
Create backup job: Select OrgVDC
Add one or more VMs or vApps to the job by adding new objects to the job viaNew.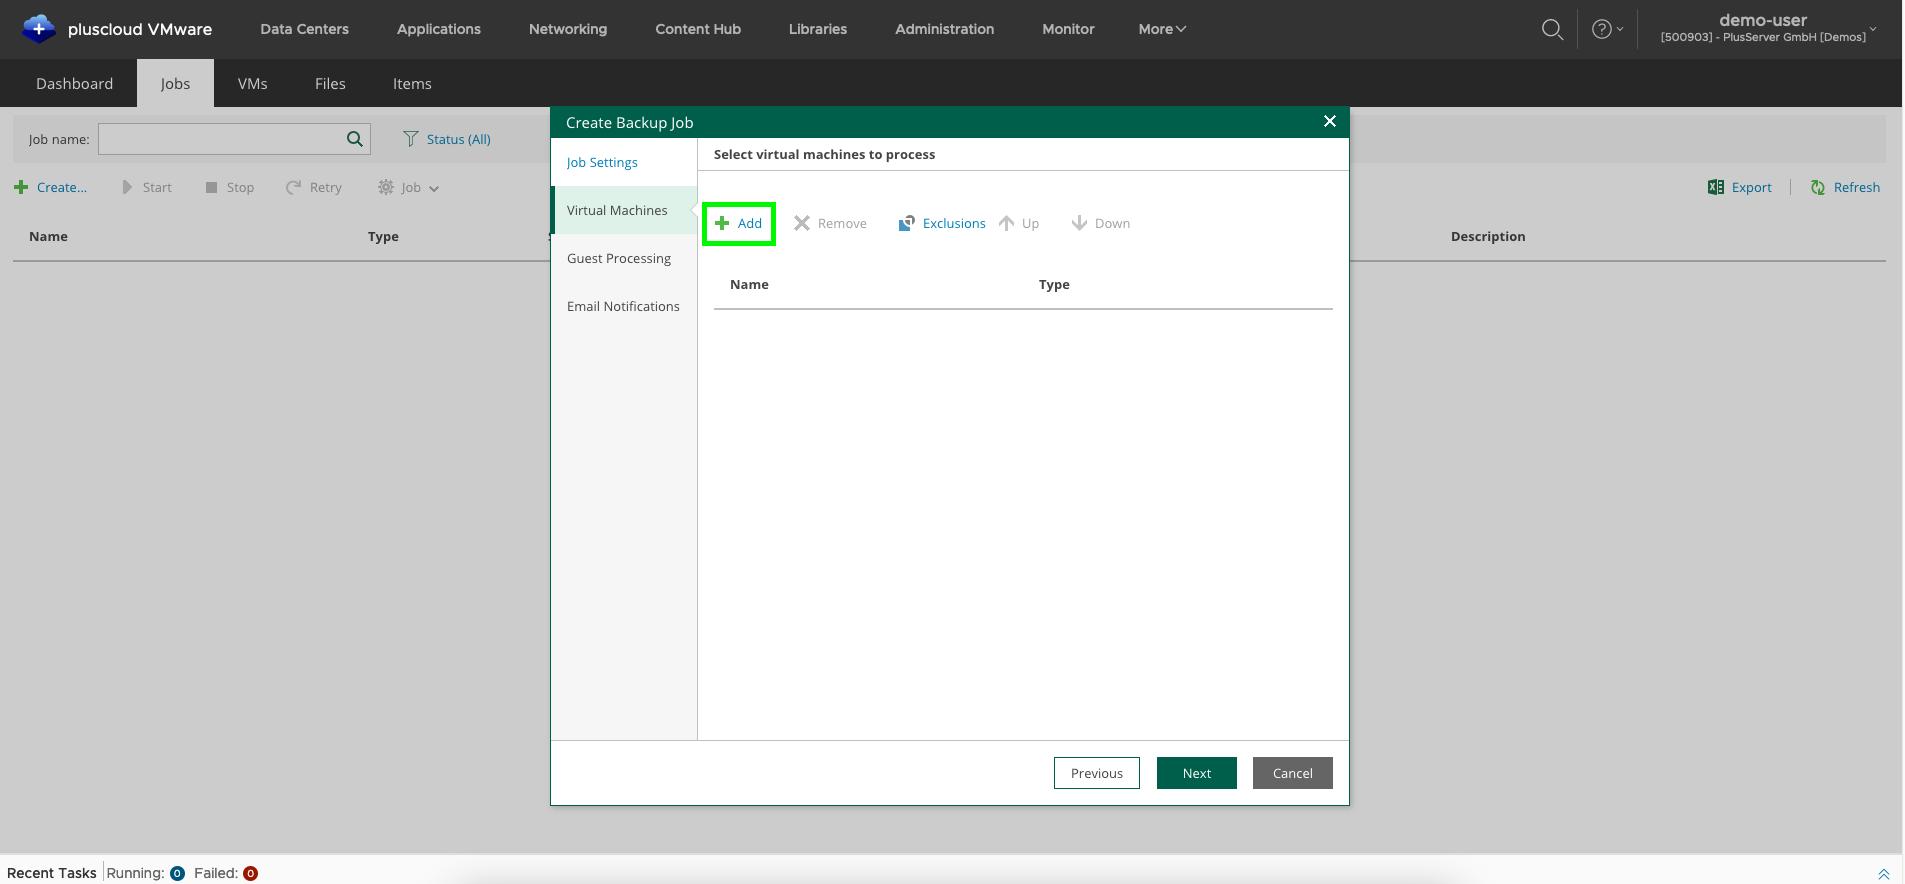
Create backup job: Select OrgVDC
Select the desired OrgVDC. This way, the job includes all vApps and VMs within the selected OrgVDC, including future new objects.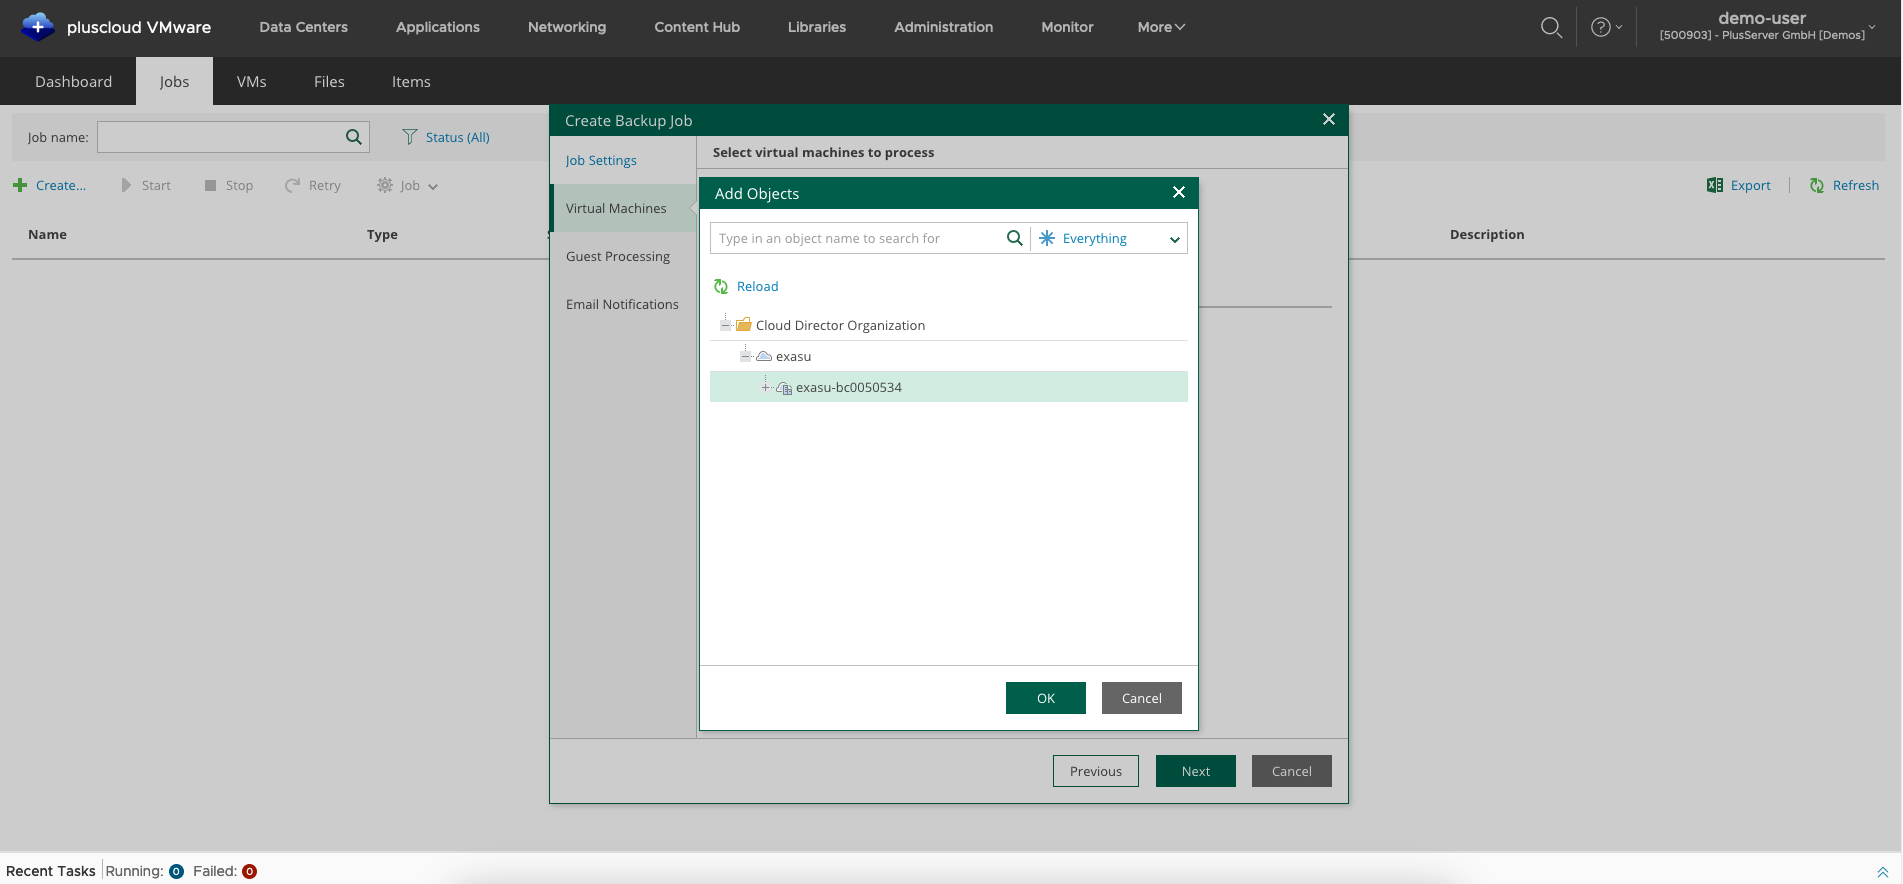
You also define the order in which the objects should be backed up (up/down arrows). Individual VMs of a vApp can also be excluded from the backup.
Creating backup job: guest integration
In the guest integration settings (Guest Processing) you can optionally activate integration options for the guest operating system.
Please note that preparatory work must be carried out on the VM in order to be able to use these integrations.
We will not use these options for this quick start guide.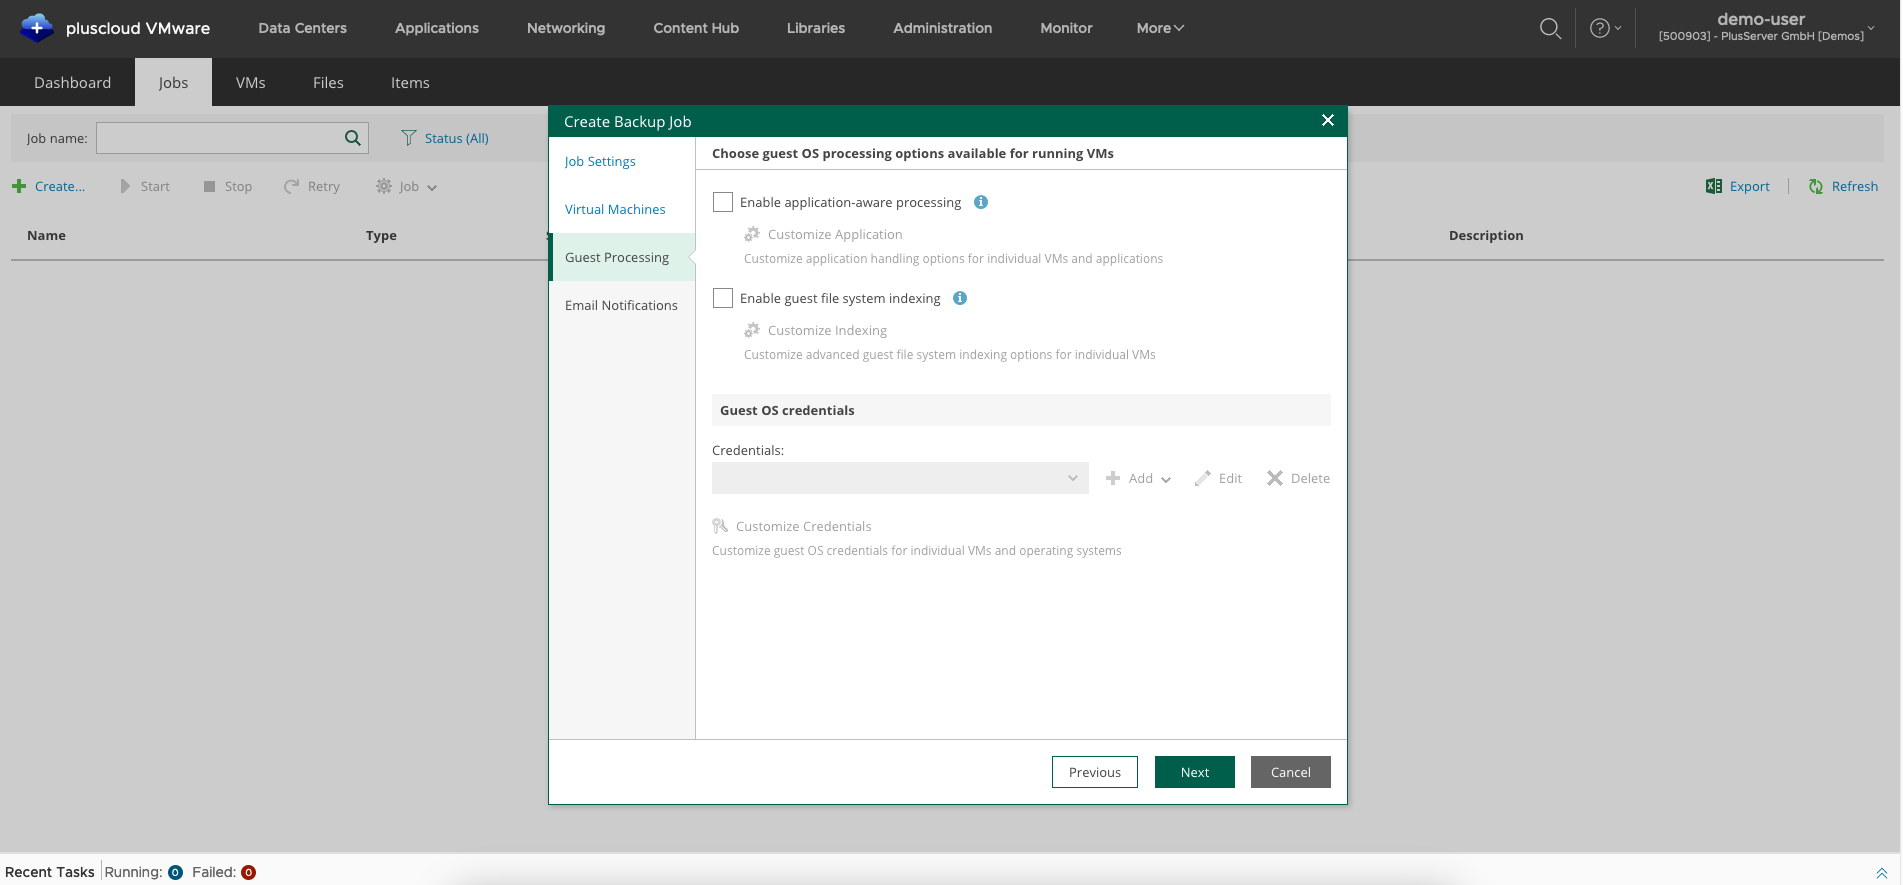
Create Backup Job: Email Notifications
Under Email Notifications you can enter an email address to which certain status emails for a job are sent.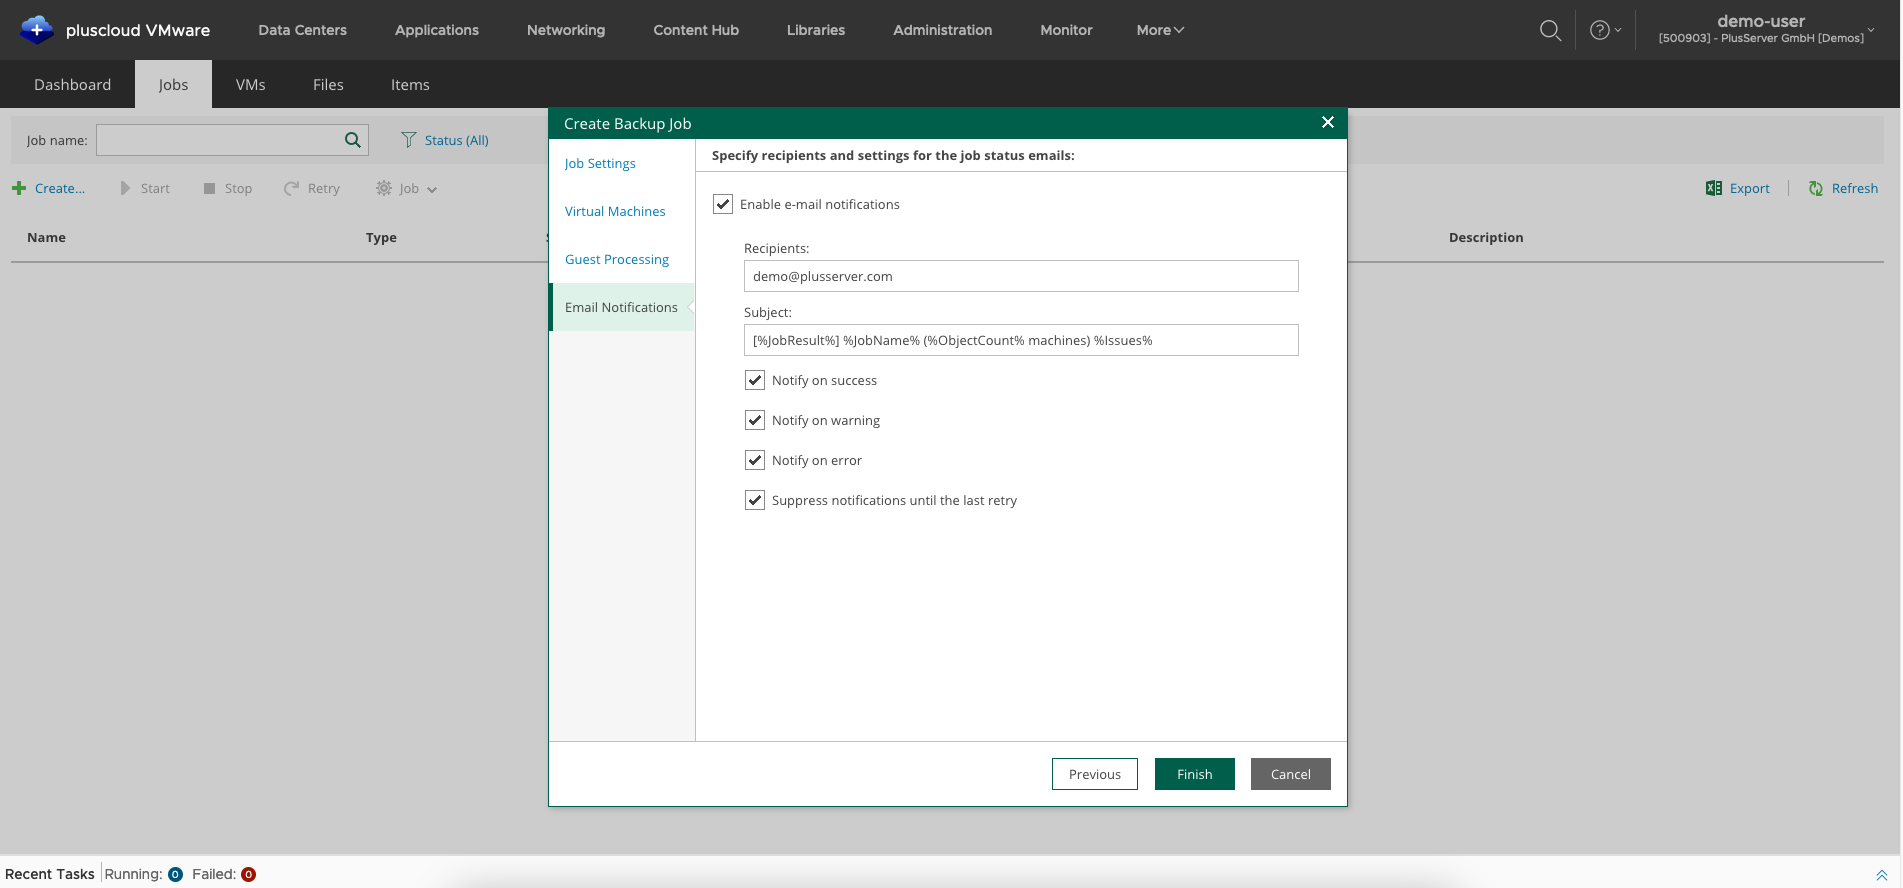
The jobs are automatically scheduled in a backup time window from 10 p.m. to 8 a.m.
Backup Job: Start/Stop/Retry
To start, stop or repeat a job manually, select it and select the desired action.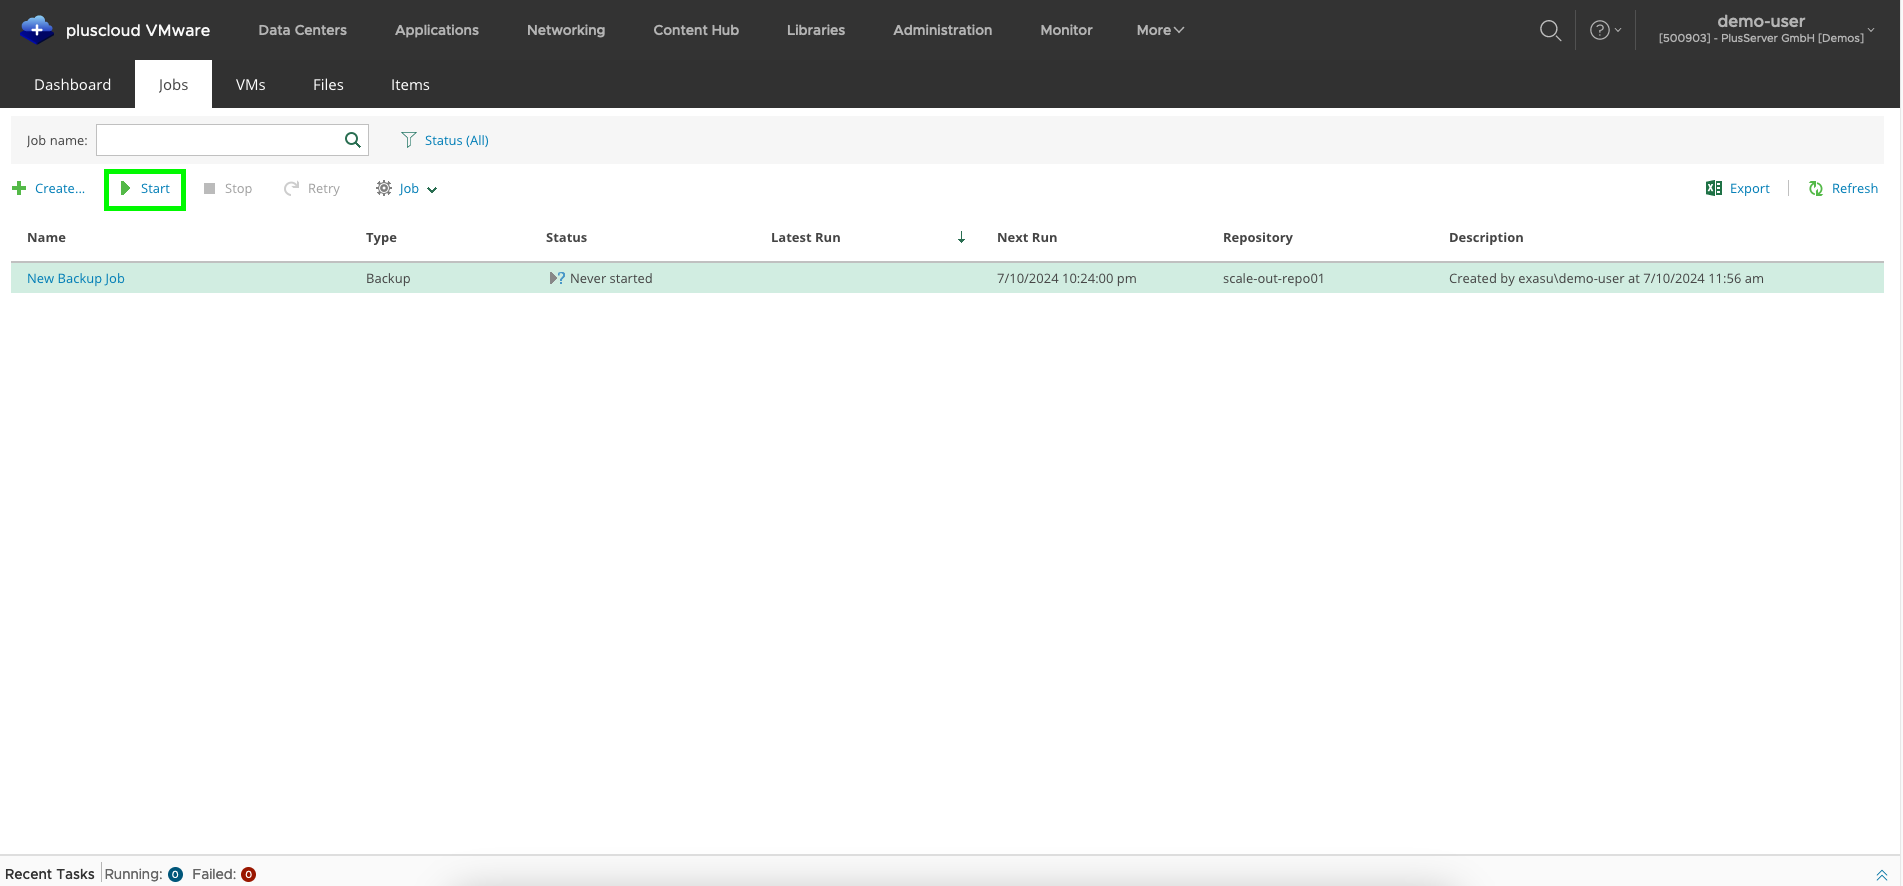
Backup Job: Disable/Enable/Edit
To edit, suspend or reactivate a job, you can select the corresponding action from theJob dropdown menu.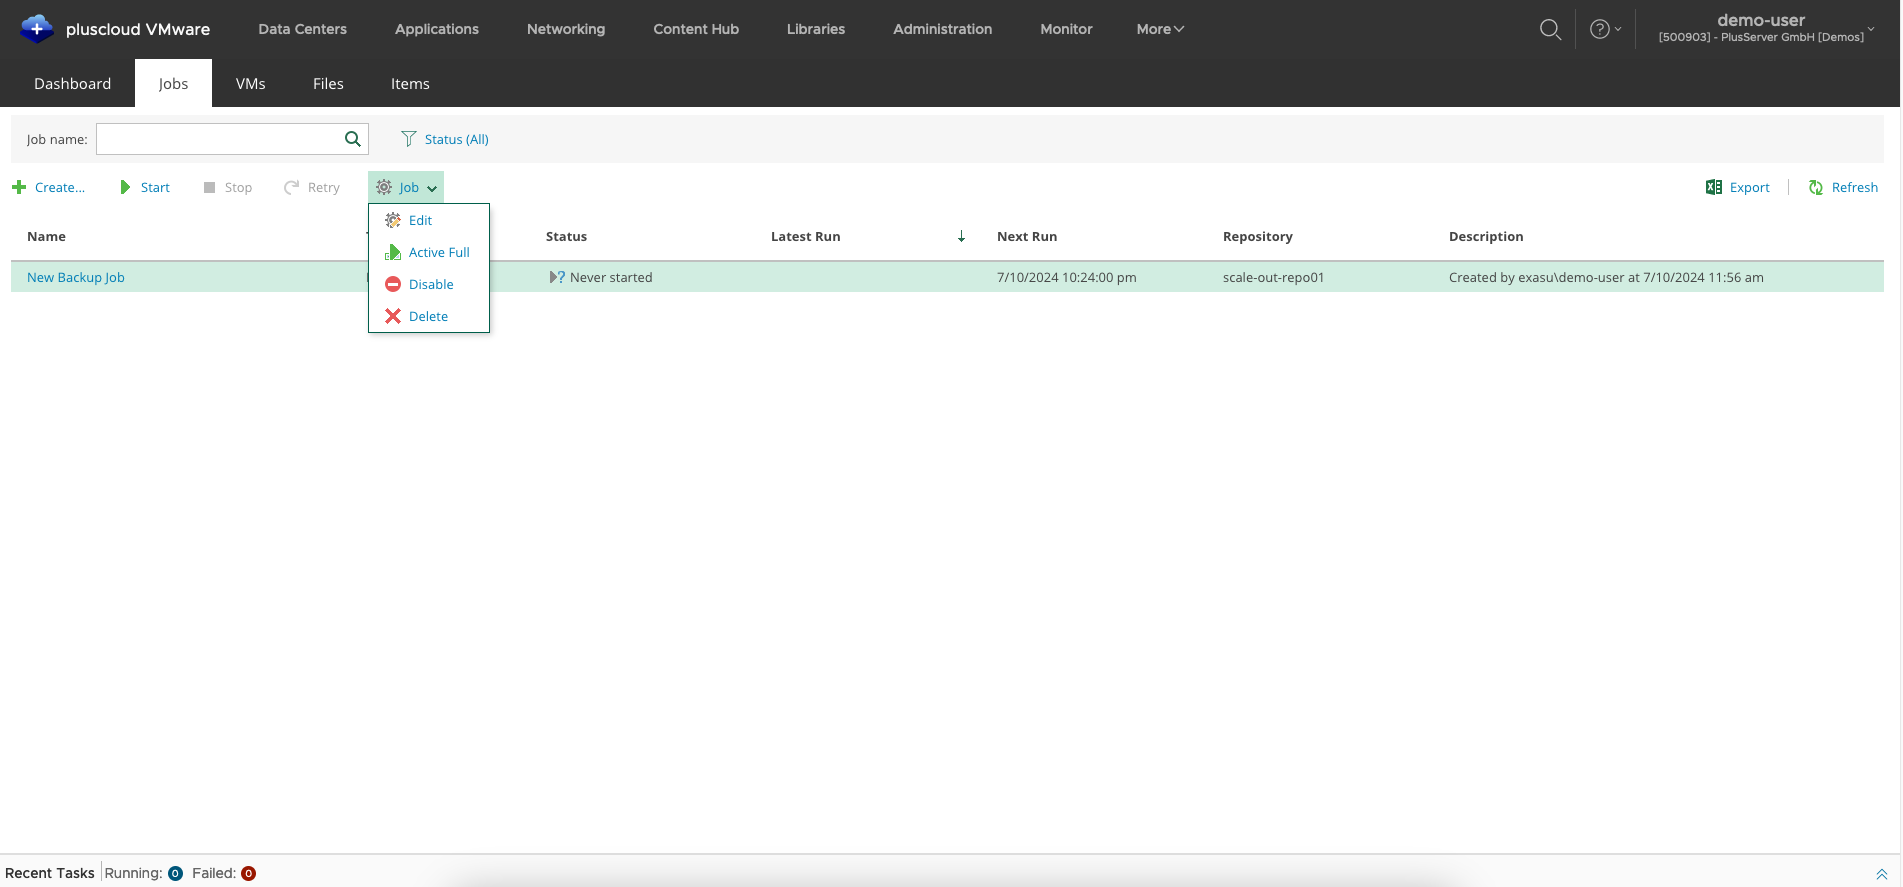
Restore a VM
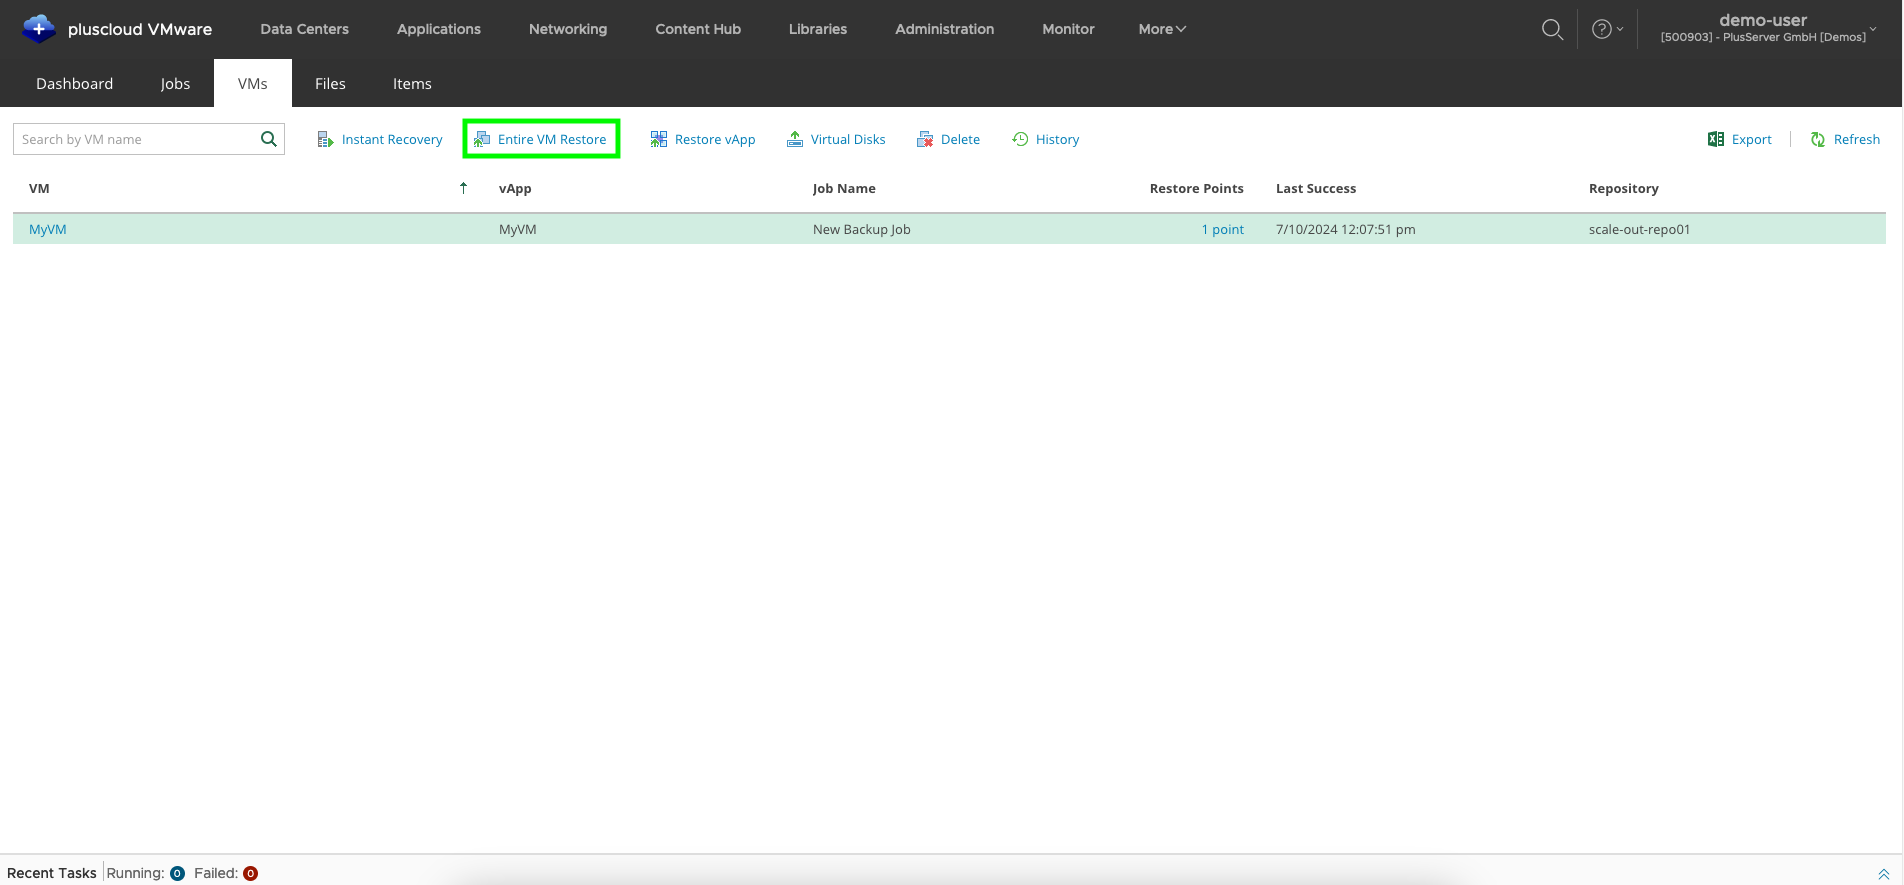
VM Restore: Select VM
In the VMs tab, find the VM you want to restore.
You can also use the search field to do this. Then select Restore VM.
Now you have two options: Keep or Overwrite.
While Overwrite overwrites the VM, Keep creates another VM with the suffix _restored.
VM Restore: Select recovery point
Then select the appropriate recovery point and confirm the restore job.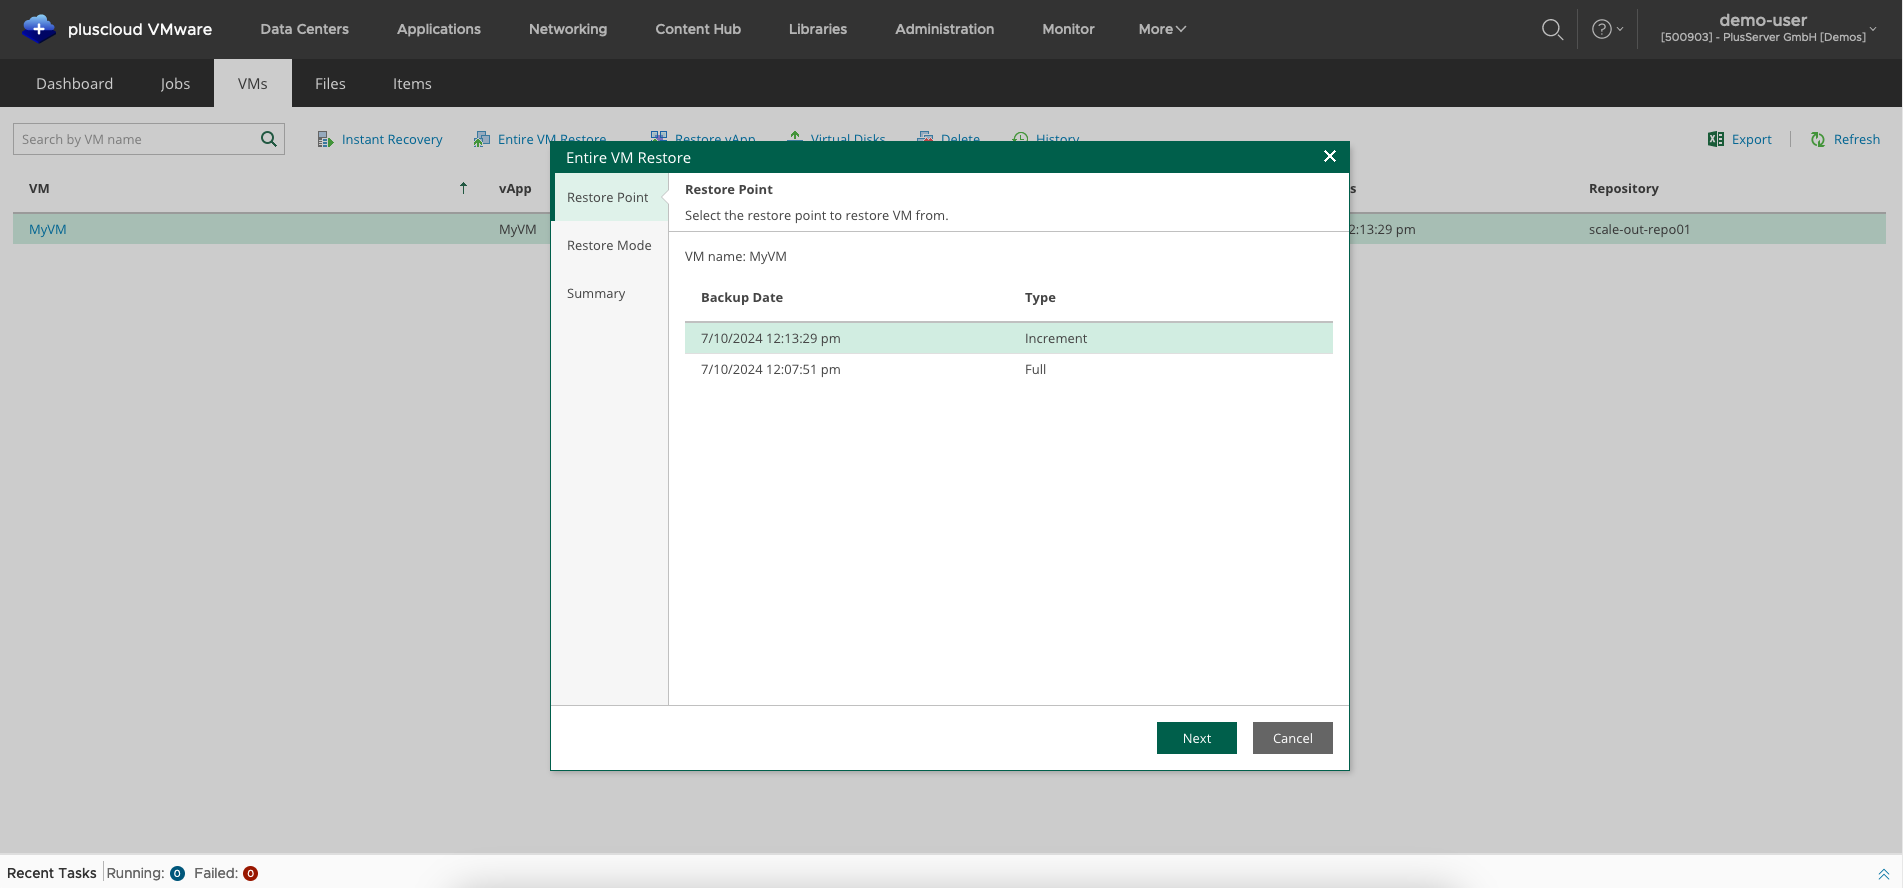
Vendor documentation
- Tenant Portal Guide: https://docs.vmware.com/en/VMware-Cloud-Director/10.5/VMware-Cloud-Director-Tenant-Guide/GUID-74C9E10D-9197-43B0-B469-126FFBCB5121.html
- API Documentation: https://developer.broadcom.com/xapis/vmware-cloud-director-api/37.3/
- SDKs:
- Golang: https://github.com/vmware/go-vcloud-director
- TypeScript / Python: https://github.com/vmware/vcd-api-tools
- IaC:
- Backup
- Veeam documentation: https://helpcenter.veeam.com/docs/backup/em/vcd_working_with_portal.html?ver=120